How to Configure SOLIDWORKS Toolbox and Hole Wizard - Part 4
Welcome to Part 4 of the SolidWorks Toolbox configuration blog series. In this blog we will talk about Step 5: Configure Smart Fasteners. Smart Fasteners automatically add fasteners, like bolts and screws, to holes in an assembly that are sized to accept standard hardware. The holes can be either assembly or part features. SOLIDWORKS Toolbox has an extensive library of fasteners, including ANSI Inch, Metric, and other standard hardware.
To access the SOLIDWORKS Toolbox setting: Start, All Programs, SOLIDWORKS 2014, SOLIDWORKS Tools, Toolbox Settings 2014 or Tools, Options, System Options, Hole Wizard/Toolbox, Configure inside of SolidWorks.
5. Configure Smart Fasteners
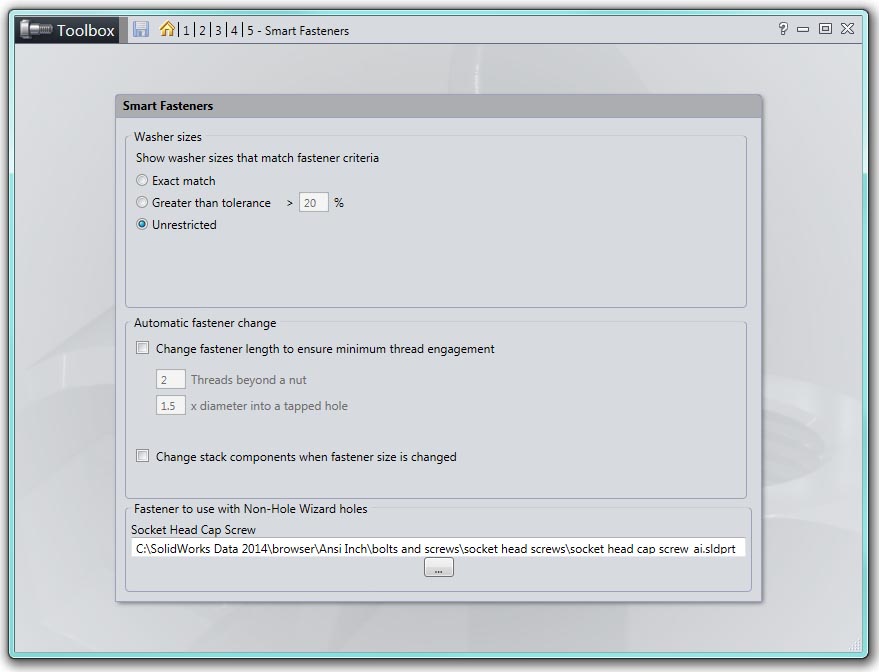
The Smart Fasteners page is used to set defaults and preferences for fasteners used with Hole Wizard holes and non-Hole Wizard holes.

Washer sizes
There are three choices to limit the available washer types, depending on the size of the Smart Fastener. The first option is Exact match. This option limits the available types to washers that match the fastener size exactly. The Greater than tolerance option limits the available types to hole diameters that match the fastener size within the specified tolerance. If the last option, Unrestricted, is selected, then all washer types are available.
Automatic fastener change
SOLIDWORKS Toolbox has built in defaults for the length of a new fastener. You have a couple of options to configure regarding the length. Under the section Automatic fastener change, the first option is Change fastener length to ensure minimum thread engagement. This option is used to adjust the fastener lengths to satisfy your thread engagement requirements. So, you can make the fastener's length change when the hardware stack changes, and make the stack hardware size change when the fastener's size changes.
If you check Change fastener length to ensure minimum thread engagement, you can enter the number of Threads beyond a nut. The fastener length will be adjusted so that a specified number of threads extend beyond the nut.
The next option, x diameter into a tapped hole, sets the minimum length a fastener engages a tapped hole. This number is based on a multiple of its diameter. For example, if the diameter is 4 inches, then 1.5 x 4 = 6. So the fastener will stick into the tapped hole a minimum of 6 inches.
If you check Change stack components when fastener size is changed, nut and washer sizes will be changed automatically when the fastener size changes.
Fastener to use with Non-Hole Wizard holes
SOLIDWORKS Toolbox gives you the ability to specify the default Smart Fasteners components to use with nonstandard hole types. So, if you add a Smart Fastener to a non-Hole Wizard hole, then the Smart Fastener that is specified here will be used. To change the default Smart Fastener, click the Browse (…) button and select the fastener of your choice.
Please check back to the CATI Blog as the Dedicated Support Team will continue posting our series of articles that goes further into the details of each section of configuring our Toolbox and Hole Wizard. All of these articles will be stored in the category of Daily Dose…..of SOLIDWORKS Support and links to each article with their release date are listed below:
- How to Configure SOLIDWORKS Toolbox and Hole Wizard – Part1 (Bryan Pawlak 12/4/13)
- How to Configure SOLIDWORKS Toolbox and Hole Wizard – Part2 (John Van Engen 12/6/13)
- How to Configure SOLIDWORKS Toolbox and Hole Wizard – Part3 (Blake Cokinis 12/9/13)
- How to Configure SOLIDWORKS Toolbox and Hole Wizard – Part4 (Neil Bucalo 12/11/13)
Neil Bucalo, CSWP
Certified SOLIDWORKS Support Technician 2013
Computer Aided Technology, Inc.

 Blog
Blog 


