SOLIDWORKS PDM Upgrade Tips Part 1: Preparing for Your Upgrade
Y our organization relies on SOLIDWORKS for product data management. How else would you centralize all your engineering data and related files in a secure repository? But if you use SOLIDWORKS PDM, then you know that the software does more than just provide a secure repository. Some of its benefits include integrating workflows, automating design and approval processes, providing version control and enabling collaboration across teams and locations. Now with SOLIDWORKS PDM 2017, you can do even more.
If you haven’t seen the new features yet, or need a refresher, here is an overview of what you can expect:
- – Enhanced support for SOLIDWORKS MBD (Model Based Definition) with the
ability to auto generate 3D PDFs - – 3D Interconnect supports native CAD files imported from other CAD programs
while preserving the assembly structure - – SOLIDWORKS PDM Vault lists native CAD files in the check-in structure and
keeps track of where they are used - – Option to overwrite versions to minimize clutter in the SOLIDWORKS PDM
Vault
We are excited about these new features and encourage you to upgrade. To help you, I’ve put together this blog series with tips to make it easier for you to upgrade to SOLIDWORKS PDM Professional or Standard.
In this first blog, I provide the following pre-upgrade tips:
- – Test the upgrade on your test environment
- – Empty the production Vault “Recycle Bin” before upgrading
- – Have all the files checked in before backing up the archive or database servers
- – Keep users out of the Vault while backing up the archive folders and database
Now, let’s get started:
Test the upgrade on your test environment
Upgrading PDM on a test environment gives you many benefits, including benchmarking the amount of time needed to upgrade the production environment, identifying any unexpected results from the upgrade, and reducing disruption for your PDM users. As a SOLIDWORKS admin, you can find instructions for creating a test environment in SOLIDWORKS’ database under: Knowledge Base Solution: S-017826.
Empty the production Vault “Recycle Bin” before upgrading
Deleted files are stored in the “Recycle Bin”. They take up space in the actual archive Vault and the database still keeps track of them. Emptying the “Recycle Bin” before upgrading can reduce the amount of data in the archive server and database. To empty the “Recycle Bin”:
- Log into the Vault View with the “PDM Administrator” account (Admin)
- Go to the Root or Top Level of the Vault and right-click on “White Space” in the Vault view
- Select “Properties”
- Click on the “Deleted Items” tab
- Select “Include items in sub-folders”
- Once the list is populated, left mouse click on the top row
- Scroll down to the bottom row
- Hold the <Shift key> and left mouse click on the last row
- Right mouse click on any of the selected files and select “Destroy”
- Press the “Delete” button
To see a short demonstration of these steps, you can watch this video.
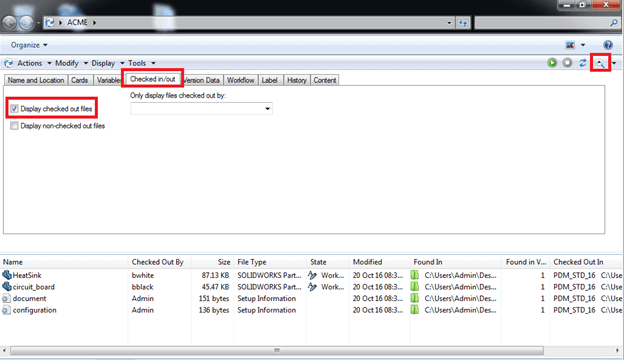
Have all the files checked in before backing up the archive or database servers
Because both the archive server and database server will be upgraded, all files must be checked in first. Log into the Vault with the Admin account. Run a search for all files checked out and then notify the users who have files checked out to please check them in.
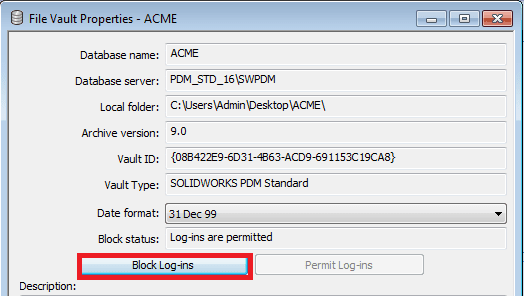
Keep users out of the Vault while backing up the archive folders and database
Once the Vault is ready to be backed up, the last thing you want is for someone to make a quick last minute change. Using the Administration Tool, connect to the Vault as Admin, right mouse click the Vault and select “Properties”. Then click on the “Block Log-ins” button. This will lock out all but the user that clicked on the button (in this case Admin).
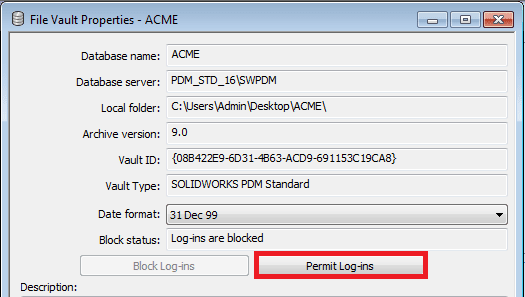
Once the upgrade is complete, connect to the Vault as Admin, right mouse click the Vault and select “Properties”. Then click the “Permit Log-ins” button.
This concludes the pre-upgrade tips in this blog series. Be sure to come back for the next blog, which will cover post-upgrade tips that will help make your upgrade to SOLIDWORKS PDM 2017 easier.
In the meantime, you can get upgrade support from one of our PDM experts if you need help.
Related Articles:
- – Upgrading to SOLIDWORKS PDM 2017- Part 2: Post-Upgrade Tips
- – Latest and Greatest – SOLIDWORKS PDM 2017