Customizing SOLIDWORKS Toolbox

I recently had a customer who called into support and was looking for a way to add some custom features to Toolbox. In particular they were looking for:
“On a number of Hex bolts that I use I need to have 3 different styles of the same size..
Say Ø1/4-20 X 2" Hex Bolts…, (1) Ø1/4-20 x 2" Grade 5, (2) Ø1/4-20 x 2" Grade 8, (3) Ø1/4-20 x 2" Stainless Steel.
Some of my hardware, I need several more styles for given size.. Different color anodizing, coatings, Zinc plate, Chrome, etc…
All these variations of same size have different part numbers on my end.. So the assembly BOM lists which variation goes in the assembly.
I can only get it to list, configure 1 single "style" per size…
How do I get it to list multiple selections (styles) for a given size?”
The answer to this can be found in the Configure area of Toolbox under the Properties Tab. There are 3 basic steps to get this set up for your application.
1. Define your properties or edit an existing value.
a. To add a new property simply select in a blank Property Name field.
b. After adding a new property set the Type to be "Choose List" or "Single Value."
c. Input your Values in the appropriate area.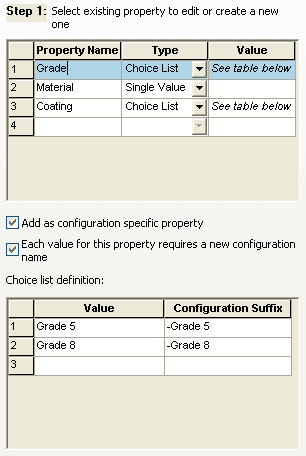
Options (Set for each Property Value):
-
“Add as a configuration specific property," turned on by default and generally recommended to be on.
-
“Each value for this property requires a new configuration,” this can be turned on for only one of the Property Values.
2. With a property selected choose to apply it to a Standard or Component.

3. Before selecting your next property you can choose Enable or Disable and set the Default property for an entire Standard or a specific Component. (This means you can set different defaults for different fasteners.)
Once these values are set you can see the results in your Assemblies when you place a
fastener.
Note: Because we are limited to only 1 property that will generate a configuration to eliminate the possibility of overwriting an existing configuration name you will need to first add additional suffix(s) to the Configuration Name, then use the Add/Update button to Create your companies specific part number for that configuration.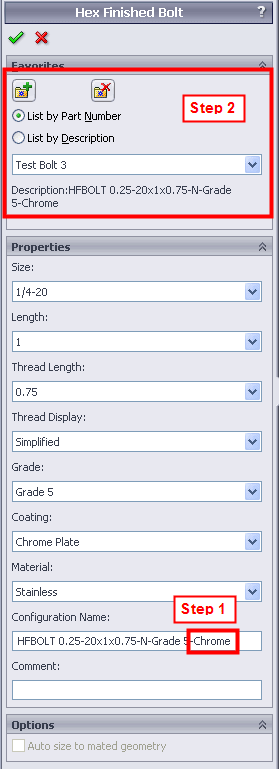

If you open the part file you can see the configurations that have been generated as well as each Configuration's Specific Properties.


Lastly, you can see the results at the drawing level once the BOM is configured to add the additional columns. Notice Item #3 has a different name than the rest of the parts and this is because we did not specify a Part Number when inserting it into the Assembly, so it defaulted to the Description/Configuration Name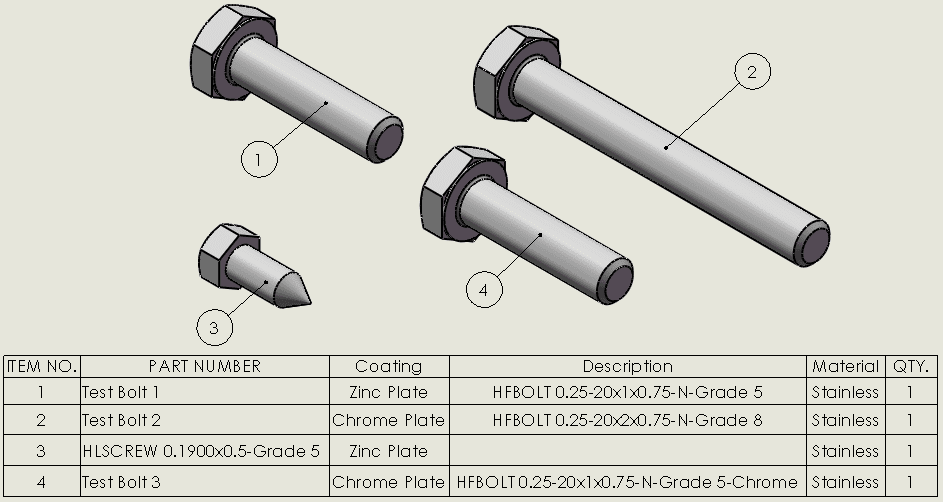
Josh Altergott
CATI Support Team Leader