Top 10 Enhancements SOLIDWORKS 2016 Part 3

In this post I will highlight 3 more of my favorite enhancements of SOLIDWORKS 2016. The first of the three will be the Intersect feature.
![]()
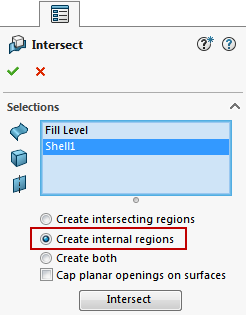
The Intersect feature isn’t new in SOLIDWORKS 2016 but was added in SOLIDWORKS 2013. When we got this feature, one of my favorite things about it was the ability to find the internal volume of a bottle/bowl/etc. Before, you would have to either do multiple extrudes or possibly some complex surfacing. This all took a bunch of time. Then the Intersect feature took all this work away and did it for you. The issue it had was it would split the main body which forced you into combining them back together with the Combine tool. It was an extra step but was still better than doing multiple extrudes or complex surfacing.
With the enhancement to the Intersect feature in SOLIDWORKS 2016, this ‘extra’ step of combining the main body back together is gone. You have the option now to ‘Create internal regions’ of the selected body.
I did quick test comparison in 2016 and 2015 using the same workflow. I had a 54% time savings in 2016!
![]()
The second enhancement is with the Sweep feature. This is another time saving improvement. If you do many sweeps, you should really enjoy these.
It seems most of the time that I need to create a sweep, the profile is a circular. So I would need to create the path and then create a profile sketch. If you are lucky, you wouldn’t need to create a plane to sketch on. But it seems most of the time I need to. In SOLIDWORKS 2016, you have an option to create a circular profile.
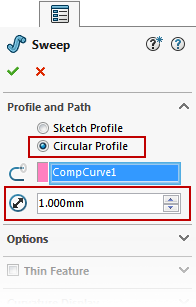
All that needs to happen is you select the path and specify the diameter of the profile. All the work with creating a plane and a sketch is done.
The other great improvement with sweeps is the ability to have the profile anyplace along the path. Typically you were required to have the profile at one end of the path. Now it doesn’t matter. You have 3 options to choose from for the direction.
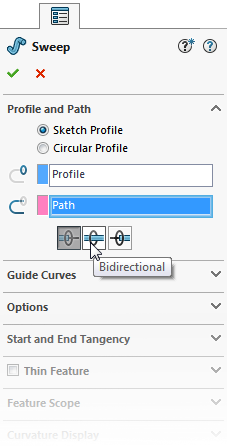
You can tell the sweep to go in just one direction or both directions while still having all the options you normally do.
![]()
For the third enhancement in this post, the new Mate Controller will make showing motion much easier. If you have components that need to move around and you want to get back to those specific locations again, you have experienced some of the struggles in doing this. You most likely have created a configuration where you have suppressed mates. The ability to move and show specific location just got a lot easier with the Mate Controller.
The Mate Controller is like a snapshot of the current location. With a simple to use interface, you get the ability to change mate values to represent different locations. This is all done without creating multiple configurations.
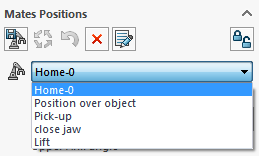
You first start out by choosing the mates you want to control. You can control Angle, Distance, Limit Angle, Limit Distance, Slot, and Width mates. These mates will be added to the Mates Position where you can either type in the value or use sliders.
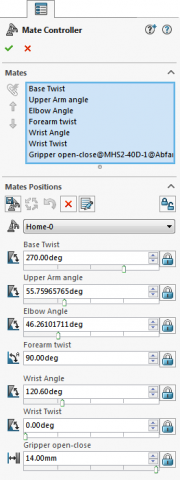
You would position the assembly and then take a snapshot of this location. It is remembered and added to a drop down list.
You would then add in all the other positions thus building up an animation. This can be exported out as an animation or added to SOLIDWORKS Motion.
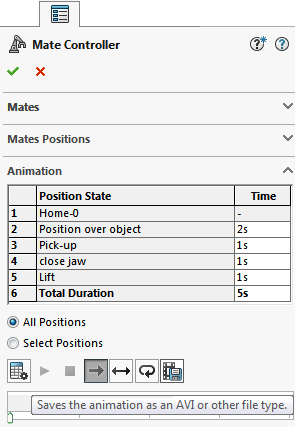
This new tool will allow you to get the desired motion much faster and easier than ever before.