SOLIDWORKS Network Install and Troubleshooting
Installing SolidNetWork Manager
Before beginning the download and installation process, make sure the computer you are planning to install SOLIDWORKS onto meets the minimum system requirements.
You will need a reliable internet connection as well as the 24-digit serial number you received from GoEngineer.
(Note: The SolidNetWork License Manager version MUST be equal to or newer than the SOLIDWORKS version installed on client/local systems).
Downloading SOLIDWORKS
Note: If you're installing a stand-alone license, please reference these instructions: How to install SOLIDWORKS
It is helpful to determine if the full SOLIDWORKS dataset will be required or only what is required to install the SolidNetWork License Manager (SNL).
If you plan to upgrade/install client systems after installing the SNL, it is recommended to download the full dataset. This dataset can then be copied to each system for install, eliminating the need to re-download.
If we are ONLY installing the SolidNetWork License Manager, then downloading the installation manager directly from SOLIDWORKS will be faster.
In either situation, begin by logging into the server where the SolidNetWork License Manager is going to be installed. (Note: You will need Windows admin privileges when installing the software.)
Steps to download ONLY the installation manager
-
Navigate to SOLIDWORKS’ download page (Figure 1). A SOLIDWORKS ID and login are required to get access to the SOLIDWORKS Downloads. For additional instructions on creating a SOLIDWORKS ID and registering your products, please reference the instructions here: Accessing the SOLIDWORKS Customer Portal.
- Select the latest version of SOLIDWORKS Products.
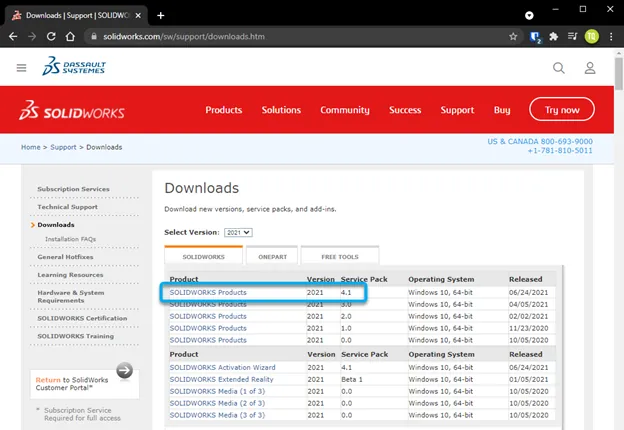
Figure 1: SOLIDWORKS download page
- Once the SolidWorksSetup.exe is downloaded, right-click and Run as Administrator (Figure 2).

Figure 2: Right-click SolidWorksSetup.exe and select Run as administrator (launches WinZip Self-Extractor).
- Unzip to the desired location (Figure 3).

Figure 3: WinZip self-extractor
- The Installation Manager should start automatically. It can also be started by navigating to [installation location]\sldim\sldIM.exe, right-click and select Run as administrator.
- Skip to the section Installing SolidNetWork License Manager.
Steps to download the entire SOLIDWORKS dataset
- It is recommended to use the above steps to download and run the installation manager.
- Select option Download and share all files (Figure 4). Follow prompts to complete the download process. The resulting downloaded media can be copied to any computer to install SOLIDWORKS products.
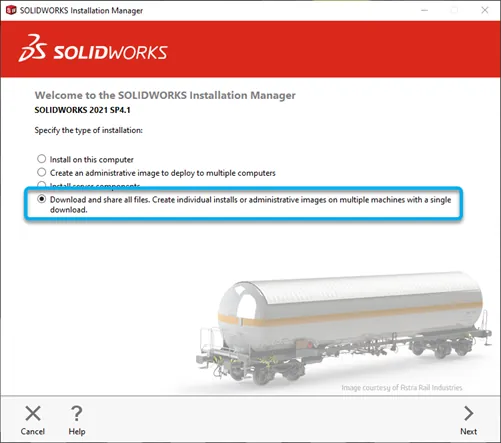
Figure 4: SLDIM - Download and share all files
- Skip to the section Installing SolidNetWork License Manager. If there are any issues with the above steps, reach out to your SOLIDWORKS support for assistance. GoEngineer customers can use the remaining steps to download the install files directly.
- Open your internet browser and go to www.goengineer.com/solidworks-downloads/ (Figure 5). Here you will enter the required information to verify your support status with GoEngineer so we can send you a download link.
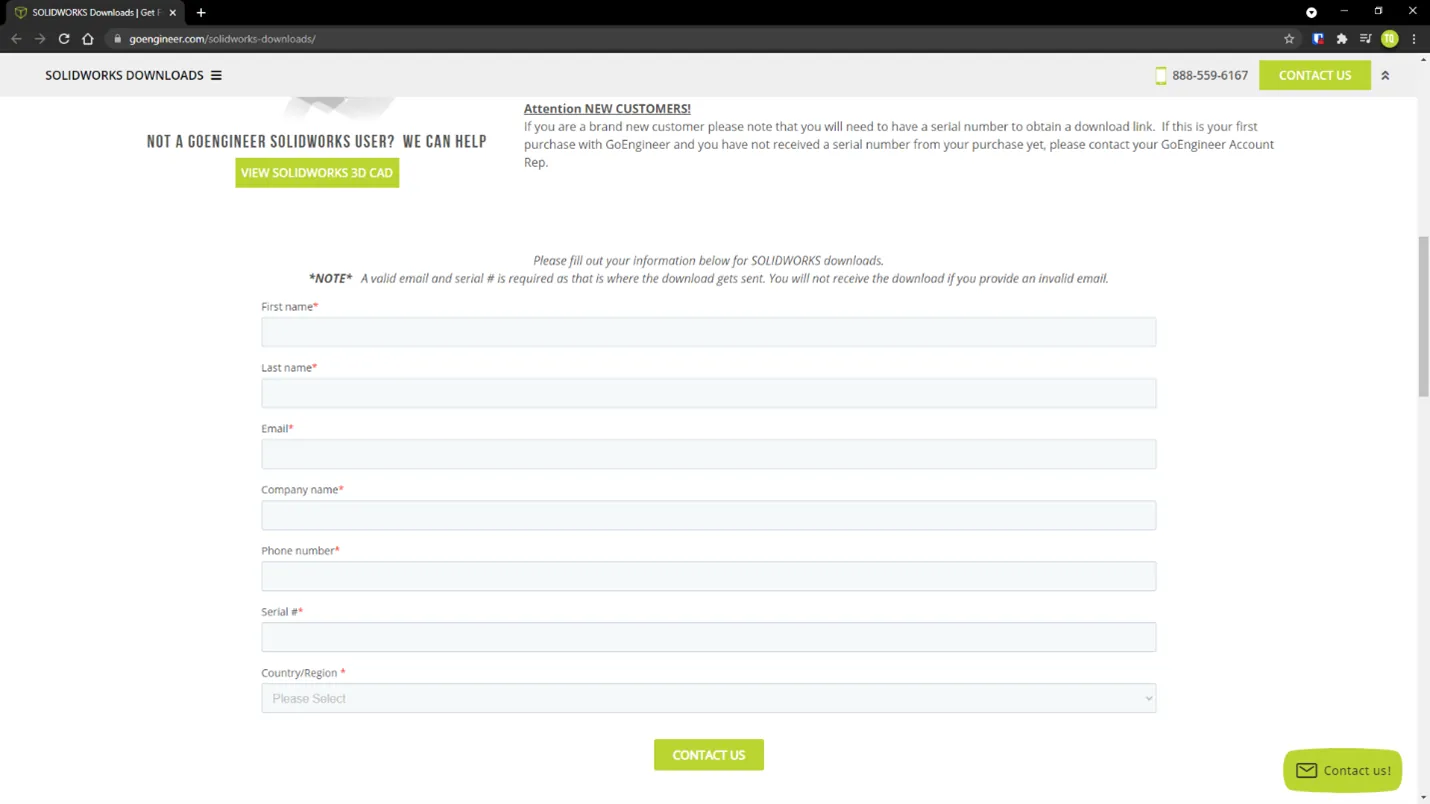
Figure 5: Download form for GoEngineer customers - Once verified, we will provide downloads for installation media for the most current version of SOLIDWORKS as well as past versions back to 2012 (older versions available by request). Click the DOWNLOAD button next to the version you want (Figure 6). This will take you to ShareFile where you will need to enter your information to begin the download. The downloads are 8-16GB; download speeds will vary depending on your connection.
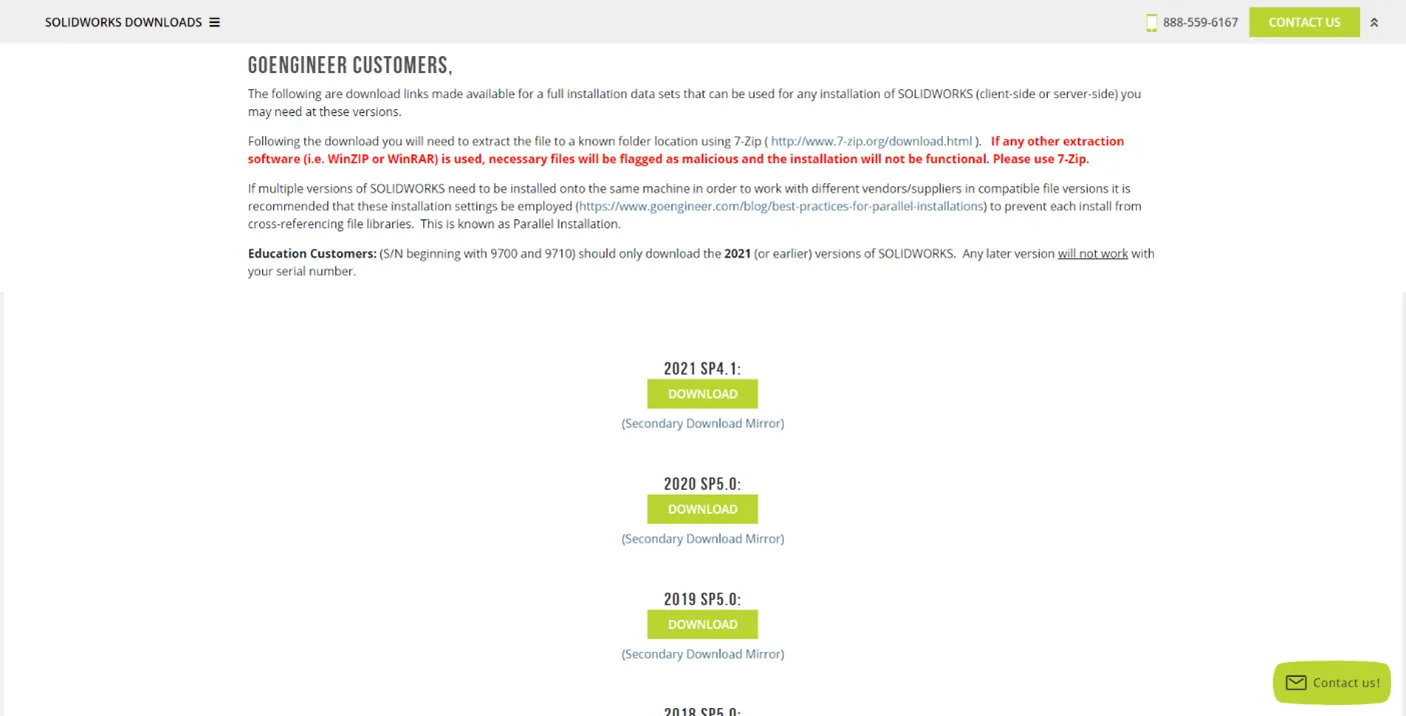
Figure 6: GoEngineer SOLIDWORKS download page - Once the SOLIDWORKS download is complete, right-click and select Extract all… (Figure 7) to use the standard WinZip application.

Figure 7: WinZip – Extract All…
- Extract the data to your desired location.
- Skip to the section Installing SolidNetWork License Manager.
Download and install 7-zip extraction tool (Optional)
There are various extraction tools available including those that are default. If another extraction software is used, necessary files may be flagged as malicious, and the installation may not be functional.
- While the SOLIDWORKS installation media is downloading, open a new internet browser tab and go to http://www.7-zip.org/download.html.
- From the 7-zip site, choose the software version that is applicable for your needs, most likely it will be the 64-bit version (Figure 8). Once downloaded, run the executable file to install 7-zip.
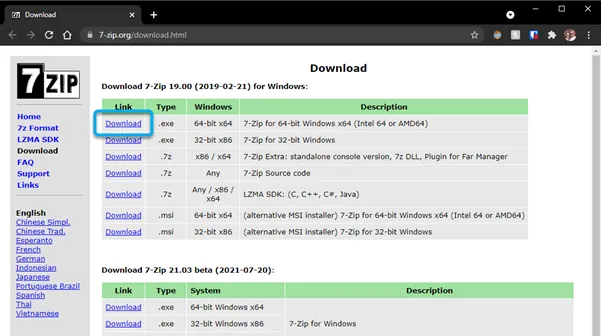
Figure 8: 7-Zip website for downloads - With the SOLIDWORKS software downloaded, right-click the SOLIDWORKS zip file, select 7-Zip, and left-click “Extract files…” to extract the folder (Figure 9).
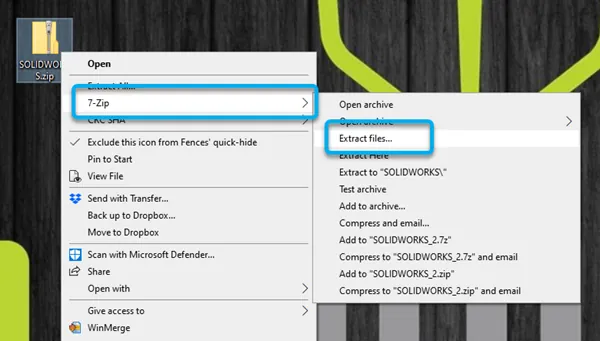
Figure 9: Extract SOLIDWORKS folder - Select the desired location to extract the files to and click OK.
- Proceed to the next section to install the SolidNetWork License Manager.
Installing SolidNetWork License Manager
- Once the installation manager or full dataset has been downloaded and extracted, open the SOLIDWORKS folder and find the setup.exe application (Figure 10).
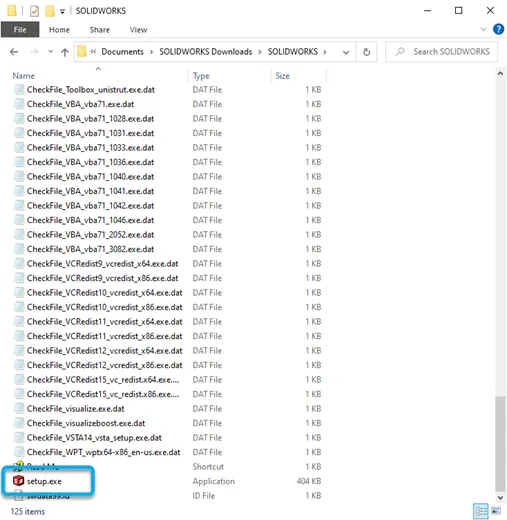
Figure 10: Extracted SOLIDWORKS folder - Right-click setup.exe and select Run as Administrator (launches SOLIDWORKS Installation Manager).
- On the Welcome screen (Figure 11), select Install server components and place a check next to Install SolidNetWork License Manager. (Note: This article only describes the install for SolidNetWork License Manager and subsequent SOLIDWORKS installs on local computers; the other options depicted below are not explained).

Figure 11: SLDIM - Select the type of installation - Click Next to proceed.
SOLIDWORKS Installation Manager will check to make sure the version downloaded is the most current version available. If the version downloaded is not the current version, you can choose to download the newer version at this time (Figure 12). You also have the option to proceed with the current install media, then, after the install is complete, update the software (Note: It is recommended to download the latest files for install over upgrading).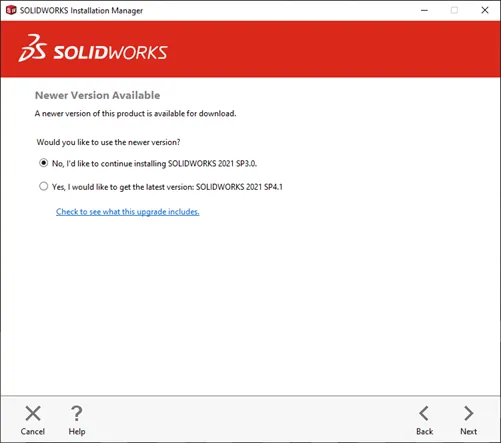
Figure 12: SLDIM - Newer version available - If applicable, select the version to install and select Next.
- SOLIDWORKS then prompts the user for their serial number (Figure 13), enter your serial number in the supplied space. Multiple serial numbers can be entered by separating them with commas. If the serial number(s) are automatically applied, verify these are correct.
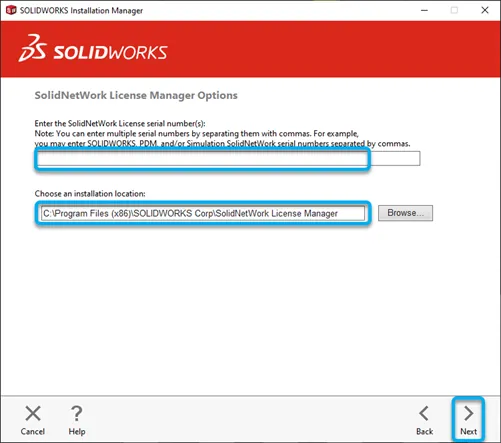
Figure 13: SLDIM - SolidNetWork License Manager options - Verify the installation location is correct or modify to the desired location.
- Proceed with the install by clicking Next.
- Review the summary information (Figure 14), check the box to accept the terms, and continue by clicking Install Now. (Note: The serial number(s) have been intentionally erased; in a normal installation, your serial number(s) will be visible).
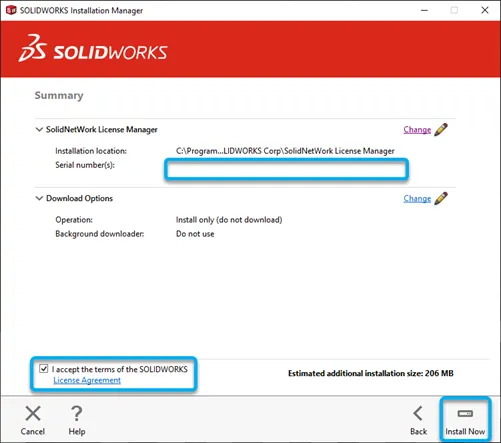
Figure 14: SLDIM - Summary page
SOLIDWORKS Installation Manager will run through the install and, when finished, will show results.
Activating the SolidNetWork License Manager
- When the install is complete, navigate to the installed applications and run the SolidNetWork License Manager Server application.
- On the Server Administration tab (Figure 15), select Modify.
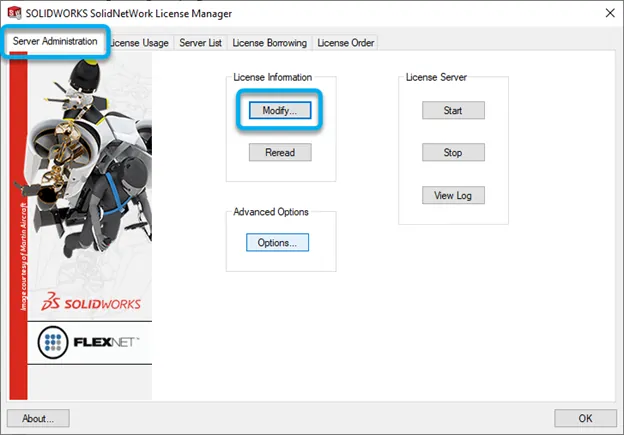
Figure 15: SolidNetWork License Manager - On the Product Activation page (Figure 16), select the radio button for Activate/Reactivate your product license(s).
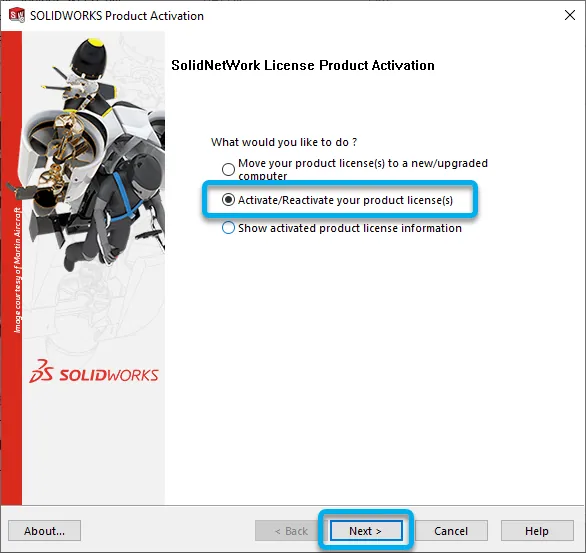
Figure 16: Product activation - Click Next to proceed.
- On the Server Information page (Figure 17), check the box if a firewall is in use on this server.
- Provide the server name of where the license manager is installed.
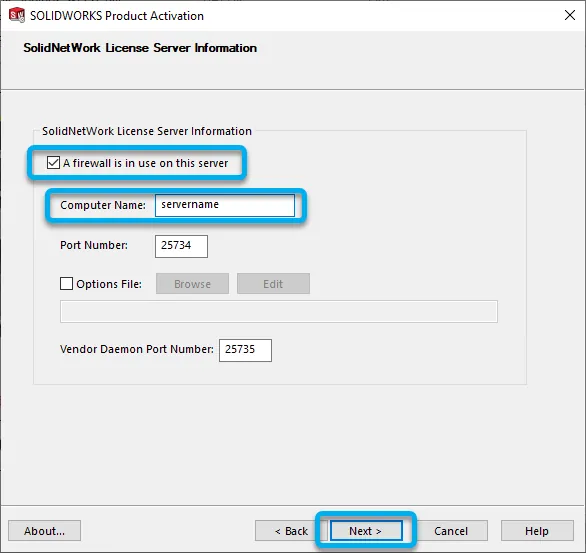
Figure 17: Product activation – server information - For information on the creation and implementation of the Options file, please reference the instructions here: Options File.
- Click Next to proceed.
The final step of the activation process is to select how to activate, automatically over the internet or manually via email (Figure 18).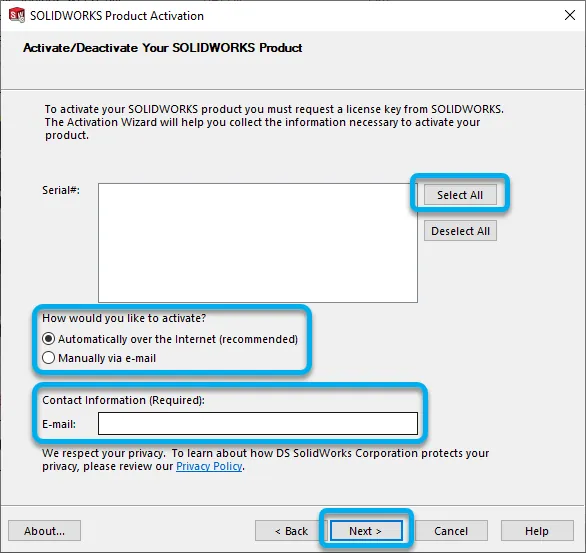
Figure 18: Product activation – activate/deactivate - Click the option Select All to select all serial numbers for activation.
- If there is a business-critical reason that we must activate manually, select the manual option, and follow the prompts. Otherwise, select automatically.
- Provide a contact email to be associated with activation.
- Click Next to proceed with the activation. (Note: The serial number(s) have been intentionally erased; in a normal installation, your serial number(s) will be visible).
SOLIDWORKS will identify whether activation/deactivations succeeded or failed and provide information on the currently activated products. - Select Finish to complete the activation process.
Installing SOLIDWORKS on a local machine
Now that SolidNetWork License Manager is correctly installed, we can proceed with installing SOLIDWORKS on local computers. There is no limit to the number of installs and, therefore, the number of computers to which we may install SOLIDWORKS; however, you are restricted by the number of licenses/seats. For instance, you may have 10 computers that have SOLIDWORKS installed, but if your company only has eight licenses, then only eight users will be able to have an active session of SOLIDWORKS running. Any other uses who attempt to run SOLIDWORKS will be prompted with a dialogue box iterating that there are no licenses available.
At this point in the installation process, select the computers desired for installs and repeat the process below for each computer.
- Copy the SOLIDWORKS installation media to the computer (suggested default location: C:\Users\[username]\Documents\SOLIDWORKS Downloads\SOLIDWORKS [version] [servicepack]. (NOTE: this should be a local directory, not a network or cloud storage)
Note: For detailed instructions on an individual SOLIDWORKS install, please reference: How to install SOLIDWORKS. - Right-click setup.exe from the above location and select Run as administrator.
- Select Install on this computer and click Next.
- Enter your serial number in the supplied boxes and click Next. If a newer version is available just choose to install from disk. Client installs should be the same version as the SNL. If upgrading is preferable, it is recommended to download the desired version, upgrade the server, then install the clients as necessary.
- Proceed through the installation prompts and select Install now.
- SOLIDWORKS will now need the port and server name for where the SNL has been installed (Figure 19). (Note: The default Client/Server port numbers are 25734/25735. If this needs to be changed, contact your network administrator).
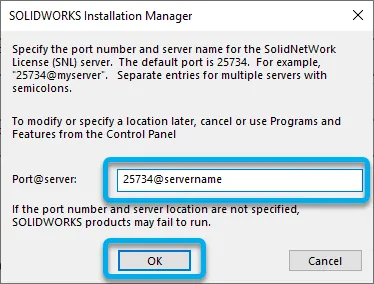
Figure 19: 25734@ServerName - Click OK to begin the SOLIDWORKS client install. The install process can take 30 minutes to 1 hour. Once the install is complete, SOLIDWORKS is ready for use.
The install of the SolidNetWork License Manager on the domain server uses port number @ server (ex. 25734@ Server). We must ensure this port is not being blocked by the Windows firewall. (Note: The default port number(s) for the SolidNetWork License Manager are 25734 and 25735).
If a firewall is in use, verify the SolidNetWork License Manager is set up correctly. These steps were previously covered in the Installing SolidNetWork License Manager section. Open the SolidNetWork License Manager on the domain server, select Modify, then select Activate/Reactivate your product license(s). Check the box to identify a firewall is used on this server.
Click Next and follow the remaining steps to activate the products. Select Finish to close.
Open ports 25734 and 25735 on the domain server and/or shadow network/server (if applicable) and the local machine(s). Label as SWX_Inbound and SWX_Outbound, respectively. This process is to force Windows to allow exceptions to the required ports for the local machine to communicate with the server.
Opening Ports in Windows
DISCLAIMER: The following steps are a guideline to perform changes in Windows functions. This should be performed by a Certified Windows Professional and the Company IT Administrator. GoEngineer holds no responsibility for user error when altering Windows operations.
Open inbound ports on all user computers (systems that have an installation of SOLIDWORKS).
- Access the Windows Control Panel. Select System and Security (Figure 20).
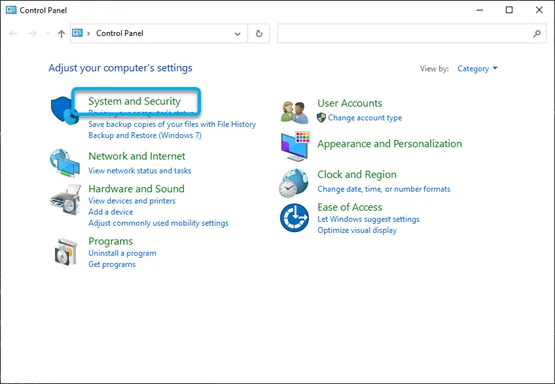
Figure 20: System and Security - Select Windows Defender Firewall (Figure 21).
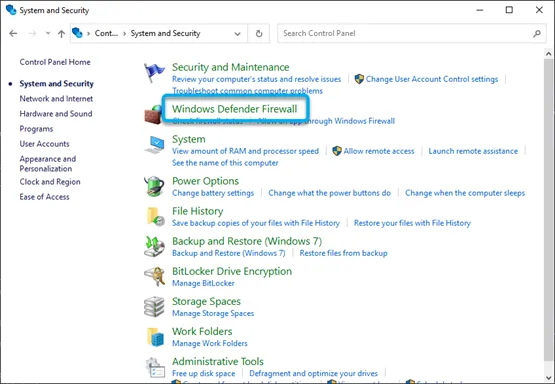
Figure 21: Windows Defender Firewall - Select Advanced settings from the options on the left (Figure 22).
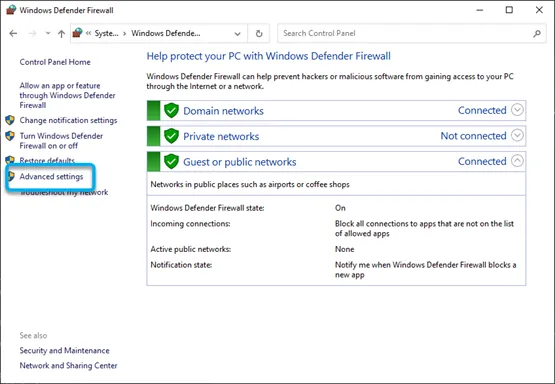
Figure 22: Advanced settings - Select Inbound Rules, then select New Rule… (Figure 23).
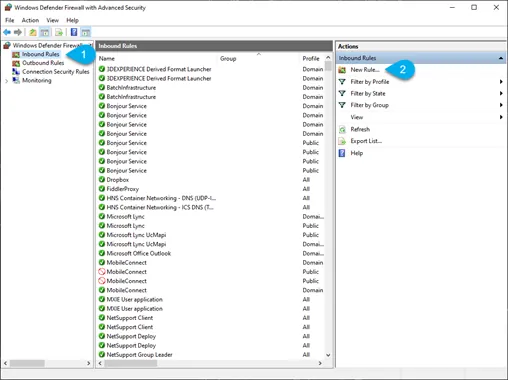
Figure 23: Inbound Rules - Select the type Port and click Next (Figure 24).
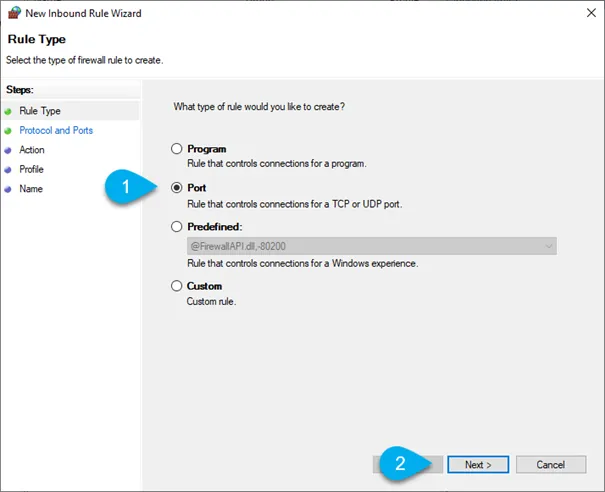
Figure 24: Rule Type - Select TCP. Select Specific local ports: Add port info: 25734, 25735. Click Next (Figure 25).
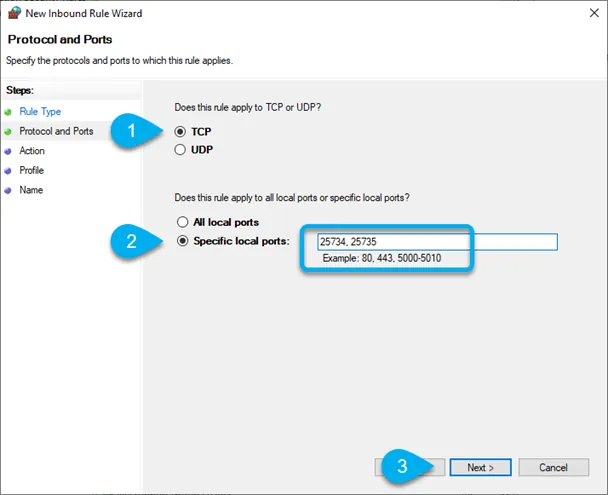
Figure 25: Protocol and Ports - Select Allow the connection. Click Next (Figure 26).
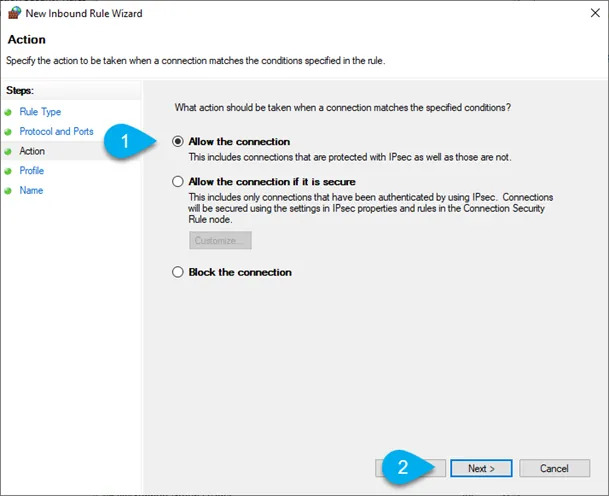
Figure 26: Rule Action - Select when this rule applies (refer to IT administrator) (Figure 27).
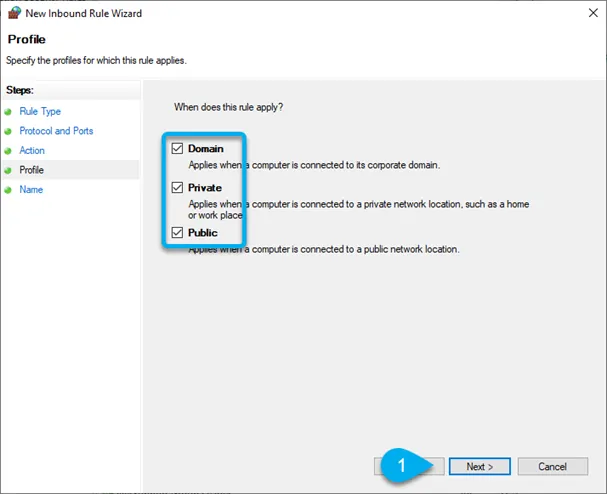
Figure 27: Rule Profile - Finish Inbound Port Rule. Give the rule a name and if desired, add a description. Click Finish (Figure 28).

Figure 28: Rule Name - Repeat steps 4-9 for Outbound Rules. Click Finish (Figure 29).
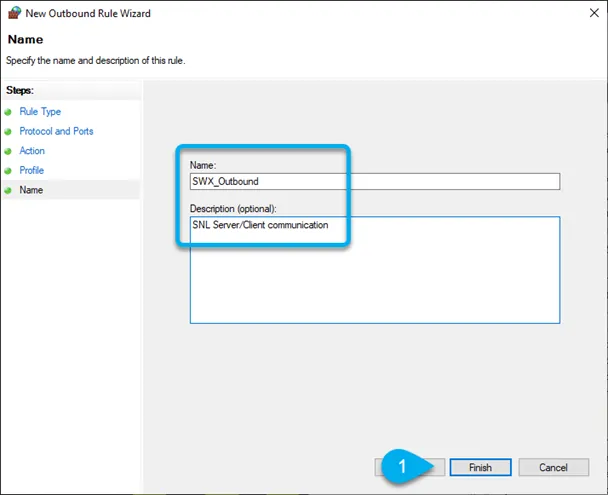
Figure 29: Outbound Rule
To verify the ports are open, go to Control Panel > System and Security > Windows Defender Firewall > Advanced settings > Inbound Rules. Filter list by name. SWX_Inbound in this case, pan to the right to verify it is enabled and the port number.
Verifying Port Communication
When SOLIDWORKS fails to locate the server or fails to install correctly on the local computer, verify that the port(s) on the local computer is open, telnet client and server are installed, and use the command prompt to ping server name and telnet, server name, port number (ex: telnet server 25734).
Activate telnet client and telnet server on the PC.
- Go to Control Panel > Uninstall a program (Figure 30).
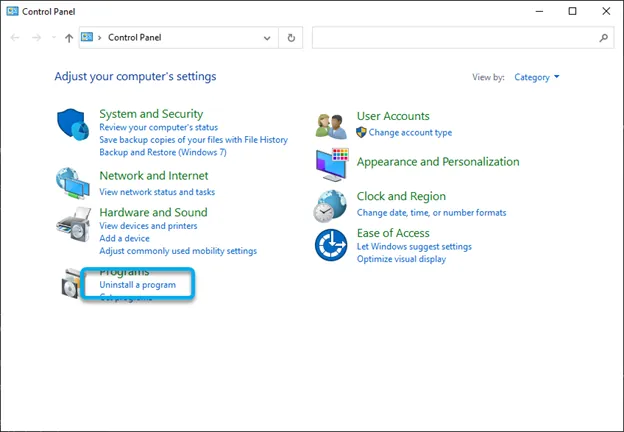
Figure 30: Uninstall a program/Programs and Features - Select Turn Windows features on or off (Figure 31).
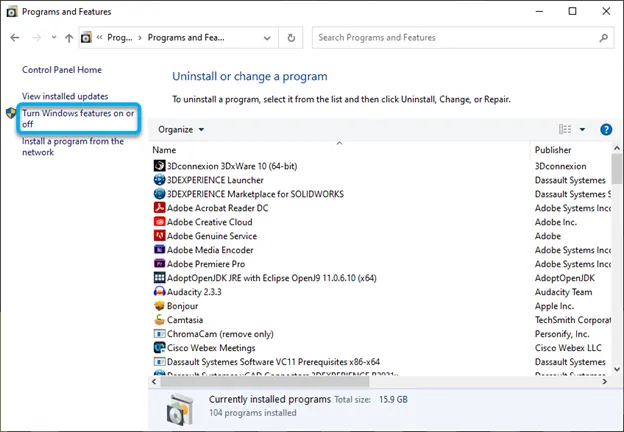
Figure 31: Turn Windows features on/off - Scroll down and toggle on Telnet Client (and Telnet Server if available). Click OK (Figure 32).
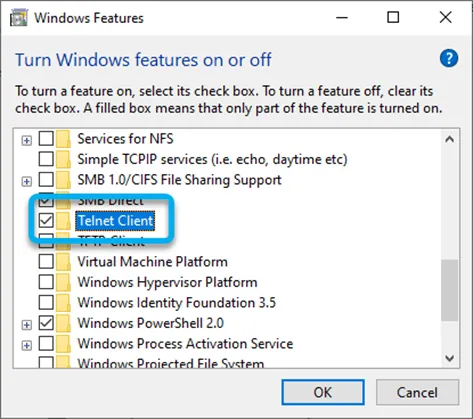
Figure 32: Telnet Client/Server
Confirm communication between the local computer and the server. - Click the Windows Start icon, type cmd, select Run as administrator (Figure 33).
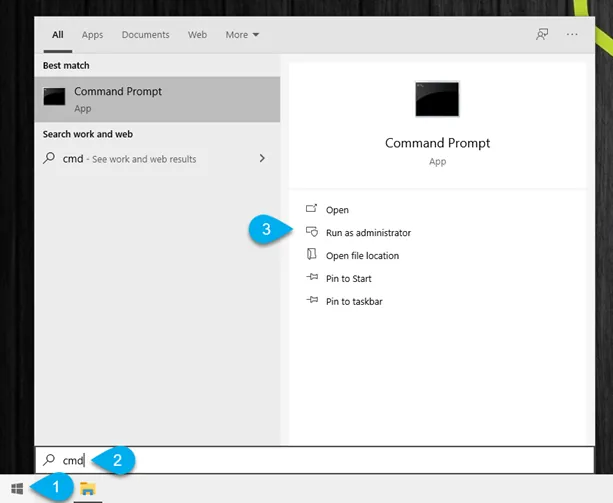
Figure 33: Opening the Command Prompt - Ping the server by typing ping [servername] and hit enter (Figure 34).
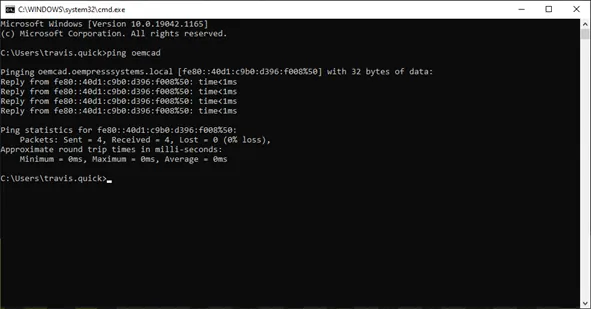
Figure 34: Ping the Server
If there is an error, then there is a problem with the connection between your domain server and the local computer. Contact your IT administrator; more than likely this will be a firewall issue or if SNL has been installed on a shadow network/server, the server may not be properly connected to the domain server. - To verify the port(s) are open on the server side, from the Windows Start menu, type cmd and hit enter.
- From the command prompt window, type telnet [servername] [port #] (ex: telnet server 25734)
If an error is returned or the connection fails, the port is blocked on the server side.
If the telnet window opens with a flashing cursor, then the port is open (Figure 35).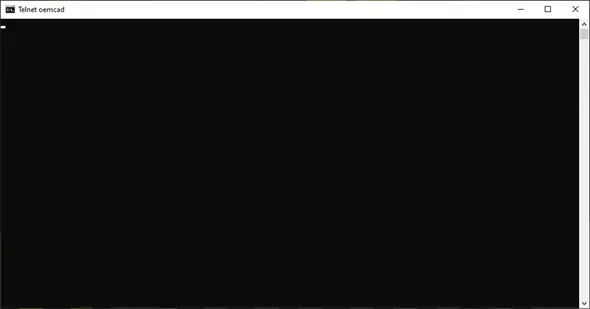
Figure 35: Successful Telnet ping - Repeat process for port 25735 (ex: telnet server 25735)
If an error is returned or the connection fails, the port is blocked on the server side.
If the telnet window opens with a flashing cursor, then the port is open.
If both ports 25734 and 25735 are open on the server and local computer ping is good, the telnet is good.
- Turn off/disable any firewalls.
- Turn off internet security and check that version for SOLIDWORKS compatibility. See link (http://www.solidworks.com/sw/support/AntiVirus_SW.html)
- Be sure there are not multiple install attempts in the machine (ex: SOLIDWORKS Install, SOLIDWORKS Install (2), SOLIDWORKS Install (3), SOLIDWORKS Install (4); select all those previous attempts, delete, and attempt to install again.)
If else: Contact GoEngineer Support
I hope you found this guide for SOLIDWORKS Network Install and Troubleshooting helpful. For more information check out the articles below.
Editor's Note: This article was originally published in February 2013 and has been updated for accuracy and comprehensiveness.
Related Articles
My SOLIDWORKS Installation Manager is Blank!
Fix SOLIDWORKS Previous Toolbox Installed Blocking Upgrade Error
Complete SOLIDWORKS Clean Uninstall Guide
How to Change Your SOLIDWORKS Serial Number

About Travis Quick
Travis Quick is an Application Engineer at GoEngineer. Travis spends his days teaching SOLIDWORKS courses and helping customers. In his spare time, he likes playing video games and testing his physical strength on an outdoor obstacle course.
Get our wide array of technical resources delivered right to your inbox.
Unsubscribe at any time.