Setting Up SOLIDWORKS for an Efficient and Effective Design Team
Having efficient and effective design teams is highly important in today’s competitive world. Product development is no longer isolated to engineering as it has been in the past and now includes business operations apart from engineering with many functional areas benefiting from CAD and design data.
This guide will help you as an administrator, manager, or end-user of SOLIDWORKS, plan and implement an environment that will help your design process be efficient, effective, and allow maximum data leverage across your organization. The concepts and suggestions contained in this guide can also be used to improve existing environments, communication, and collaboration among your design team.
Please note that this guide is meant to serve as a model only and is not meant to be all-inclusive. Resources used in the creation of this guide include the SOLIDWORKS online help website (help.solidworks.com) and articles from GoEngineer.
Hardware Considerations
Just like having the right tools for a job is important, having the right hardware in which to run SOLIDWORKS is important. The latest versions of SOLIDWORKS have been programmed to take advantage of the increased capabilities of modern hardware.
Because SOLIDWORKS is constantly adapting, it is important to consult the Hardware & System Requirements page on the SOLIDWORKS website when purchasing new workstations or components. SOLIDWORKS relies heavily on the OpenGL specification, and as such, it is important to use an Open GL graphics card that has been certified for use with SOLIDWORKS to achieve the best possible user experience.
SOLIDWORKS has created a Graphics Card Drivers selection tool on its website to help identify and download the correct graphics card driver for your system. It can also be used to see which graphics cards are certified and supported for use with SOLIDWORKS.
Installation types
Once you have the supported or recommended hardware in place, you should create a SOLIDWORKS installation and license management plan. SOLIDWORKS offers two different installation methods and it is important to understand the pros and cons for each type so that when it comes time to deploy SOLIDWORKS in your organization it can be done efficiently and effectively.
Individual
The first and most common type of installation method is standalone or individual. This type of installation is a good option for teams of 10 individual users or less. It is also recommended for teams in different physical locations (also with 10 users or less). With an individual installation, SOLIDWORKS is installed and administered on the local machine or workstation. This means that each installation of SOLIDWORKS can be slightly different and each user’s environment (settings and customizations) can be different as well.
Administrative Image
For teams of 10 or more individual SOLIDWORKS users, it is recommended that an administrative image be used. With an administrative image, SOLIDWORKS is installed and administered by a single installation image, which can be located on a network or in a central file repository. Because the image includes installation files, serial number information, and can include customized settings, it allows for standardized installations across the organization. This means that users can be set up on the same version of SOLIDWORKS and be working in the same environment. For administrators, this can make upgrading and overall installation management much easier. Administrative images can also be used in conjunction with Windows Active Directory for automated upgrades and delivery to client machines.
License Management
Managing licenses correctly will help ensure that your users will be able to use the tools they need when they need them. License information should be reviewed and updated regularly. Managing licenses should be part of any installation or upgrade procedure, whether dealing with software or hardware.
System Options
Your organization is different from every other organization in both small and large ways. Most out-of-the-box software solutions are not tailored to meet the specific needs of your organization or users, SOLIDWORKS included. SOLIDWORKS can work very well with no additional customizations, however, greater efficiency can be achieved if customizations are made that will help with your specific organizational needs. Investing a small amount of time at this point has the potential to save large amounts of time and possible frustration in the future.
SOLIDWORKS Options
SOLIDWORKS has a considerable number of available options that change the program's behavior and it can be hard to know which of them will produce the best results. While it is advised that all settings be reviewed, there are a few settings regularly used and recommended by GoEngineer technical support that will help provide effective and efficient SOLIDWORKS use.
System Options » Performance » Verification on rebuild (enable advanced body checking)6
- System Options » Performance » Verification on rebuild (enable advanced body checking) With this option enabled each time the model is rebuilt using the CTRL+Q shortcut SOLIDWORKS checks every new or changed feature against all existing faces and edges, not just adjacent faces and edges. Features that cause invalid geometry fail when this option is turned on. This means that model errors can be caught and corrected earlier in the design process.
-
System Options » Performance » Enhanced Graphics Performance Selecting this option will enable advanced graphics processing which will increase usability of complex geometry. Rotating a complex file will be smooth.
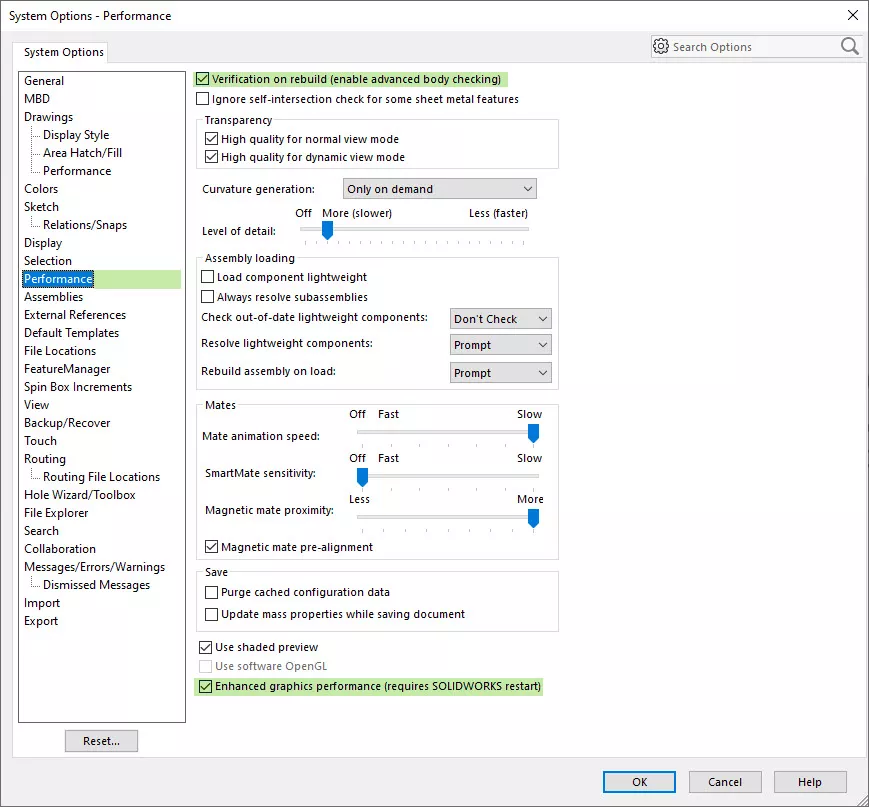
Figure 1 - Performance Options
- System Options » Messages/Errors/Warnings While it may seem like an annoyance at times, the option to “Show errors every rebuild” should be checked as this will indicate when there are issues with the model that needs to be corrected. Whenever the “Don’t show this again” option is checked in a warning, message, or error dialog box, SOLIDWORKS keeps a record of what was dismissed in this area of the system options. It is a good idea to review this section regularly to make sure that messages indicating major issues are not suppressed from being displayed.
Other options to consider:
- Colors » Background Appearance Color settings can be used to further standardize the SOLIDWORKS user environment.
- Collaboration » Enable multi-user environment Adds Make Read-Only and Get Write Access menu options as well as a few other tools that help preserve data and file integrity when multiple users are working on the same file set.
- Sketch » Enable on-screen numeric input on entity creation This is a time-saving feature that allows for direct entry of dimensions while creating sketch entities. “This option helps build design intent into sketches because you do not have to exit the sketch entity tool to dimension the entity.”
Toolbars
Just as a well-organized and thought out work area increases productivity and efficiency, a well-organized and customized workspace in SOLIDWORKS also increases productivity and allows the user to work more efficiently. Customizing toolbars is one way to achieve a well-designed workspace. As with SOLIDWORKS options, it is advised that you thoroughly review the available toolbar options and customize them for your companies particular design processes and workflows.
To customize the toolbars within SOLIDWORKS, right-click on any open area of the toolbar and choose “Customize”. Additionally, you can navigate to Tools » Customize.
One of the easiest toolbars to customize, and one that often gets overlooked, is the Shortcut toolbar. This toolbar is what appears by pressing “S” on the keyboard. The Shortcut toolbar is meant to quickly provide the most common tools for the current context (part, assembly, drawing, and sketch) to the designer. This toolbar is displayed wherever the mouse cursor is located and can reduce or eliminate the need to navigate to a static toolbar. This is a great toolbar to have mapped to a fourth mouse button and can be mapped to a different keyboard key if desired.
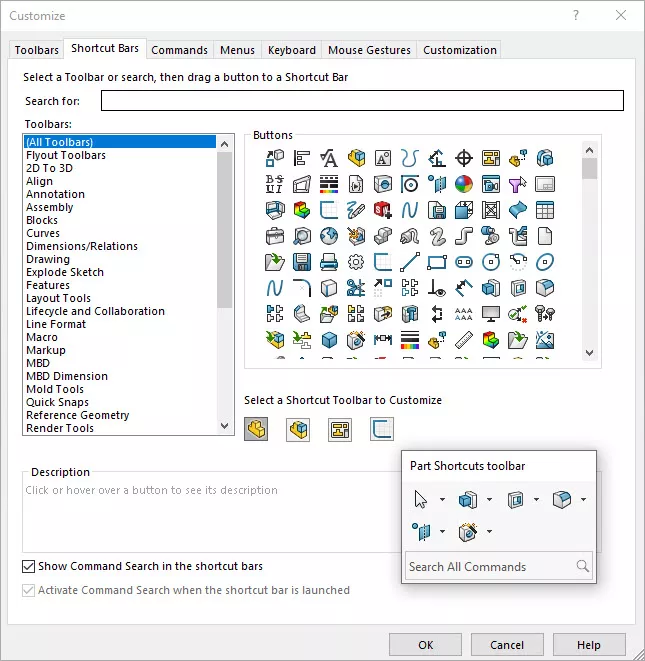
Figure 2 – Customize the Shortcut toolbar
Mouse Gestures
Mouse gestures are another often-overlooked feature in SOLIDWORKS. Mouse gestures allow for quick access to context-sensitive commands by right-clicking and moving the mouse in one of four or eight directions. The commands invoked can be customized and can result in efficiency gains.
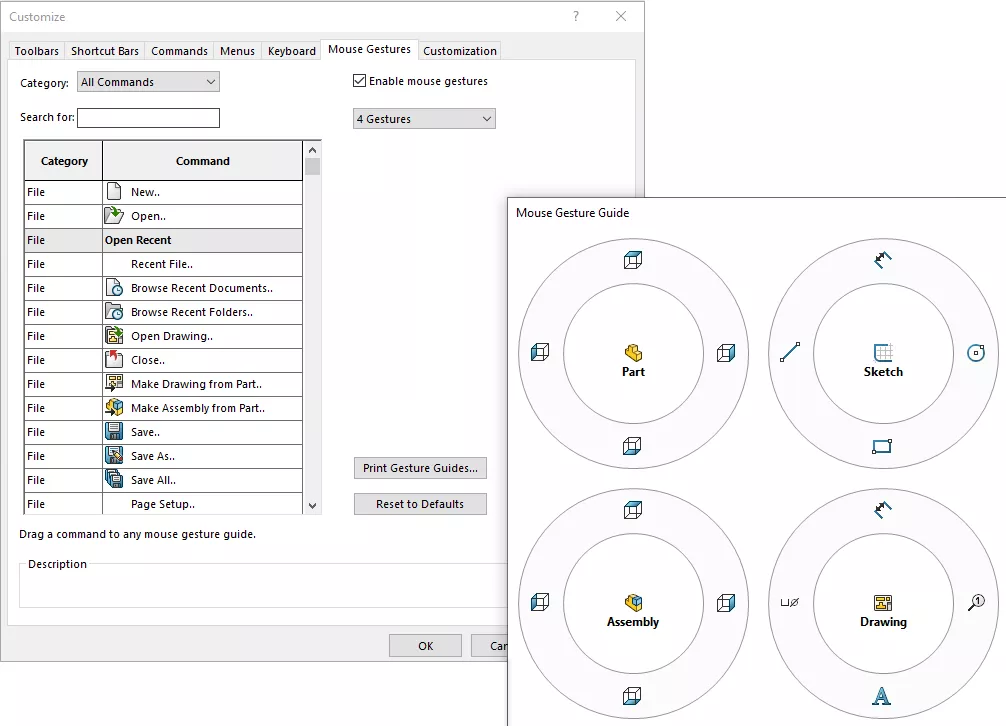
Figure 3 - Customize Mouse Gestures
Add-ins
Add-ins provide extended functionality to standard SOLIDWORKS and include features such as Routing, Electrical, Simulation, and PDM. These additional features can be turned on and off via Tools » Add-Ins. Add-ins, while necessary for some features, should be turned off when the features of the add-in are not being used as the add-ins use additional SOLIDWORKS resources and can affect performance. It is recommended to have commonly used add-ins marked to load on startup but others should only be loaded when required. In addition to SOLIDWORKS add-ins, there are add-ins available from third parties such as Solid Professor.
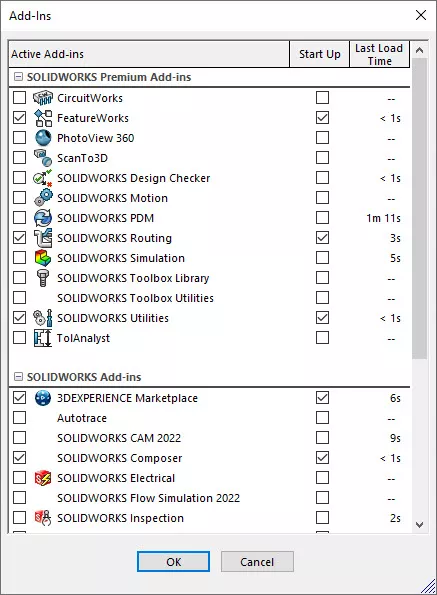
Figure 4 - Add-ins
Sharing customization / Copy Settings Wizard
Now that time and effort have been invested customizing the user interface to best suit your company, processes, and workflows, it is important to share these customizations among the other users and workstations in the organization. This standardization helps to maintain and manage hardware and software and allows for more efficient and effective use of SOLIDWORKS.
One way these settings can be quickly shared with all users in your organization is to use the Copy Settings Wizard. This tool is installed with SOLIDWORKS and is available by navigating to Start » All Programs » SOLIDWORKS 20XX » SOLIDWORKS Tools » Copy Settings Wizard 20XX. The copy settings wizard will create a file that can be distributed across the organization or included in an administrative installation image (using the administrative image options editor). Users can double-click, or launch, this file, and the settings are copied to the SOLIDWORKS installation.
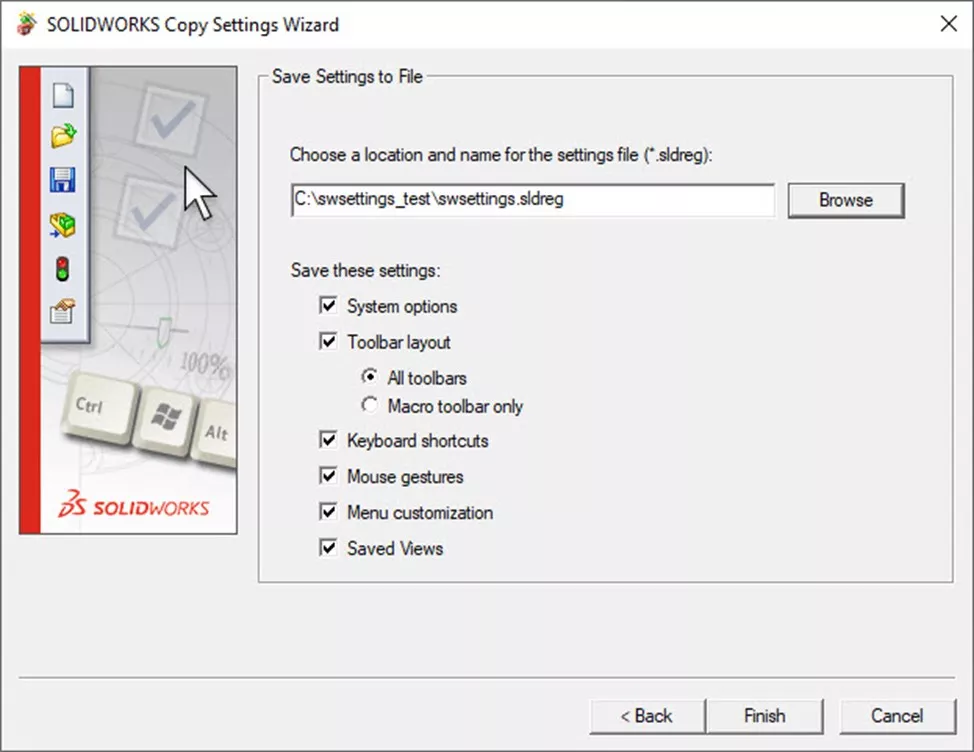
Figure 5 - Copy Settings Wizard
Standards
In general, standards attempt to establish a norm or set of requirements. Most companies have standards dealing with design and data that allow for consistent output throughout the organization. Standards can be implemented in many ways in SOLIDWORKS, from templates to custom properties and folder structures.
Custom Properties
Custom properties16 play an important role in standardizing information and are, at their most basic, text fields associated with and contained within a SOLIDWORKS file. Custom properties can be used to automatically fill in drawing title blocks, bills of material information, and searchable metadata. Custom properties can also be used to shuttle information to and from a PDM or ERP system.
Custom properties can be set up in document templates so that when the template is used for a SOLIDWORKS file, the custom properties are already present. Additionally, custom properties can be standardized for a particular SOLIDWORKS file type by using the Property Tab Builder or the Properties.txt file.
Templates
The use of file templates is an effective way to standardize design output and helps define processes and workflows. Templates can, and should, be created for parts, assemblies, and drawings. Template files should contain default custom properties, drafting standards, and any other organization-specific customizations and should be saved and stored in a universally accessible location like a shared folder on a network.
Drawing templates can be set up to link to defined part or assembly custom properties to automatically populate title block information by using linked properties.
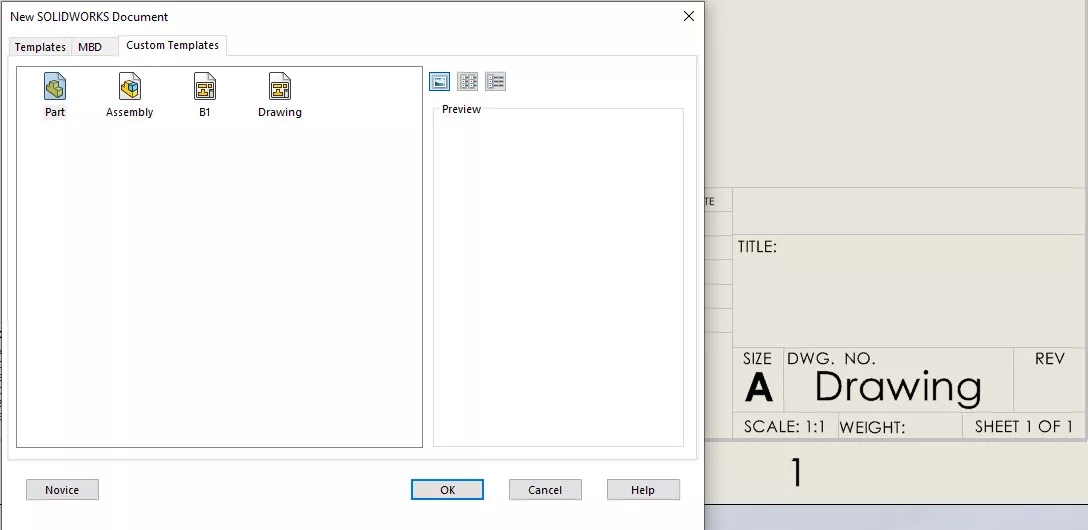
Figure 6 - Templates
Having good template files can eliminate file setup time and will help produce consistent output across the organization.
Standardized Folder Structure
Whether or not you use a PDM system, folder structure is an important consideration in determining how to organize and standardize your files. With a well-defined folder structure in place, your users will be able to find information quickly and save data in a standard manner.
Considerations for how to define your folder structure include: is your work project or product based, number of projects or products designed in a year, are you planning to manage revisions, what other departments are going to be accessing or creating data, and what kind of security is required.
Shared Libraries
Sharing data across the design team is essential to working efficiently. Shared libraries help in making standard data – design features, parts, templates, or settings – available to all users. Shared libraries in SOLIDWORKS include the Design Library and Toolbox.
Shared libraries and common folder paths are found in the SOLIDWORKS System Options » File Locations and should be reviewed regularly. Paths should be adjusted when all users need access to the same resource or if content is stored in a PDM vault.
Design Library
The design library is accessible from the task pane in SOLIDWORKS and allows access to shared design resources. The design library can contain anything from annotations to individual features to smart components. Folders containing shared design data can be easily added to the library allowing other users access to the information.
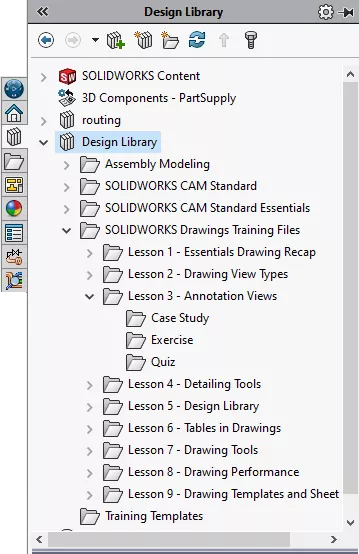
Figure 7 - Design library folders
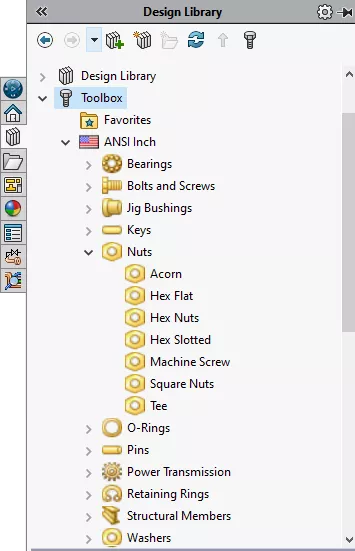
Toolbox
SOLIDWORKS Toolbox is a hardware library that is dedicated to fasteners. It contains an expansive default set of nuts, bolts, and other fasteners that can be easily added to your design. The toolbox can become a shared library if its contents are moved to a shared file location such as a shared network folder or drive. If a PDM system is being used, it can be located inside a PDM vault which will allow shared access to the same resources. Once the toolbox has been located in a shared location it is important to update the toolbox folder path on each client machine so that SOLIDWORKS will locate and use the correct files.
Individual toolbox items can be configured and customized to your organization's needs. New items can be added and maintained by toolbox making it a powerful feature that can have impacts on efficiency and standard design practices.
Define processes
Designing products that produce the most profit and reduce cost for your organization is the goal of most designers and engineers. However, without the proper processes in place, it is difficult to accomplish this goal. Processes based on the evaluation of daily activities will help design teams work together efficiently and systematically to obtain their goals.
One of the most common processes in an organization is an approval process. Some other common processes include change or revision (ECO), sales, purchasing, BOM approval, and design processes (i.e. data reuse, feature utilization, template use, etc). Understanding how SOLIDWORKS, PDM, and other tools help to streamline or improve your processes is an important part of having an efficient and effective design team.
Collaboration
Having a centralized and organized system is key to helping designers and engineers work together on a project. Network drive and shared folders work well for small teams but suffer performance, data loss, and other issues with larger design groups.
Enterprise PDM, or EPDM, has been designed to store and manage data and provide a platform for collaboration among your design team. EPDM can be implemented in any size organization and in multiple locations. Through file replication, EPDM can allow distributed teams to work with the same data and information no matter where they are. A robust permissions system and strict data workflows protect your information and allow approval processes to be implemented and enforced. Automated processes can be created whereby notifications can be sent and PDF files created when a file is released. In short, EPDM is a great collaboration tool for small to large design teams.
Another PDM system worth mentioning is Workgroup PDM or PDMW. PDMW is included with SOLIDWORKS Professional or Premium licenses and allows small design teams on the same network to manage data in a centralized vault. PDMW also includes project-based permissions and helps automate design tasks and is a good option for those who may be constrained by budgetary concerns.
Departmental integration
Once a design team or engineering group is working efficiently and collaborating effectively it becomes easier to interface with other departments in your organization. Increased communication between departments is desirable and often leads to reduced time-to-market and better products.
Electrical Engineering
Depending on the type of electrical design work being done at your organization, there are many tools and products available to facilitate collaboration with other engineering groups. For small electrical or circuit design, knowing the capabilities and functions of CircuitWorks, which is integrated with SOLIDWORKS Premium, can be of benefit. For more complex electronics design, including PCB and Schematic capture, GoEngineer offers Altium Designer. These tools represent the next wave in electrical and circuit design and allow for a direct interface with SOLIDWORKS and other 3D design tools.
Manufacturing
For a product to be made correctly, it is essential that manufacturing have the most up-to-date and accurate information possible. Implementing a manufacturing solution available from GoEngineer such as CAMWorks, SOLIDWORKS Inspection, or 3D Printing can give your organization the manufacturing edge it needs.
Marketing
Making a great product isn’t the end of the process in product design. Letting the target market know about your product is essential to success. SOLIDWORKS Composer has been designed to allow your marketing team to leverage the existing CAD data within your organization. Whether producing product brochures, installation manuals, or assembly instructions, Composer has tools that will help streamline the marketing process and reduce the overall time-to-market.
Continuous improvement
Implementing small, incremental improvements over time through an ongoing effort to improve products, services, and processes is what continuous improvement is all about. This guide has been an attempt to help you realize and begin to implement improvements that will result in more efficient and effective design teams.
Because technology is constantly evolving and changing, reviewing this guide and the resources cited here regularly will help you and your organization continue to improve over time.
GoEngineer is committed to helping you achieve success. Please contact us at any time and we will be glad to assist you.
Editor's Note: This article was originally published in May 2016 and has been updated for accuracy and comprehensiveness.
Related Articles
Design Faster and Smarter With SOLIDWORKS 2021
SOLIDWORKS Basics: Crossing the Bridge from 2D to 3D
Ultimate Guide to SOLIDWORKS Licensing: types, Activation and Borrowing
![]()
About GoEngineer
GoEngineer delivers software, technology, and expertise that enable companies to unlock design innovation and deliver better products faster. With more than 40 years of experience and tens of thousands of customers in high tech, medical, machine design, energy and other industries, GoEngineer provides best-in-class design solutions from SOLIDWORKS CAD, Stratasys 3D printing, Creaform & Artec 3D scanning, CAMWorks, PLM, and more
Get our wide array of technical resources delivered right to your inbox.
Unsubscribe at any time.