Removing or Deleting a Local Vault View in SOLIDWORKS PDM
Before removing a local view, make sure that all files are checked in from the local vault view. If users do not check in these files, any work in the local copy will be lost. These files will be shown as checked out in the new local view but the data from the local copy will not exist so it will not be possible to recover those changes.
Fortunately, there is a check performed when deleting the local vault view. It will give a warning that there are checked out files and a prompt to check them into the vault.
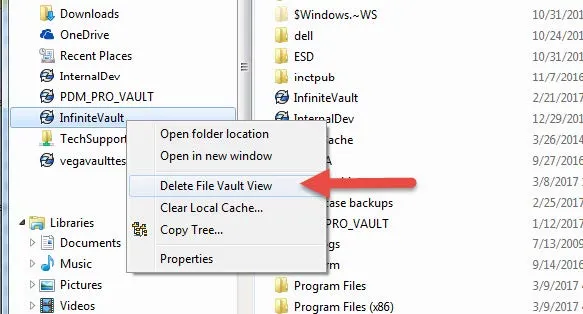
To remove the local vault view normally go to the vault view in your windows explorer folder, Right Click the vault view, and select “Delete File Vault View”.
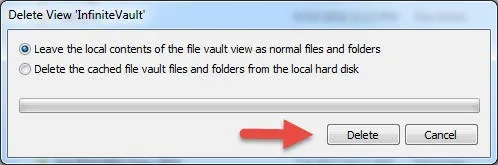
A warning message will appear asking if you want to leave the local contents as normal files or delete anything every file viewed from the local machine.
This should remove the vault view but in case it does not, we can delete it manually as shown in the section below. Once again, if removing the vault manually, make sure all files are checked in before proceeding.
Manually Removing Vault View
To start the process, open the windows registry as an administrator (click the Start button, type “regedit”, right-click “regedit.exe” and select “Run as Administrator”). Here we will delete certain keys. If you are not comfortable doing this, get help from your IT group.
- Delete the following registry key folder for the respective vault view:
HKEY_LOCAL_MACHINE\SOFTWARE\SolidWorks\Applications\PDMWorks Enterprise\Databases\[VAULT_NAME]
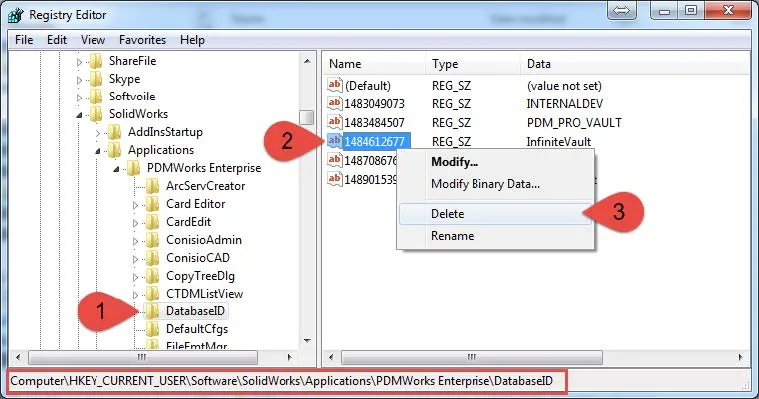
If in doubt, make sure you check the bottom of the registry key (shown in the red rectangle) to make sure you are viewing and deleting the right key at all times. - Delete the folder (for 64-bit machines):
HKEY_LOCAL_MACHINE\SOFTWARE\Wow6432Node\SolidWorks\Applications\PDMWorks Enterprise\Databases\[VAULT_NAME]
- Delete the vault name entry corresponding to the vault view within the folder: HKEY_CURRENT_USER\Software\SolidWorks\Applications\PDMWorks Enterprise\DatabaseID
- Delete the folder:
HKEY_CURRENT_USER\Software\SolidWorks\Applications\PDMWorks Enterprise\ConisioAdmin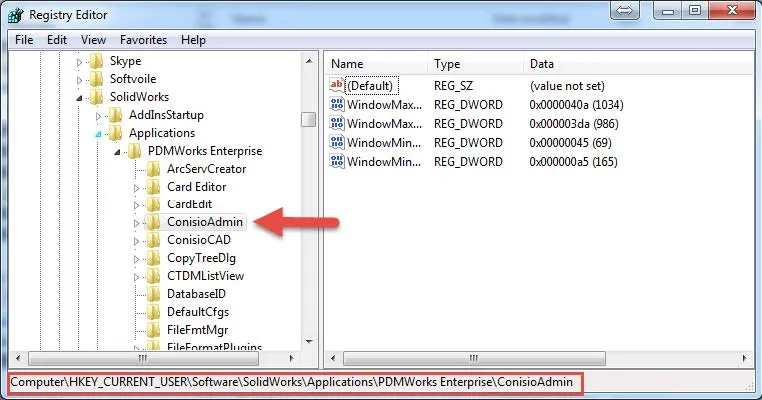
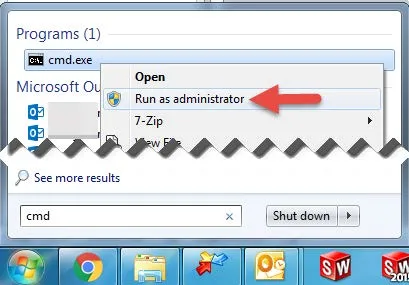
- Now to remove the local view folder, open a command prompt as Administrator (click Start button, type CMD, right-click CMD and select “Run as Administrator”).
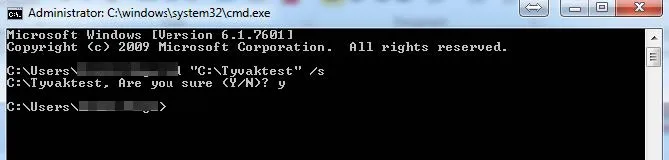
- In the command prompt type: RD “C:\path_to_vault_view” /s and type “y” to accept.
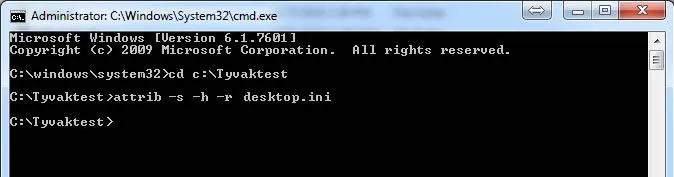
OR - As an alternative you can also remove the attributes from the folder by going into the folder itself (type cd c:\Path_to_vault_view) and changing the desktop.ini file using the command “attrib –s –h –r desktop.ini”
- You can now delete the desktop.ini file (type DEL Desktop.ini)
- Exit the command prompt, close any windows explorer windows and reopen explorer.
- You can now delete the leftover file vault view folder (now a local yellow folder).
I hope you found this SOLIDWORKS PDM tutorial helpful. For more articles just like this be sure to subscribe.

About Erick Vega
Erick has a B.S. in Mechanical Engineering and 6 has years of Microcontroller Automation experience. You can find him venturing out climbing into the Wasatch mountains, tinkering around with salvaged electronics or trying to program a Windows application that probably didn’t need to exist.
Get our wide array of technical resources delivered right to your inbox.
Unsubscribe at any time.