How to Map PDM Variables into Microsoft Excel
One of SOLIDWORKS PDM’s most underused but powerful capabilities is the ability to map PDM variables into non-CAD document types. In this tutorial, we explore how to use the CustomProperty function in Microsoft Excel to map PDM variables into an Excel document. To illustrate this, we will be creating an ECR (Engineering Change Request) template to be used to create new ECR’s through PDM.

In this article, we'll cover:
- How to create variables with custom mappings
- How to create a robust Excel template file
- This file will be used for our ECR documents
- Linking them together to automate the ECR creation process
Required items to use this tutorial:
- SOLIDWORKS PDM Professional
- Experience with PDM templates is a plus
- Microsoft Office Excel
Step 1: Create your Excel Template File
This step is very important because without the template file none of this would work!
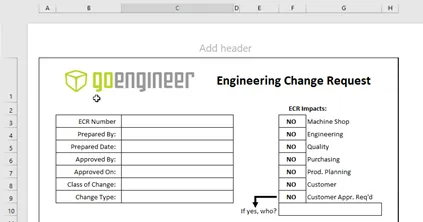
- Create and/or open your Microsoft Excel template. (.xls or .xlsx)
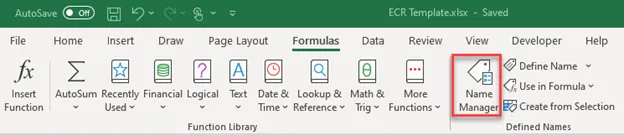
- Navigate to the ribbon, under ‘Formulas’ and open the ‘Name Manager’.
As you can see, I already have several cells named what I will ultimately be tied back to their master PDM variables:
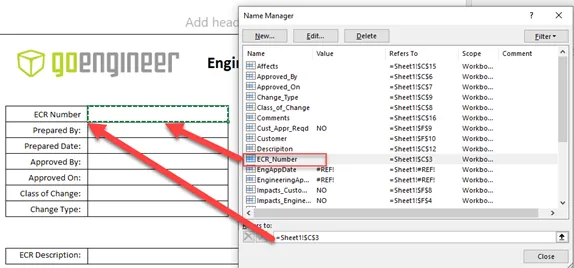
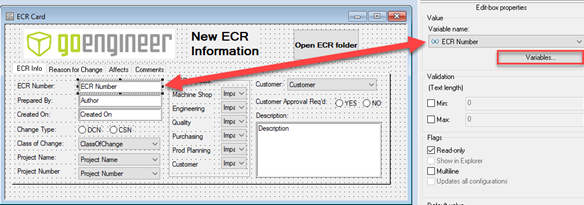
Once in the Name Manager, you can assign a name to a specific cell. In the example above, to the right of my title ‘ECR Number’ where I want the ECR Number to be displayed is where I will assign the name ECR_Number to that cell (cell C3 in this case).
Note: You must use names that do not include spaces. I use the underscore ( _ ) where a space is needed.
To create a new cell name definition, simply click ‘New…’ and create it where it is needed. You need to provide a name and a cell location in the workbook.
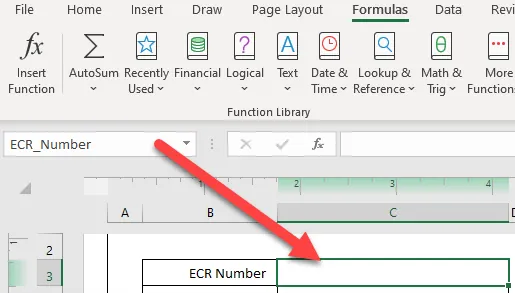
Once your cells are properly named, when you highlight the cell you should see the following in the cell definition block up near the ribbon:
Step 2: Head to your PDM Administration tool to map your variables
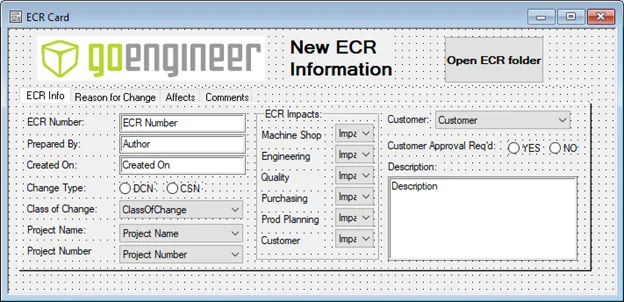
- Open the data card that you intend on using for this template.
- For this example, I created an ECR template card. When I input information into this template data card and create my new ECR file, the data I input on the card will pass to the newly created Excel file*.
*We will still need to update the Excel file to ensure the mapping works correctly.
- For this example, I created an ECR template card. When I input information into this template data card and create my new ECR file, the data I input on the card will pass to the newly created Excel file*.
- Open up the Variable editor to assign the variables that will map to the CustomProperty block in the Excel document.
From the data card, we can select any control and open the variable editor easily.
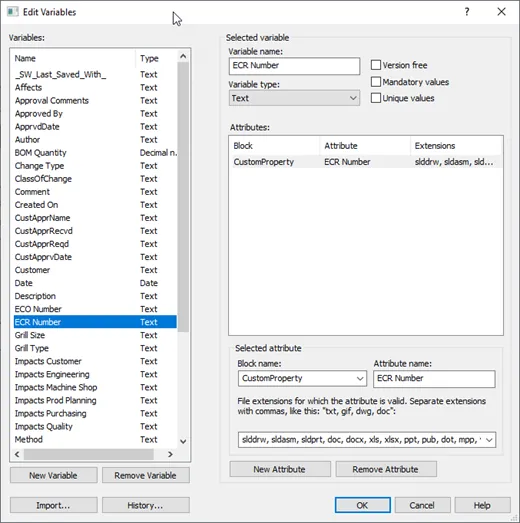
- Assign the variable Attributes mappings to the variable in PDM we want to map to the CustomProperty in the Excel file.
Once you are inside the variable manager you can select the variable you want to map. In this case, our variable ‘ECR Number’ is already selected.
If the are no assigned Attributes for the variable you are mapping, simply click the ‘New Attribute’ button near the bottom right of the variable manager.
Three primary components need to be entered accurately in the variable manager for each variable you intend to map:
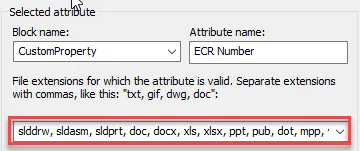
- Block Name: The Block name is the destination located inside the file properties that house the attributes you intend to map. In this case, we are mapping to a Microsoft Excel file. The Block name that SOLIDWORKS PDM can map into is named “CustomProperty”.
- Attribute Name: The Attribute name is what the name of the property in the file we are mapping to inside the CustomProperty block is called. When we created our cell names in the ‘Name Manager’ we were creating a place holder for these attributes in the Excel file.
- Associated File Extensions: The associated file extensions are very important. Here we need to tell SOLIDWORKS PDM which file extensions this variable mapping applies to. Since the ‘CustomProperty’ block is used in Microsoft Office documents and SOLIDWORKS files, we can see the associated file extensions listed out and separated by commas:
Step 3: Go back to the Excel Template File to update the File Properties
Now that we’ve correctly named and assigned our variables in the Name Manager of the Excel template file and mapped the applicable variables from PDM to the Excel CustomProperty block, we can link them in the File Properties of the Template.
- Open the Excel Template file and go to File -> Info -> Properties -> Advanced Properties.

Once the Advanced Properties dialog window is open, click on the Custom tab:
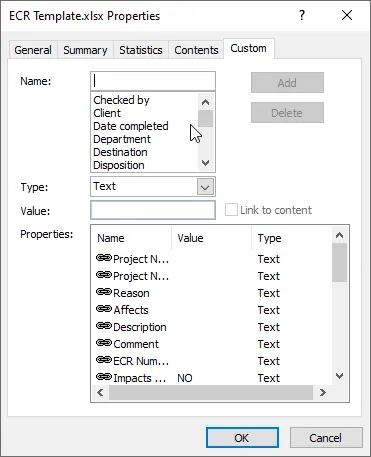
If your template is new, unlike mine, you should see no entries in the Properties section of the Custom tab. Here’s where the rubber meets the road with getting your data from the data card and the file inside of PDM into the Excel file!
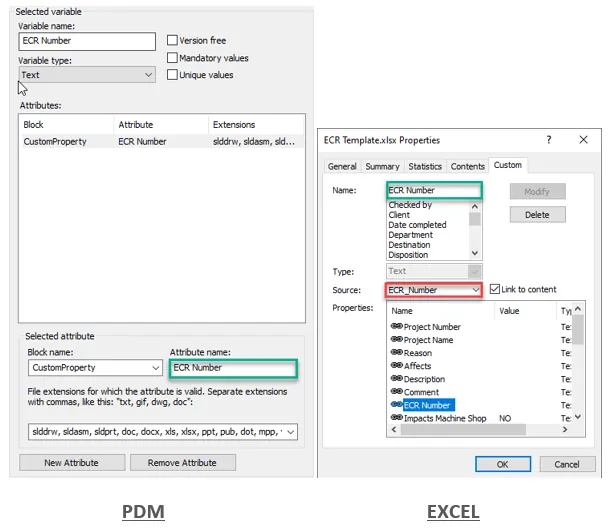
When you create a new link in the Custom Property section of Excel the name of the Property (green box in this case) MUST match the Attribute name in PDM (also green here). Once you’ve typed the name correctly, you must next check the ‘Link to content’ box which will bring up a list of items to choose from in the Source (Red box above) dropdown. If you’ve named your cells correctly in the Name Manager back in step 1 then your list should be populated with all the relevant variables you want to link. In this example, we will select ‘ECR_Number’ from the list and then click ‘Add’ (the Add box will be where the grayed out Modify box currently is in the above screenshot). Manually add all your PDM variable attributes and link them accordingly using the same process.
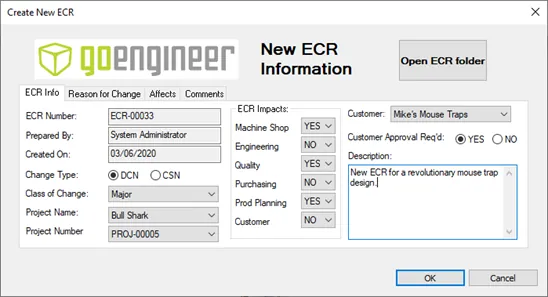
Now that you’ve properly built your Excel template file, assigned the attributes in PDM, and mapped them to your Excel template file, it’s time to test it out! I will use my ECR Data card for this example and show what the process looks like from start to finish.
ECR Data Card: Fill our your template data card with the appropriate information.
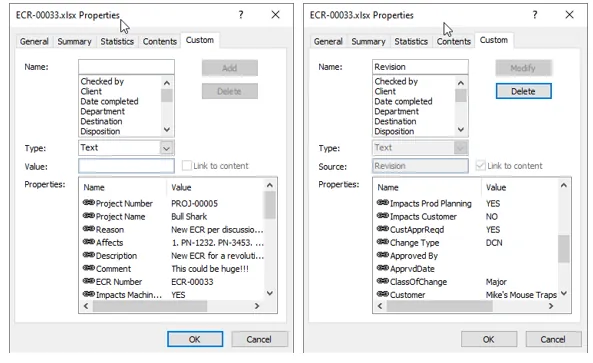
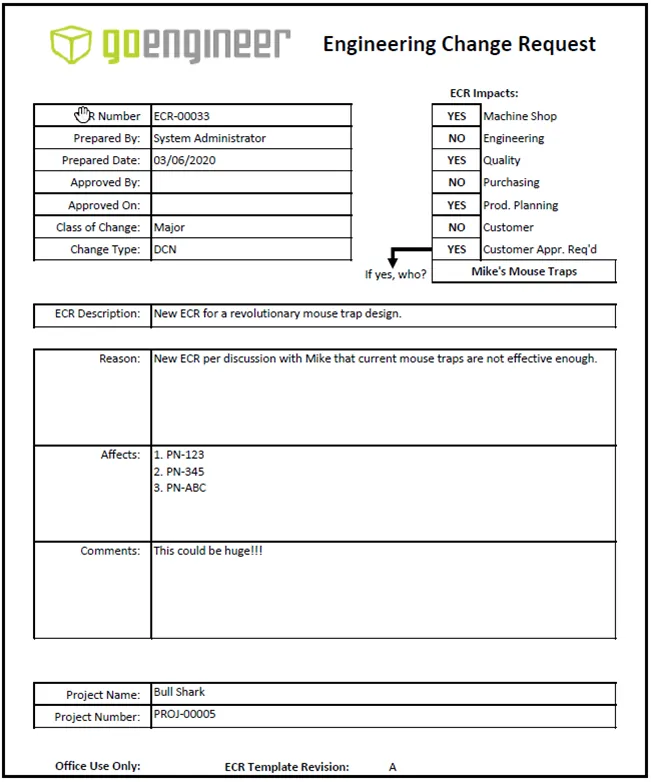
New ECR File Properties inside of Excel: All the mapped data should be present.
PDF of automatically generated ECR File.
A few things to note:
Any variables that you mapped that are tied to your workflow, like Approved By or Approved Date, for example, will also be mapped when the action in the workflow occurs. In my example, I have an ECR approval process in which once the ECR has been approved the Approver and Approval date gets stamped to the data card. Once the data has been written to the data card it will automatically update and map into the Excel file accordingly.
- If some of your variables are not mapping correctly double-check the following:
- The spellings match identically in the PDM Attribute and the Excel property name
- You are using the CustomProperty block for each variable
- You’ve correctly typed in the file extensions in the variable manager
Summary
In conclusion, this guide covers how to correctly configure your Excel file template and map variables from a SOLIDWORKS PDM data card into that template file for new file creation. The result will be time savings and consistency with your documents, like ECOs and other commonly used engineering documents.
It’s also important to know that this is just one example of how to map variables and data from PDM into other file types. While it is widely used for Microsoft Office documents like Excel and Word it is also highly useful for other files like PDFs, Autodesk/AutoCAD files, and many more.
More PDM Turorials
Using Conditional Notifications in SOLIDWORKS PDM

About Steven Humphrey
Steven Humphrey is a PLM/PDM Solutions Architect based out of San Diego, California. He earned his Bachelor’s degree in Mechanical Engineering from the University of South Florida then earned his Master’s degree from the University of California, Los Angeles in Engineering Management. Steven has an extensive engineering background with over 10 years experience in a variety of industries. He joined the GoEngineer family in July 2019.
Get our wide array of technical resources delivered right to your inbox.
Unsubscribe at any time.