Using Cosmetic Threads: SOLIDWORKS Best Practices
If you need to display the threads on a hole in SOLIDWORKS, what is the best way? Cosmetic Threads! Cosmetic Threads is an annotation that allows thread location to be displayed without taxing your graphics card. Rather than render all of the surfaces of the thread profile, a graphical image of the thread is applied instead. In this article, learn where Cosmetic Threads in SOLIDWORKS are located, when and where to use them, and how to display them.
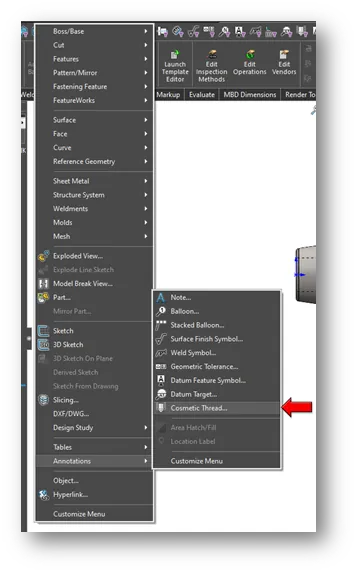
First, let's get to the basics. Cosmetic Threads are located under the Insert command. Insert > Annotation > Cosmetic Threads.
An alternate location for Cosmetic Threads is in the Hole Wizard, which offers a bit more informational control.. This option offers a bit more informational control. The Hole Wizard is a one-step process and is best for when the Hole is created within SOLIDWORKS.
When to use Cosmetic Threads
Cosmetic Threads are typically best used with parts that have been imported or are not native to SOLIDWORKS. This allows you to make a thread call out, which without Cosmetic Threads, may have taken time to incorporate into a part or drawing to show a thread is being used.
Cosmetic Threads are ideal for those who wish to reduce build times. Because Cosmetic Threads are a graphical image rather than a helix, multiple triangles are not created. Displaying these triangles as various geometries in a tight, circular sweep shape can cause server strain on the graphics card, resulting in downtime.
Where to use Cosmetic Threads
If you don't need to model the actual thread, is it best practice to use Cosmetic Threads. In doing so, you can display the thread without the graphics taxing issue. You can have them display in Part, Assembly, or Drawings within SOLIDWORKS. You can also make them show on imported parts as well as within drawings, both native and imported.
Because of the lightweight performance of Cosmetic Threads versus model threads, Cosmetic Threads are often recommended for large assemblies as they will drastically reduce the file size and rebuild time.
Displaying Cosmetic Threads
It is important to note, before getting into the conversation of displaying Cosmetic Threads, there is a setting that must be checked to ensure the Cosmetic Threads will display as they should.
If the Cosmetic Thread annotation in the components feature tree is set to Hidden, the Cosmetic Thread will not display, regardless of what setting you attempt, it will remain hidden.
This is important because the following options will depend on that setting being set to visible in order to display the Cosmetic Threads.
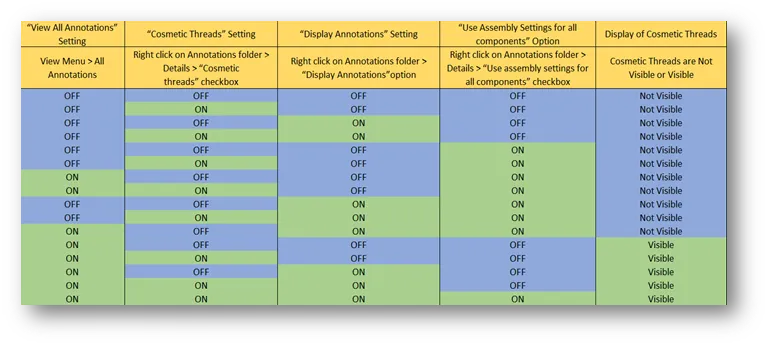
Below are the four settings to display Cosmetic Threads:
- View All Annotations
- Cosmetic Threads
- Display Annotations
- User Assembly Settings for all Components
To help gain a general idea of what the different options and settings handle, see the chart below.
So, when possible, please take advantage of the Cosmetic Threads in SOLIDWORKS to improve the clarity of your designs without using up unneeded PC resources.
Want to Learn More?
SOLIDWORKS Cosmetic Thread Upgrades
SOLIDWORKS Cosmetic Thread View Options
To Thread or Not to Thread? Hyper Threading and SOLIDWORKS Performance
![]() How to Use the SOLIDWORKS Thread Feature Part 1
How to Use the SOLIDWORKS Thread Feature Part 1

About Krystal Petersen
Krystal Petersen is a SOLIDWORKS Technical Support Engineer based out of Auburn Hills, Michigan. Krystal studied Product Engineering at Oakland Community College and has earned her CSWA and CSWP Certifications. She joined the VAR channel in 2015 with DASI (now GoEngineer). Krystal is a huge fan of Star Wars and likes to spend her off time fishing and camping.
Get our wide array of technical resources delivered right to your inbox.
Unsubscribe at any time.