SOLIDWORKS Decals from Scratch
Nearly every commercial product has some sort of product marking. It could be a rating plate, the brand name or logo, or instructions to assemble the batteries. Product marking can be an adhesive label applied to the product, or, artwork that is pad printed. In SOLIDWORKS, we represent the product markings with Decals.
SOLIDWORKS, out of the box, includes a few decals found in the Task Pane > Decals folder.
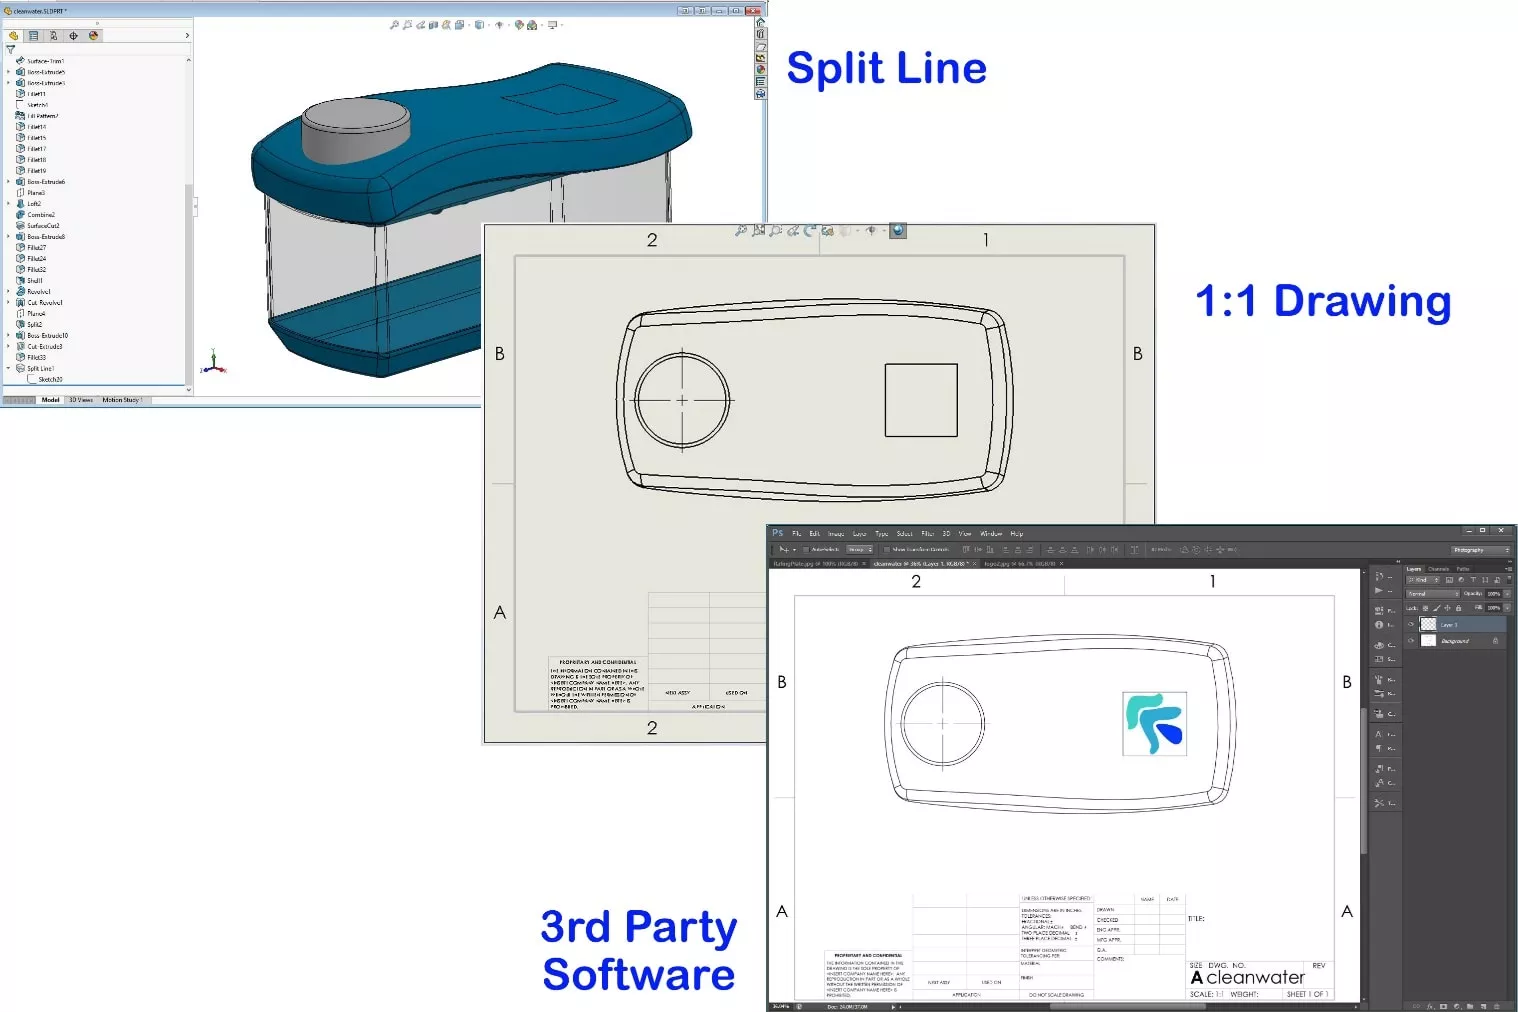
But what if you have to create a SOLIDWORKS decal from scratch? Perhaps you have an existing image to apply to your model or need to create artwork in a 3rd party software.
Typically, for custom decals, an individual face on the part is created to place the decal. This decal face can be created using a Split Line. A 1:1 drawing of the part is created and imported via .dxf, .pdf, or .jpg into a 3rd party software to develop the artwork. This ensures the decal is accurately sized and proportioned. Plus, you can dimension the Split Line so manufacturing knows exactly where to place or print the artwork.
Having said that… this step is not absolutely necessary, as you can scale and position decals in SOLIDWORKS.
Creating Artwork
When creating the artwork, for best results,
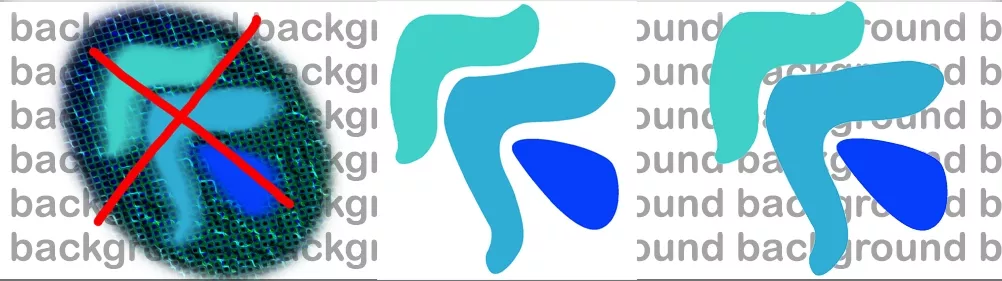
- The edges of the artwork should be crisp; no soft blended edges.
- Use a solid background for easy background removal.
- The best option is to have a transparent background and save it as a .png or .tif file format.
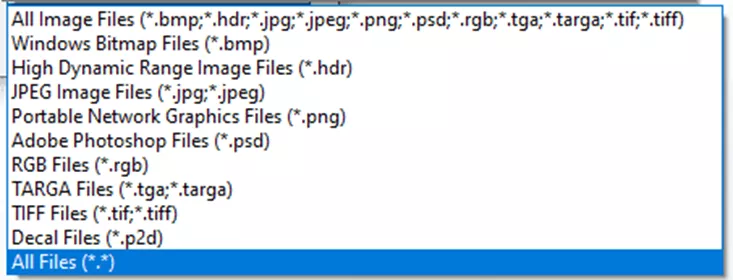
Save the artwork to one of the supported file formats for decals.
Creating SOLIDWORKS Decals
In SOLIDWORKS, you can create a decal from the artwork. Decals are created in the DisplayManager > Decals. Right-click in the DisplayManager and Add Decal.
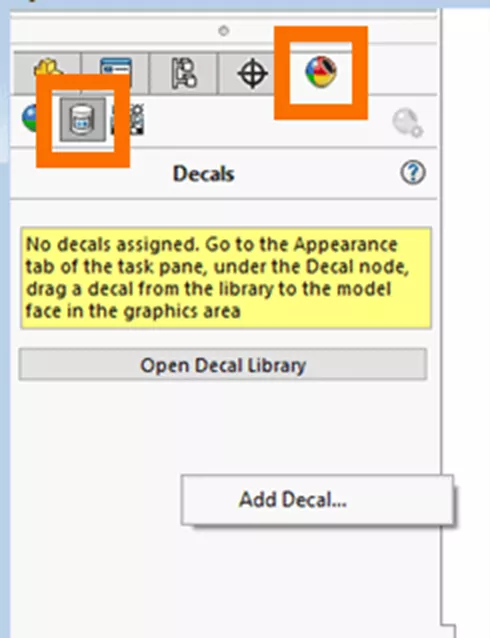
The Decals PropertyManager opens with three tabs: Image, Mapping, and Illumination.
The Illumination Tab sets the lighting properties of the decal. Some settings require a light to be enabled in PhotoView 360 (SOLIDWORKS Pro/Premium required).
- Suggested Article >> PhotoView 650 for SOLIDWORKS Retirement: What to Know
This example will concentrate on the Image and Mapping tabs and allow the default for illumination.
Image Tab
Browse and select the image for the decal. It shows in the Decal Preview window.
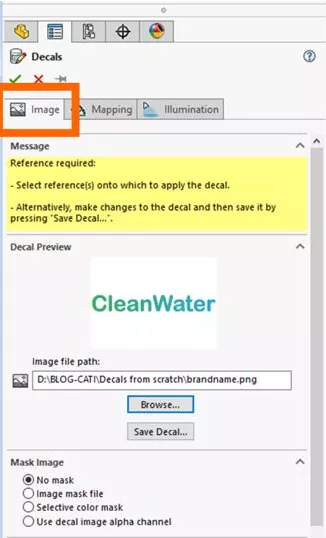
Mask Image Options:
- No Mask - Uses the image as is.
- Image mask file - Requires a second black and white image to denote which areas of the decal are transparent or not. The Image Mask is superimposed over the decal image. The white areas in the Image Mask file remain, the black areas become transparent.
- Selective color mask - Select the eyedropper and pick a color from the image shown in the Decal Preview. Colors that exactly match the selected RGB values will be removed/transparent. If your background image has 10 color, then all 10 of those colors must be selected to create the mask.
- Use decal image alpha channel - If the decal image is a .tif or .png file with no background, SOLIDWORKS recognizes the transparent background as the alpha channel.
Mapping Tab
The Mapping tab controls the size, location, and orientation of the decal.
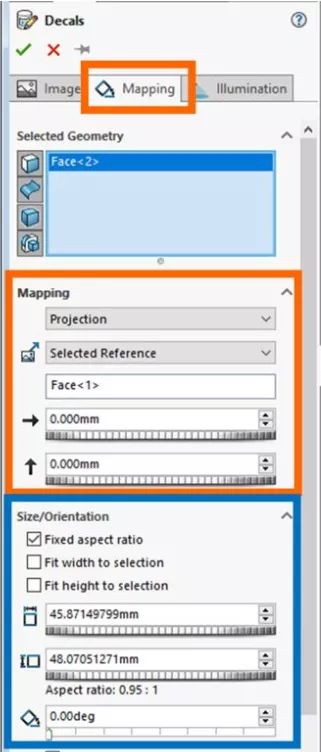
Mapping Type:
- Label - Maps the decal onto a single or multiple continuous planar or non-planar faces. Label is akin to applying a sticker onto a physical part - no stretching or shrinking.
- Projection - Projects the image from a specified plane onto the selected reference geometry.
- Spherical - Maps all points onto a spherical face.
- Cylindrical - Maps all points onto a cylindrical face.
There are specific options per Mapping Type to locate the decal.
The Size/Orientation options numerically control the size and orientation of the decal.
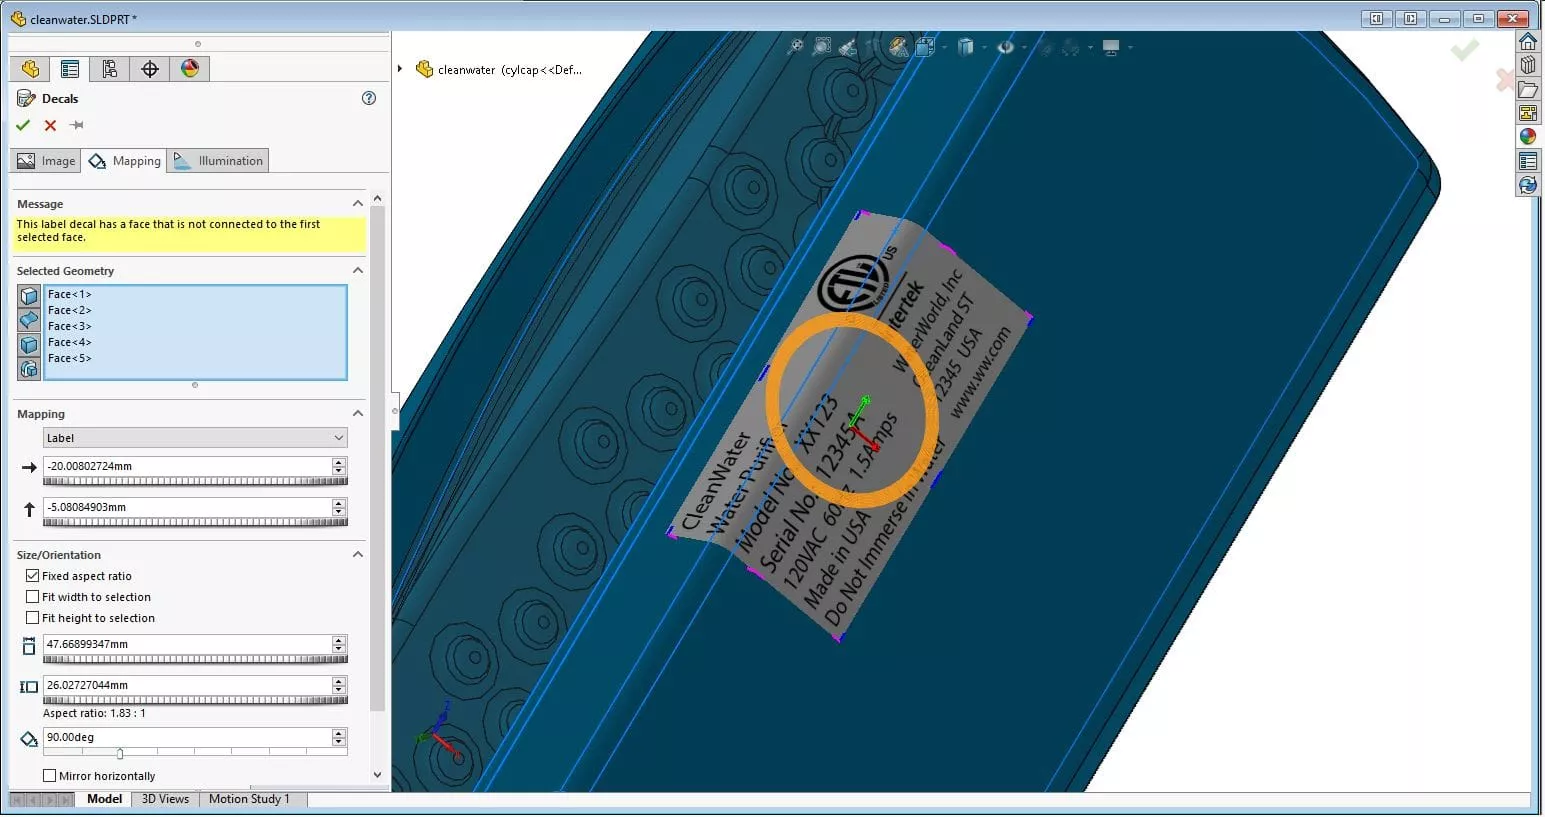
Applying Decals to Models
This Rating Plate will be added to the bottom face of the housing.
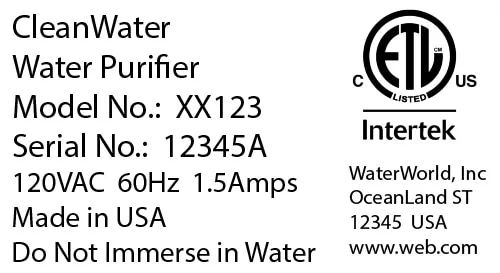
For the Mask Image options, select No Mask and use the image as is, black text on a white background.
The bottom face will be selected as the Selected Geometry to apply the decal.
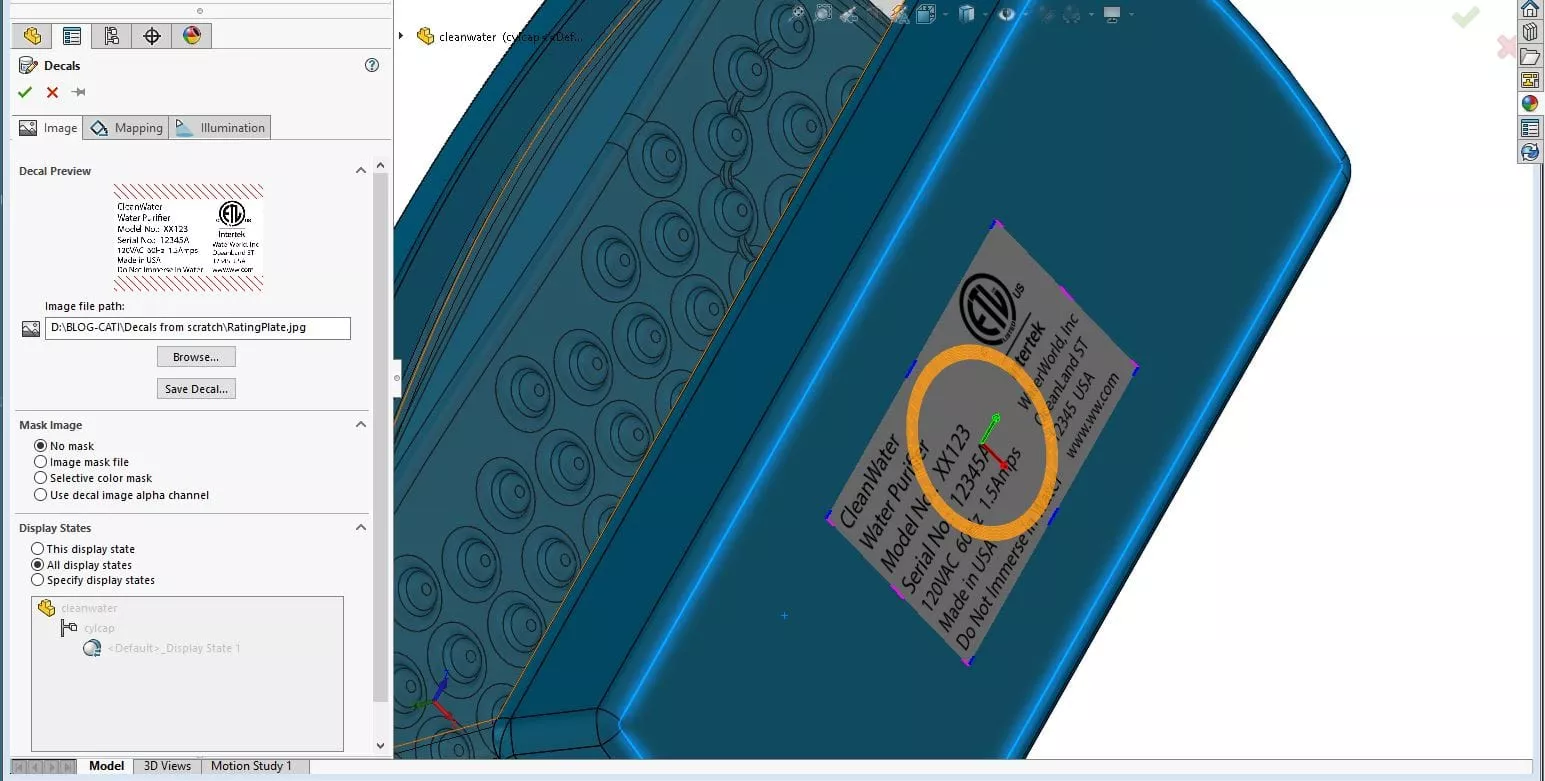
You can adjust the location, orientation, and scale of the decal from the Mapping tab and in the graphics area.
Notice the pink and blue outlines around the decal and the orange ring on the decal.
Click inside the outlines to pick up the decal and move it; click on the orange ring to spin the decal; and click on the corners of the outlines to scale the decal.
Notice the Mapping tab has many options to numerically adjust the decal as well.
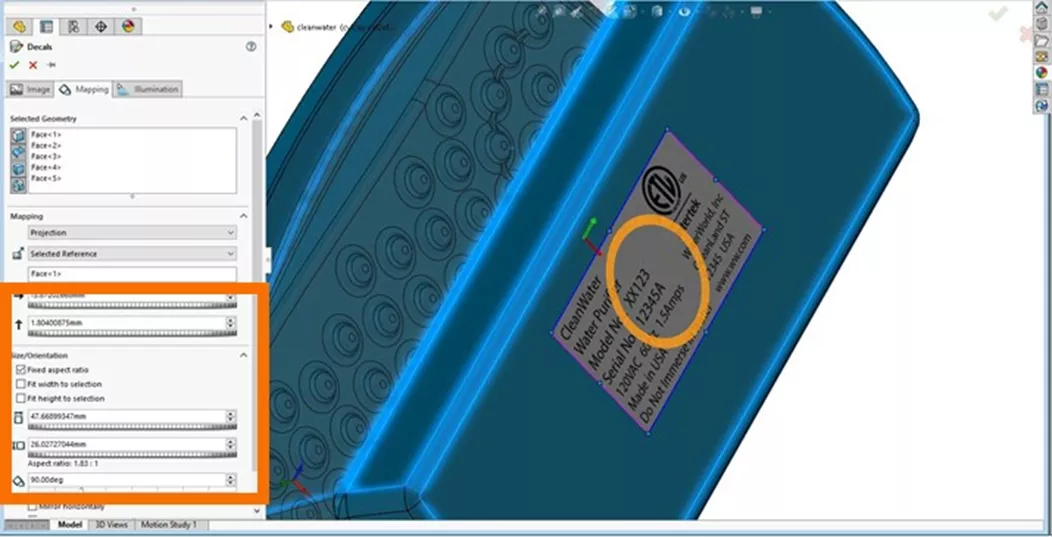
You can select and apply the decal across multiple faces. The Projection Mapping mode allows the decal to stretch when it spans across the side faces.
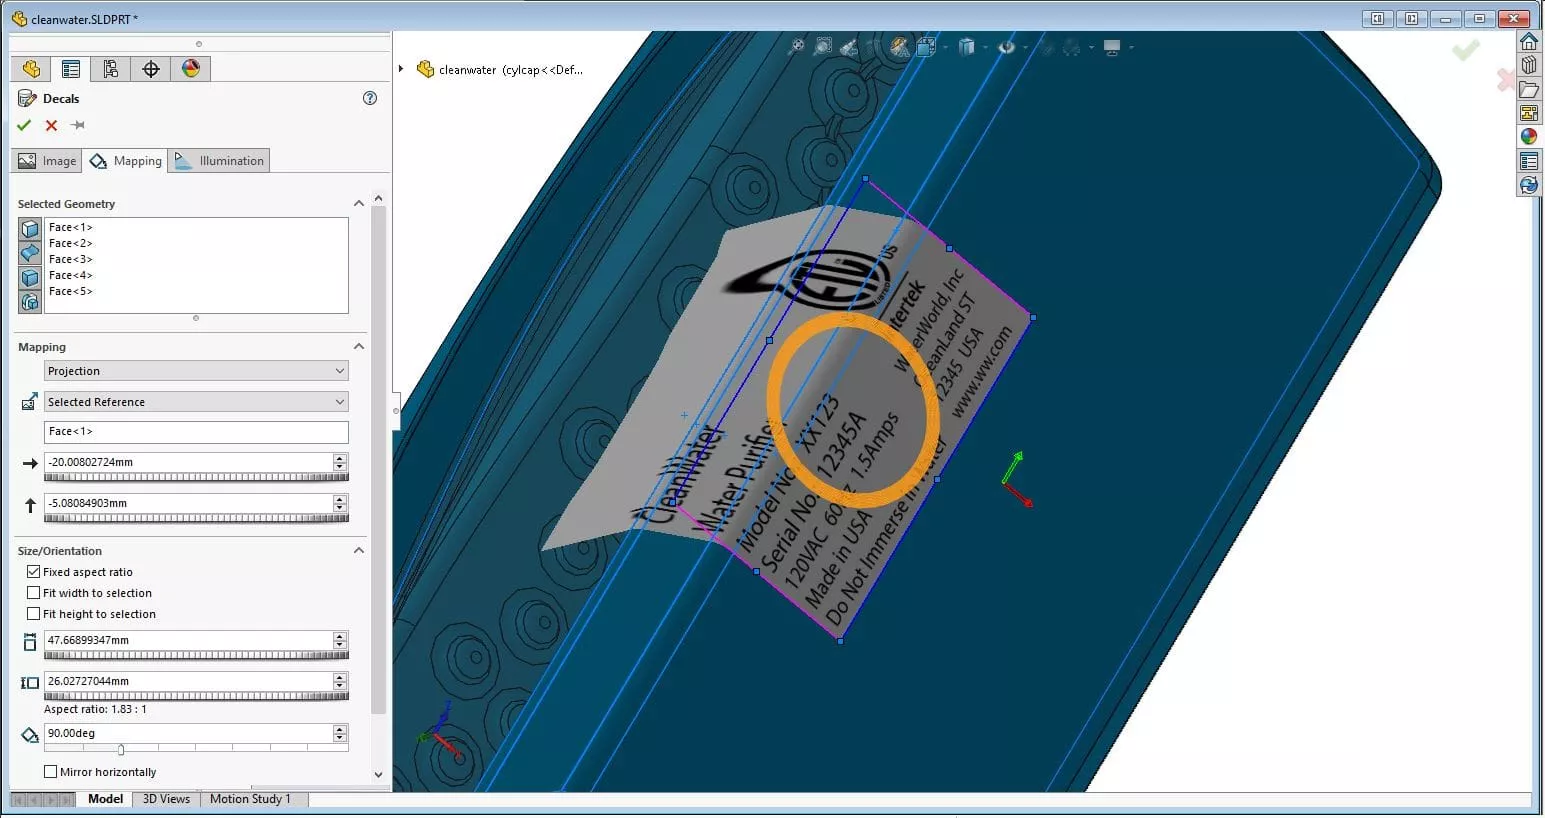
The Label Mapping mode applies the decal as if it were a sticker that bends without stretching or shrinking. For best Label results, the edge between faces should be a linear edge.
In this case, the decal is moved back to the center of the lower face, and the green check applies the decal.
This Brand Name Will Be Added to the Cap.

This image below is a .png file, and the background is transparent. For the Mask Image options, we’ll select Use decal image alpha channel. SOLIDWORKS recognizes the transparent background as the alpha channel.
The cylindrical face of the cap will be selected to apply the decal.
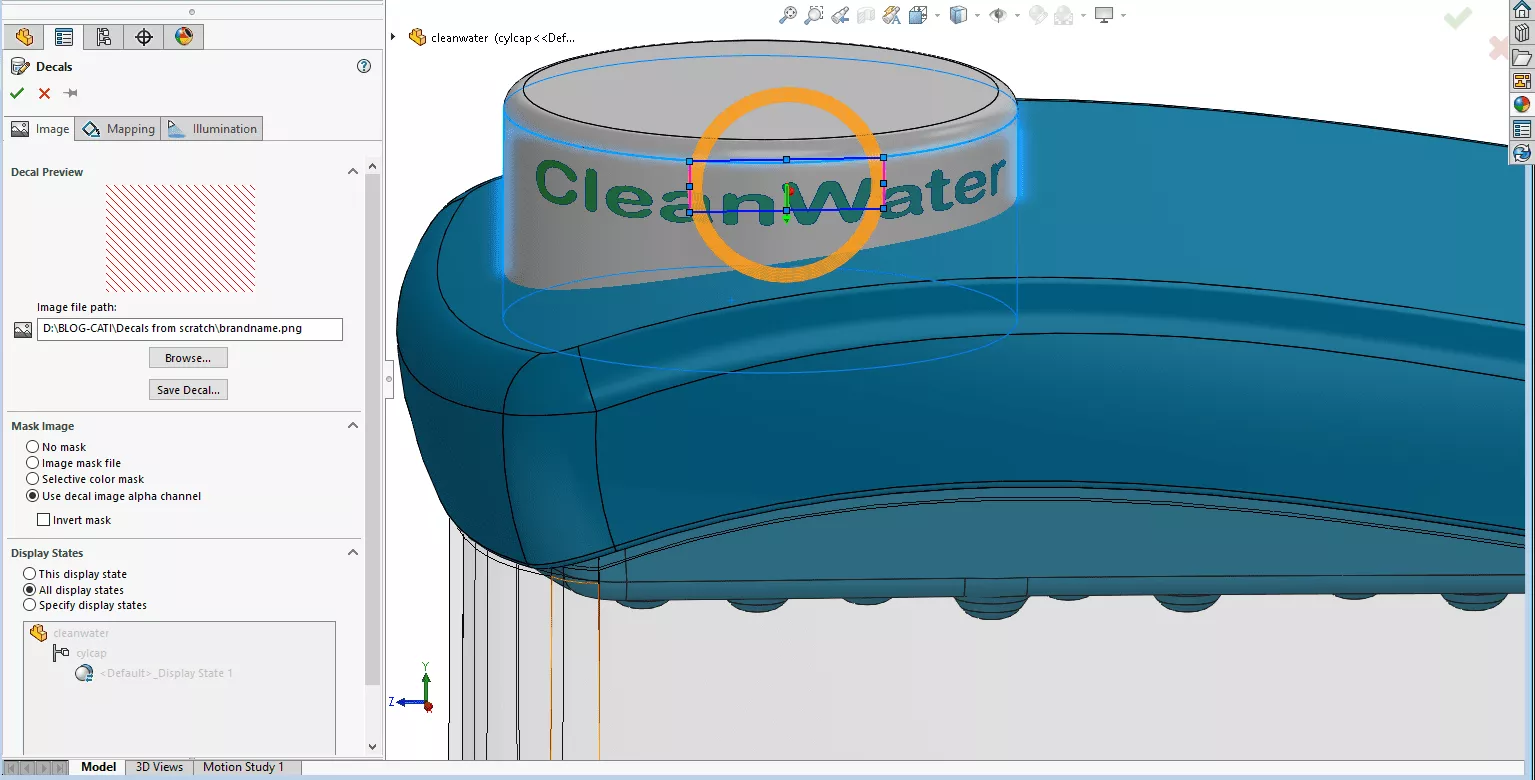
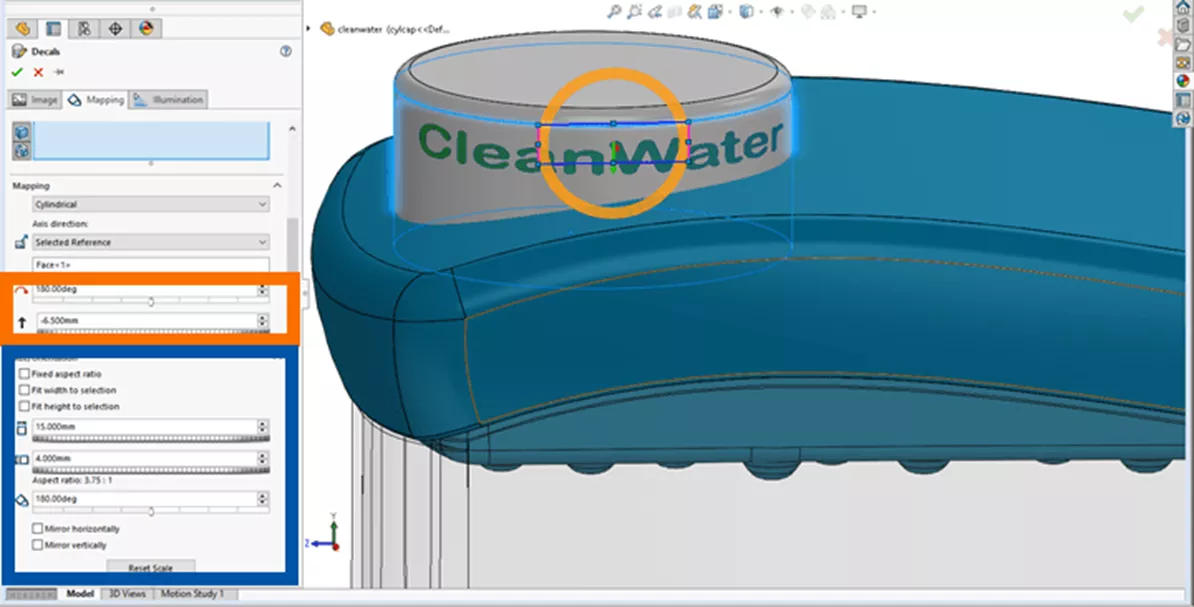
The Mapping tab shows SOLIDWORKS identified the cylindrical face and automatically used the Cylindrical mapping mode. (SOLIDWORKS will also recognize a spherical face and set the Spherical mapping mode.)
There are similar options to move, spin, and scale the decal from the graphics area and in the PropertyManager, along with options to locate the decal: rotate about the cylindrical axis and move along the cylindrical axis.
Green check applies the decal.
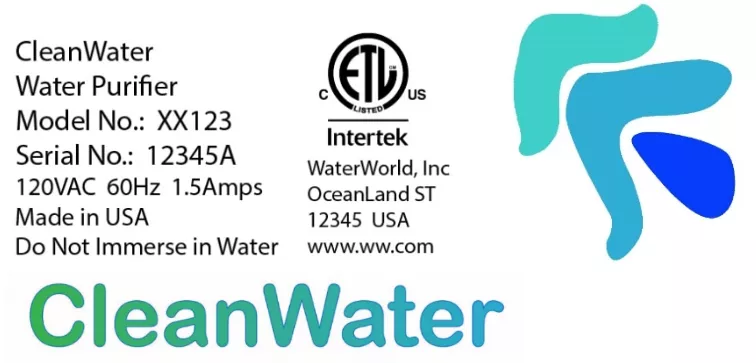
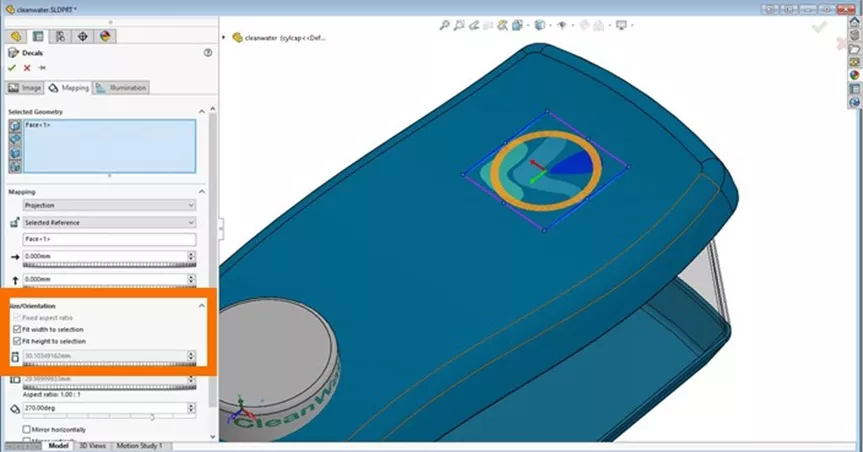
This Logo Will Be Added to the Top Face.
![]()
This image is a .jpg file with a white background. For the Mask Image options, we’ll use the Selective color mask option to remove the background.
Select the eyedropper and pick the white background color from the image shown in Decal Preview. Multiple colors can be selected to be removed and are listed in the grid. A color can be restored by selecting the color in the grid and clicking the Remove Color button.
For the logo, the decal face created with the Split Line will be selected to apply the decal.
![]()
The white background is not completely removed, so let’s try another approach.
For the Mask Image options, use Image mask file. The Image Mask is superimposed onto the artwork. The black color of the Image Mask will denote which areas of the artwork are transparent. The white color of the Image Mask remains.

(See below for instructions on how to create an Image Mask.)
Browse to find the black and white Image Mask for the Mask file path.
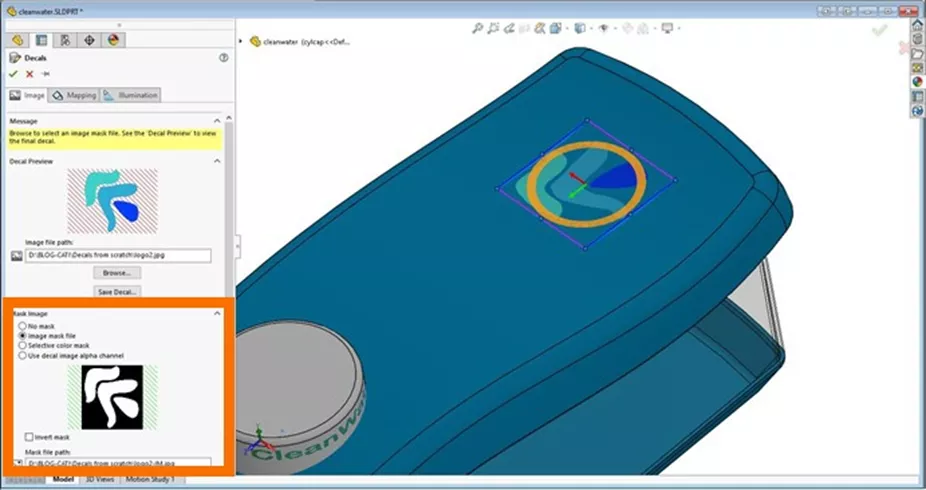
In the Mapping tab, use the options Fit width to selection and Fit height to selection to scale the artwork to the width and height of the selected decal face.
Green check applies the decal.
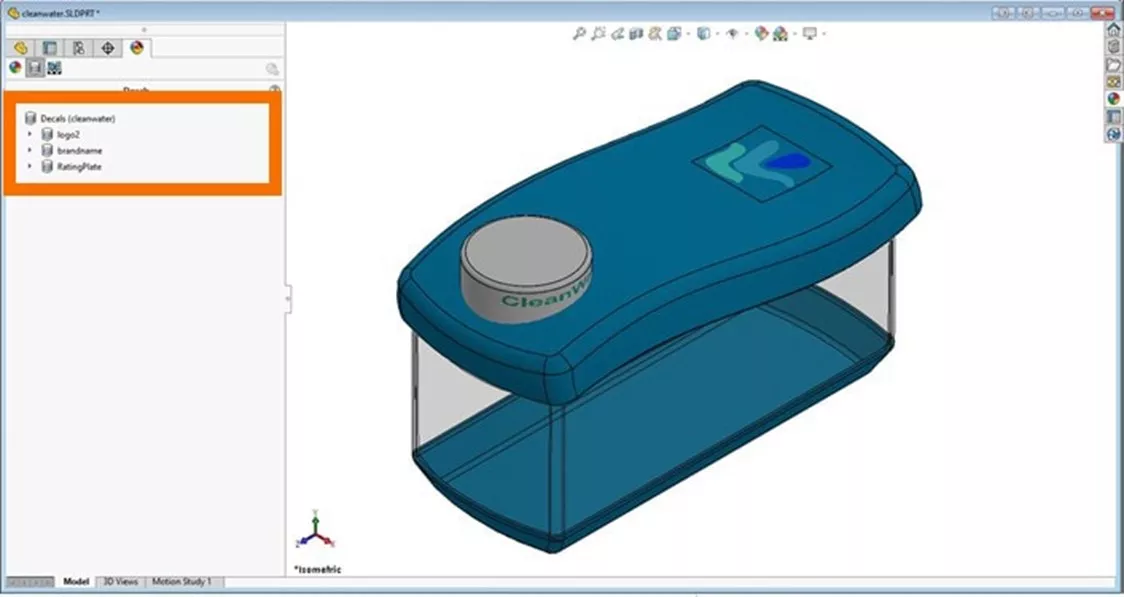
The Three Decals Have Been Added.
Additional Information:
- To edit a decal, in the DisplayManager > Decal, expand the Decals folder, right-click on a decal, and select Edit decal. This brings you back into the PropertyManager for any adjustments.
- Decals are only visible in Shaded and Shaded with Edges display styles. This is true for drawings as well.
- Saving a decal will make the decal available from the Task Pane > Decals folder.
- To create an Image Mask, here are two potential methods:
- In Paint, open the decal artwork having a white background. File > Save As, and save the file to a Monochrome Bitmap image. There will be a warning about decreased image quality, click yes.
- In Photos, open the decal artwork. Use the dropdown next to Edit & Create and select Edit. Select the Adjustments button at the top. On the right, drag the Color Slider to the left to 0. If needed, drag the Light Slider to the left to 0. Save a copy and provide a new name for the jpg image.
Both of these methods create a black (dark gray) and white image but in reverse. The black is the area of the artwork, the white is the background. In SOLIDWORKS, when selecting the Mask path file, click the checkbox Invert mask to reverse the colors in the Image Mask.
Creating custom decals in SOLIDWORKS from scratch is very straightforward and easy. Starting with high-quality artwork with crisp edges will yield a perfect SOLIDWORKS decal.
I hope you found this article explaining how to create SOLIDWORKS Decals from scratch helpful. Check out more tips and tricks below. Additionally, join the GoEngineer Community to participate in the conversation, create forum posts, and answer questions from other SOLIDWORKS users.

SOLIDWORKS CAD Cheat Sheet
SHORTCUTS ⋅ MOUSE GESTURES ⋅ HOT KEYS
Our SOLIDWORKS CAD Cheat Sheet, featuring over 90 tips and tricks, will help speed up your process.
More SOLIDWORKS Tutorials
Mastering SOLIDWORKS Model Display Properties
Changing SOLIDWORKS Temporary Graphics Colors
Creating Exploded Views in SOLIDWORKS with Selection Sets
How to Customize the SOLIDWORKS Hatch Pattern File

About Laura Nickerson
Laura Nickerson is a Senior Application Engineer with GoEngineer. She is a Certified SOLIDWORKS Expert with many certifications in SOLIDWORKS and the 3DEXPERIENCE Platform applications. She has 17 years of experience in the consumer appliance industry working as an industrial designer and mechanical designer. Laura is detail-oriented, a problem solver, and is listed as co-inventor in over 40 patents.
Get our wide array of technical resources delivered right to your inbox.
Unsubscribe at any time.