What is CATIA V5 PLM Express and How to Install It
What is CATIA V5 PLM Express?
One of the great features of CATIA V5 is that it has a wide variety of functionalities. Unfortunately, navigating through all of them to find which ones are going to be beneficial to your business can be a bit challenging, and individually hand-picking which options to use could end up being expensive. This is where CATIA V5 PLM Express comes into play.
CATIA V5 PLM Express provides numerous bundled solutions or configurations based on overall functionality. This allows customers to buy pre-made packages geared toward their company’s needs. Often, these configuration packages result in more functionality at an overall lower cost.
Some of these configuration packages include Mechanical Design, Complex Surface Design, Sheet Metal Design, as well as many others. If your company needs multiple configurations, CATIA V5 PLM Express allows you to bundle different configurations together, allowing for even more versatility and customization. There is even a starting configuration, CAT3DX, that provides the base functionality of CATIA V5 as well as an entry-level for the 3DEXPERIENCE Platform.
Listed are some of the more common configuration bundles and their general application:
- CAT3DX + MCE – Advanced Mechanical Design
- CAT3DX + MCE + HDX – Complex Surface Design
- CAT3DX + FPE – Sheet Metal Design
- CAT3DX + TRE – Review 3D tolerances & annotations
- CAT3DX + GAE – FEA Analysis
- CAT3DX + MME – Design + Multi-Axis Machining
- CAT + MCE + CPX – Composite Design
How to Determine if you Should Install CATIA V5 PLM Express, P2, or Both
Before installing CATIA, check which licenses you plan to use. The license type determines whether to install PLM Express, P2, or both.
CATIA PLM Express uses the base license "CAC", so if you see a license like CAC-MCE_HDX, PLM Express is the platform to install.
CATIA P2 uses base licenses such as HD2, MD2, DP2. In short, any license ending in "2" typically indicates a P2 platform.
In some cases, you will need both PLM Express and P2. This is because some add-ons or shared licenses require P2 to be present, even if you're using CAC (PLM Express). In these cases, install both PLM Express and P2 to ensure full compatibility.
how to install CATIA V5
When installing CATIA V5, there are several crucial steps to ensure a successful installation. Below is a step-by-step guide to getting the software up and running for you. Before doing any of these though, you will need to verify that you have installed the Dassault Systèmes License Server (DSLS).
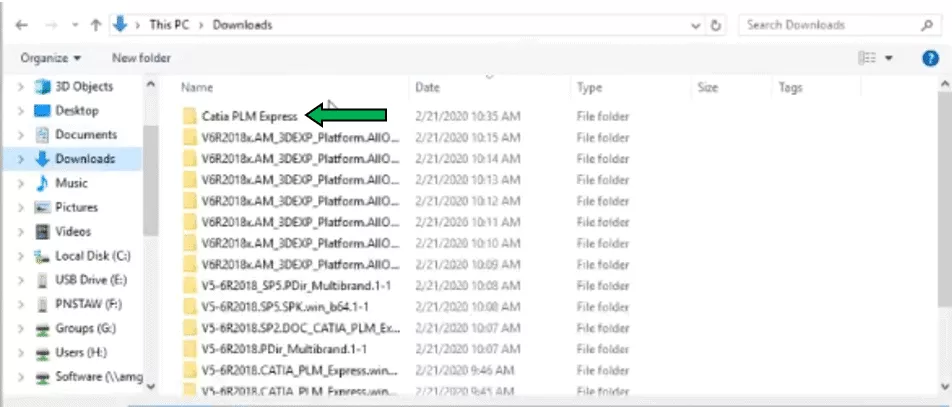
Step 1: Locate your two CATIA PLM Express Edition 3 zip files. For this example, we will be using V5-6R2018.CATIA_PLM_Express.win_b64.1-2 and V5-6R2018.CATIA_PLM_Express.win_b64.2-2 files.
Step 2: Create a folder to extract both CATIA PLM Express Edition 3 zip files into. We will call this folder “CATIA_PLM_Express”. Extract both the V5-6R2018.CATIA_PLM_Express.win_b64.1-2 and V5-6R2018.CATIA_PLM_Express.win_b64.2-2 file into this newly created folder.
- When creating the folder name, you will want to avoid using special characters and spaces. You will also want to make sure that the file path does not exceed 180 characters in length.
Step 3: Open your newly created folder. You will notice that inside it, a new folder, “CATIA_PLM_Express.win_64”, has been created.
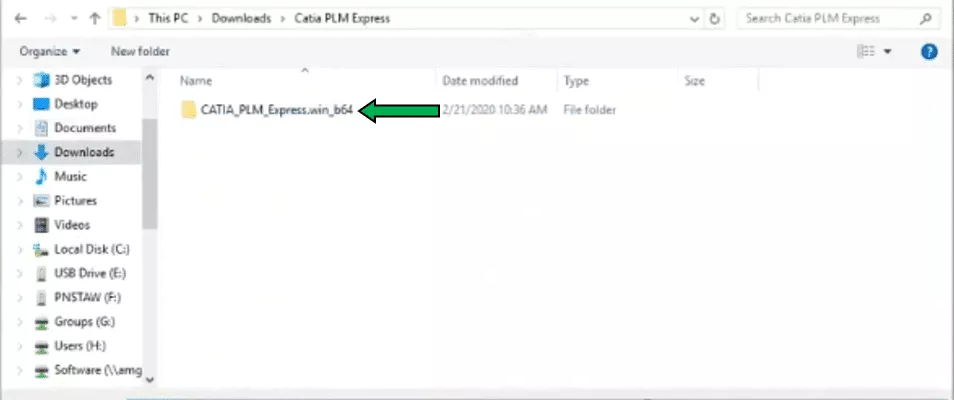
Step 4: Open the “CATIA_PLM_Express.win_64” folder.
Step 5: Next, open the “1” folder.
Step 6: Double-click the setup file to begin installing the software. When installing the software, use the default settings unless otherwise recommended.
Step 7: While the software is installing, go to your Windows Search bar and type in Notepad. You will open the Notepad app to create a new text file.
Step 8: With the Notepad app open, you will type in one of the following text formats:
Device Name:4085
Or
IP Address:4085
The IP Address format is used when the DSLS is put on an external machine. When this is the case, you will need to open the 4085 ports in the firewall to allow proper communication.
For this example, the device name is CIN-TECH-JZ, therefore the text file will read:
CIN-TECH-JZ:4085

Step 9: Click File, Save As, and browse to where you have your CATIA PLM Express Edition 3 software download zip files. Here, you will save this text file as the following:
DSLicSrv
- It is important you save this file exactly how it is spelled out including proper capitalization.
- Do not add “.txt” to the end of the file name.

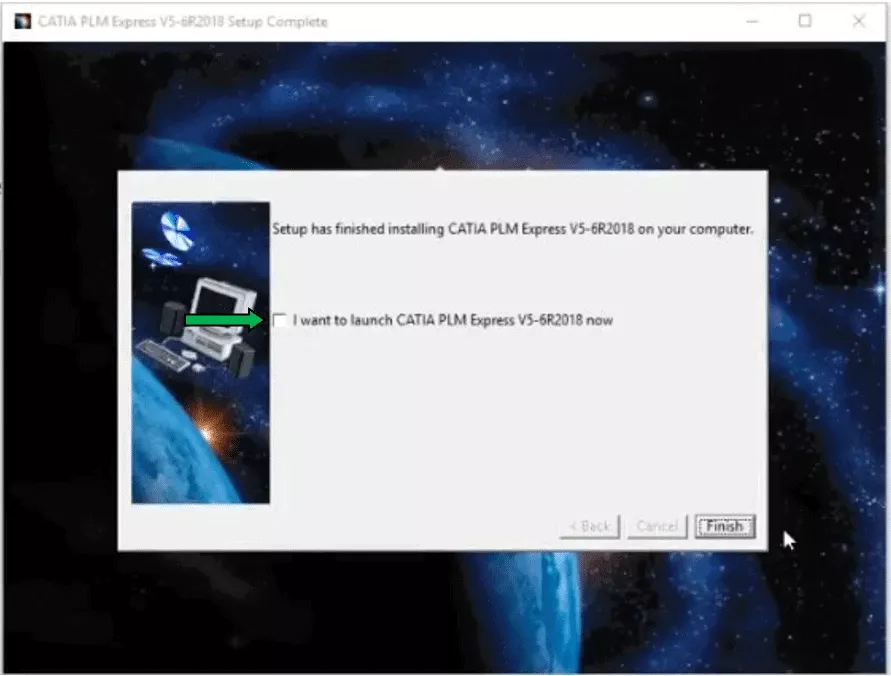
Step 10: Once the software install is finished, uncheck I want to launch CATIA PLM Express V5-6R2018, and click Finish. There are a few more steps before the software is ready.
Step 11: Right-click on your newly created “DSLicSrv.txt” file and Copy it.
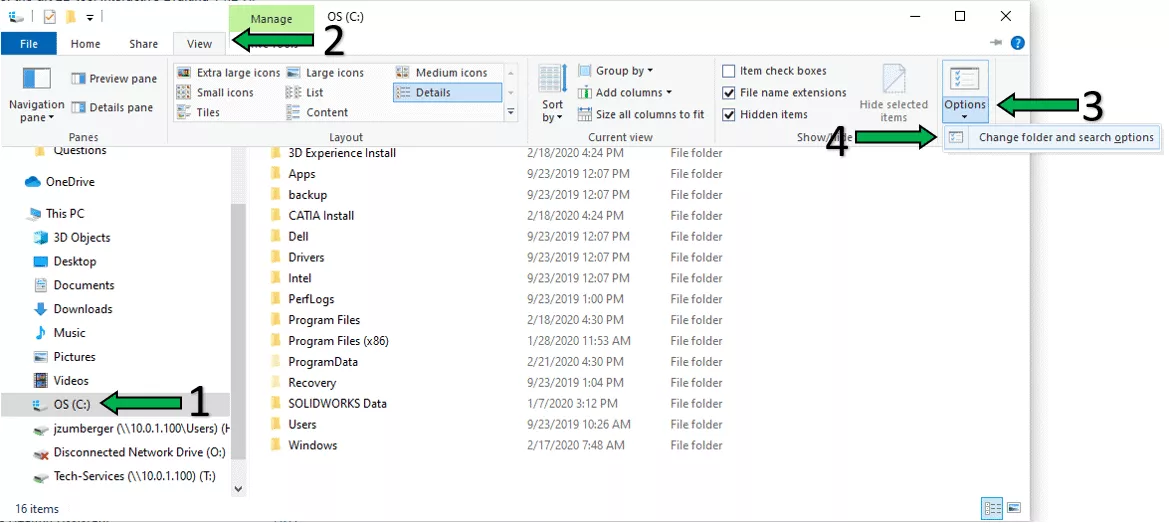
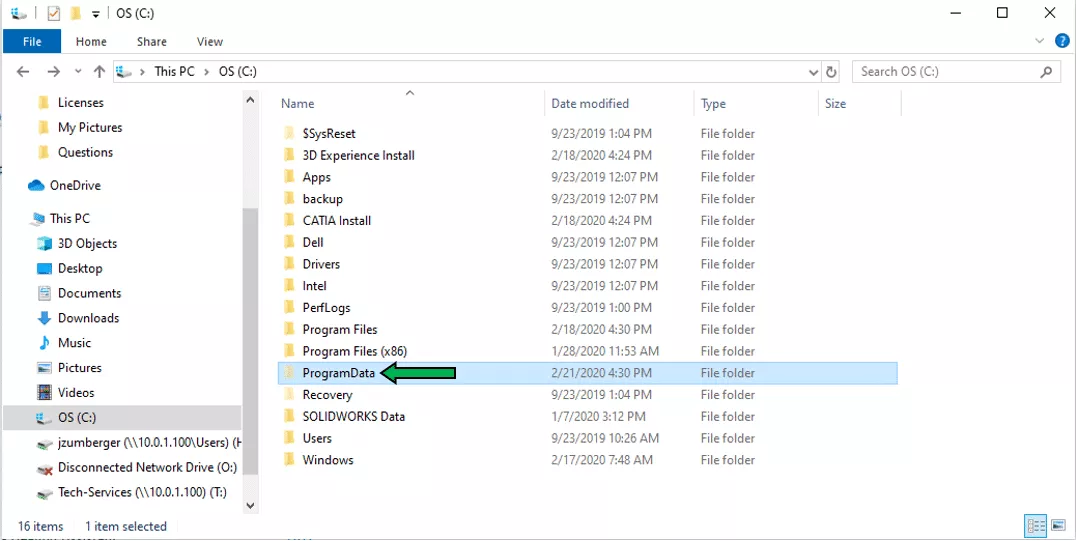
Step 12: Go to your C: drive.
Step 13: At the top of the window, click View. Then go to the right side of the screen and click the down arrow under Options, followed by clicking Change Folder and Search Options.
Step 14: A Folder Options window will open. Select the View tab at the top. Towards the middle of the screen will be a Hidden files and folders icon with two options below it. Select the Show hidden files, folders, and drives option.
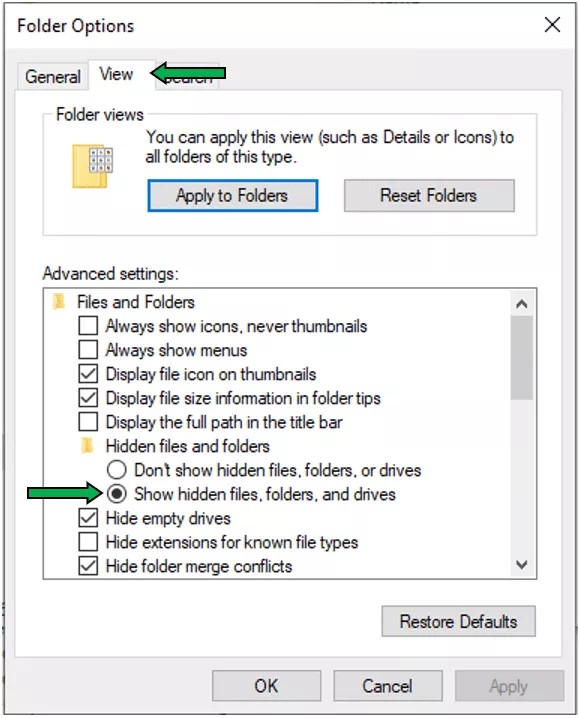
Step 15: Click Apply. Then OK in the Folder Options window.
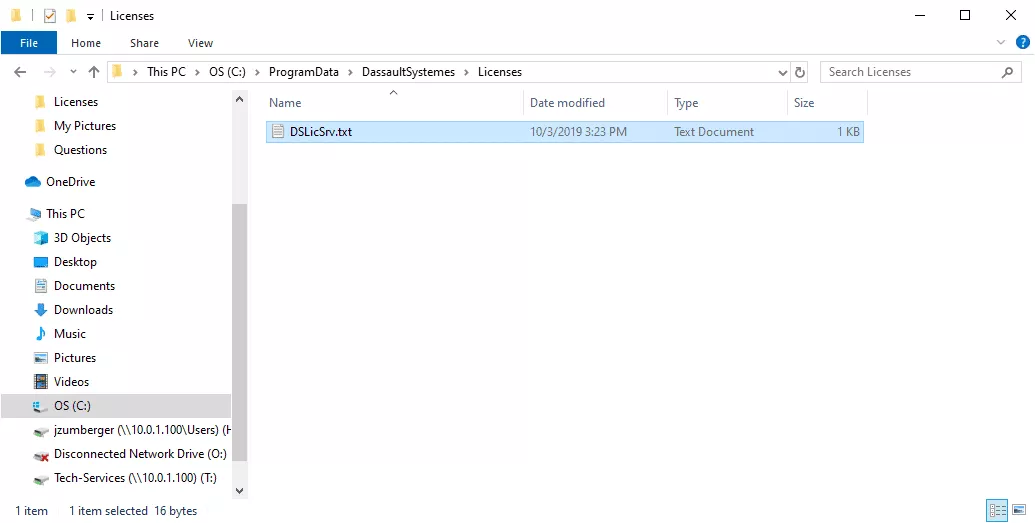
Step 16: In the C: drive, open the newly unhidden Program Data folder.
Step 17: Open the DassaultSystemes folder.
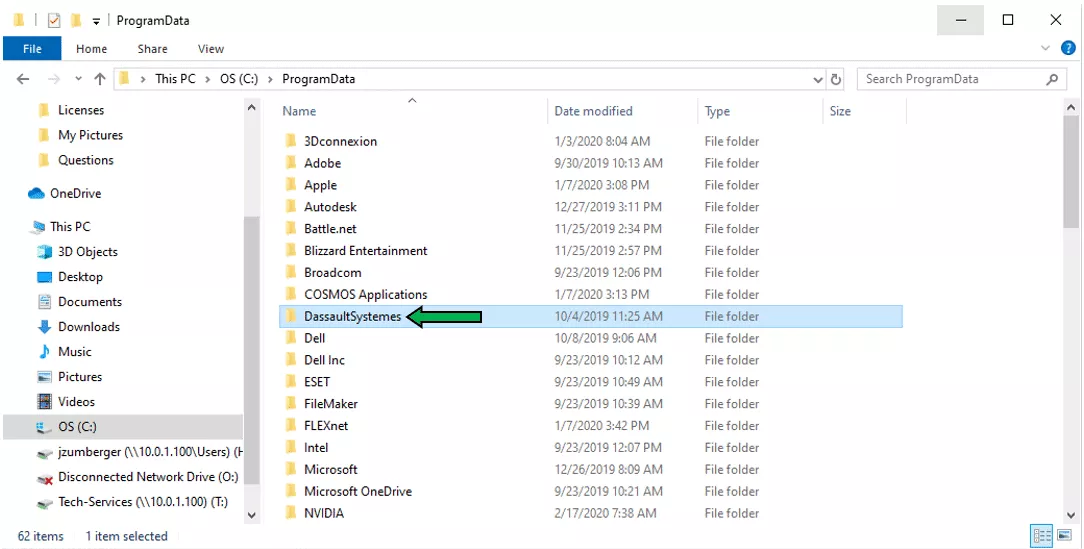
Step 18: In the DassaultSystemes folder, you will create a new folder called Licenses. Ensure that you spell it with a capital L.
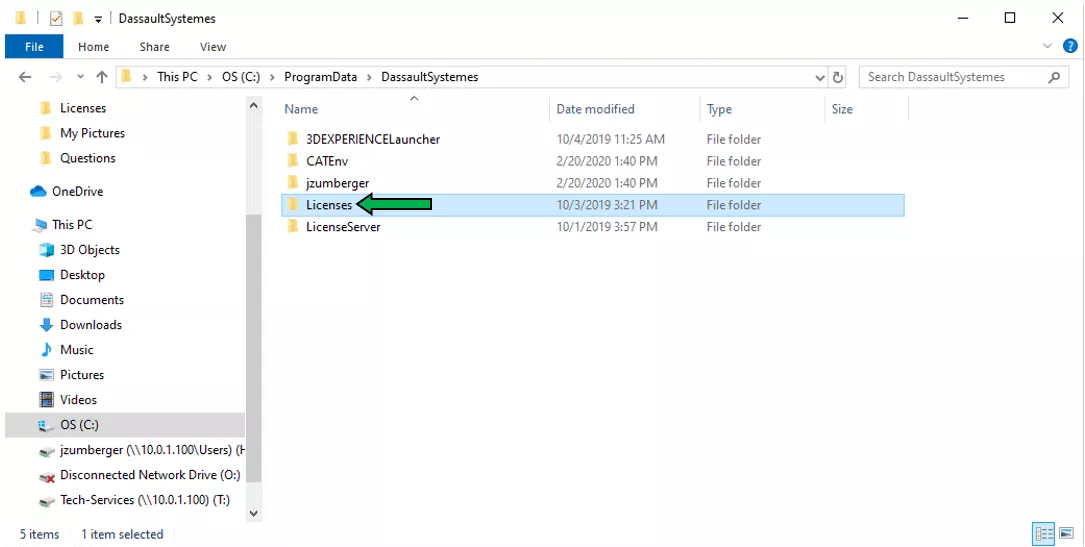
Step 19: Open the Licenses folder and paste the “DSLicSrv.txt” file into it. This step allows this computer to point at the License Server.
Step 20: Open the CATIA software. An error message will pop up. Click OK.
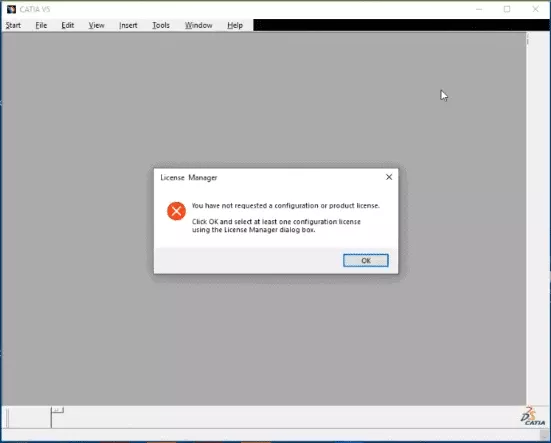
Step 21: The License Manager window will open with a list of Available Configurations or Products. Select all that apply, then click OK.
Step 22: Close out of the software, and re-open it up. Your CATIA software is now ready to use.
I hope you found this tutorial helpful. Learn more about CATIA below.
Related Articles
CATIA V5 Parametric Optimization Guide
Abaqus and CATIA Now Available from GoEngineer: NOT Just for Enterprise!
CATIA V5 vs 3DEXPERIENCE CATIA: Interface, Licensing, Installation, & Setup
![]()
About GoEngineer
GoEngineer delivers software, technology, and expertise that enable companies to unlock design innovation and deliver better products faster. With more than 40 years of experience and tens of thousands of customers in high tech, medical, machine design, energy and other industries, GoEngineer provides best-in-class design solutions from SOLIDWORKS CAD, Stratasys 3D printing, Creaform & Artec 3D scanning, CAMWorks, PLM, and more
Get our wide array of technical resources delivered right to your inbox.
Unsubscribe at any time.