Symmetry with SOLIDWORKS Plastics
If I told you that you could solve an analysis 75% faster, would you be interested? I think so. In several of my previous blogs, I have written about time-saving tools to utilize when working with SOLIDWORKS analysis products. I plan on continuing this practice because knowledge is power! Plus, if you’re able to analyze more iterations of your design, that will lead to better products for you and your customers!
If you are a SOLIDWORKS Simulation user, I’m sure you are already familiar with the concept of symmetry for your analysis work. The benefits of symmetry in Finite Element Analysis are reduced mesh sizes, fewer contact conditions to solve, and faster solution times. Similarly, SOLIDWORKS Plastics projects, when properly set up using symmetry, will have reduced mesh sizes and faster solve times. Symmetry was originally introduced with SOLIDWORKS Plastics 2015. Aside from this blog written by one of my Simulation counterparts, Robert Warren, we haven’t expanded upon this significant enhancement to our SOLIDWORKS Plastics analysis capabilities.
Before you start a SOLIDWORKS Plastics study that will include symmetry, your model file needs to adhere to a few simple rules. The cavity (or cavities) included in the analysis must be symmetric about one or two planes (half-symmetric or quarter-symmetric). Alternately, the cavity could be symmetric about an axis (rotational symmetry). Another rule is that the sprue and injection location must be split by the symmetry condition. Finally, the mesh must be created with solid elements. If these conditions are met, symmetry conditions can be specified when the process to transform the surface mesh into the volume (solid element) mesh begins. Check the box indicating a Symmetrical runner at the top of the Property Manager (Figure 1), then click the ‘Edit’ button.
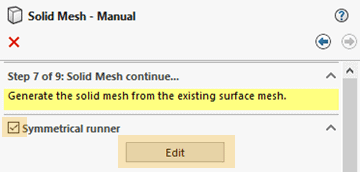
Figure 1
Then choose the appropriate symmetric runner setting based upon how you have prepared your SOLIDWORKS part file (Figure 2). Then continue the mesh transformation of the surface mesh to a solid mesh, and eventually setting up the boundary conditions and choosing a plastic resin for your SOLIDWORKS Plastics study.
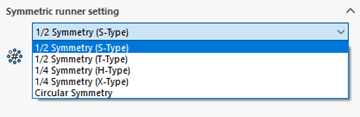
Figure 2
The proof of Symmetry with SOLIDWORKS Plastics is in the results and time savings. I created a model of a four-cavity family mold that I will analyze using three methods – the full 4-cavity family mold, a half-symmetric version filling only two cavities, and a quarter-symmetric version filling only one cavity. The original family mold and runner system are shown in Figure 3. The SOLIDWORKS Plastics study settings for all trials include a mesh size of 1.6 mm with Automatic Refinement active, a Generic ABS material, and a cavity filling time set to 1.8 seconds. I also used the same sized sprue, runners, and gates for all three projects.

Figure 3
While there are many results of a SOLIDWORKS Plastics flow study that can be reviewed, the most important for this comparison is the result Pressure at End of Fill. The four-cavity results indicate a maximum pressure of 42.52 MPa (Figure 4). The total time to solve the flow study for the four-cavity mold was 913 seconds (15 minutes, 13 seconds).
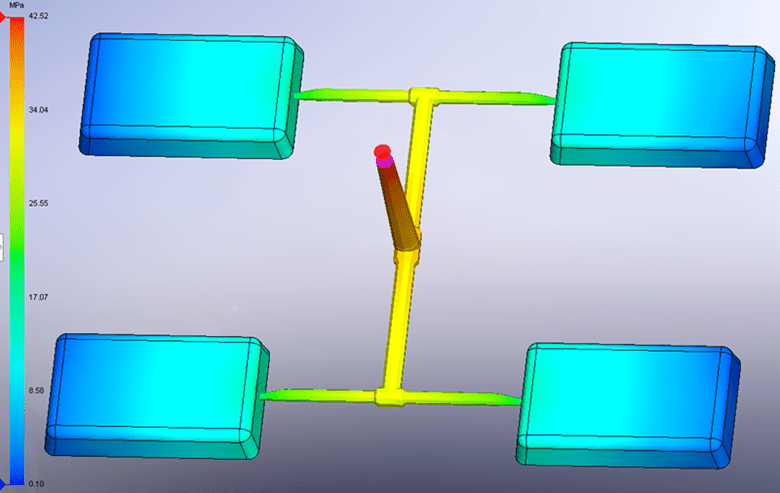
Figure 4
The Pressure at End of Fill result for the half-symmetric model (Figure 5) was 42.14 MPa. The solve time for the half-symmetric model was 447 seconds (7 minutes, 27 seconds).
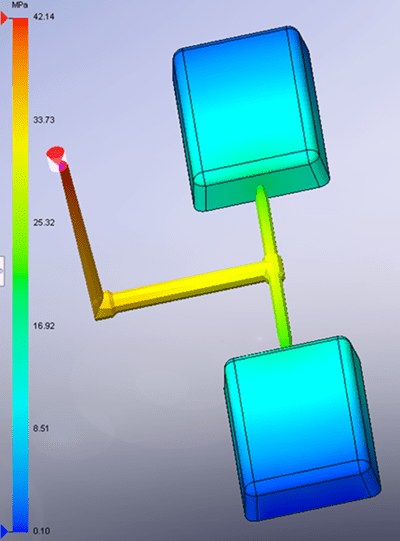
Figure 5
The Pressure at End of Fill result for the quarter-symmetric model (Figure 6) was 41.24 MPa. The solve time for the quarter-symmetric model was 217 seconds (3 minutes, 37 seconds).
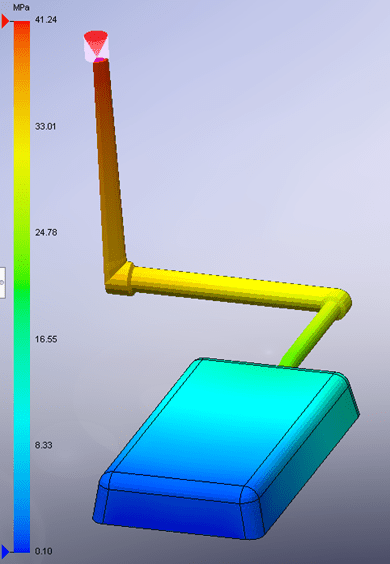
Figure 6
Comparing the Pressure at End of Fill results, the half-symmetric model indicated a pressure 0.9% less than the full four-cavity solution. The quarter-symmetric model indicated a pressure 3.0% less than the four-cavity solution. Personally, I can live with a 3% discrepancy in results. I think one of my next steps is to create a significantly more complex part file and analyze that to further verify pressure results. That reads like a follow-up blog, for certain!
Comparing the solve times for the three versions of my SOLIDWORKS Plastics studies should further bolster my position that you should be using Symmetry in your analysis. The half-symmetric model solved 51% faster than the four-cavity analysis. The quarter-symmetric model solved 76% faster than the four-cavity analysis. Admittedly, for the model I analyzed, this equates to a time savings of roughly twelve minutes. Regardless of model size and complexity, the time savings is, in my opinion, significant.
So, SOLIDWORKS Plastics users, have you used symmetry in your analysis work yet? If so, I am interested to learn about your experiences with this tool. If you haven’t attempted to utilize symmetry with your SOLIDWORKS Plastics work, what is stopping you from trying it? As I originally posed, if I told you there was a way to get your analysis work completed 75% faster you would be interested! Now go make your products better with SOLIDWORKS Simulation!

Bill Reuss
Product Specialist, Simulation
Father, golf junkie, coffee connoisseur, computer nerd
Computer Aided Technology, LLC