Configuring Copy Tree: Making Sense of all the Options
Configuring Copy Tree: Making Sense of all the Options
At first glance, the SOLIDWORKS PDM Copy Tree wizard can be somewhat daunting with all the buttons, check boxes, and drop-down menus. If you are familiar with the SOLIDWORKS Pack and Go, the interface is very similar, with additional options specific to PDM. To access the wizard, highlight a file in the PDM Explorer View, and navigate to Tools>Copy Tree.
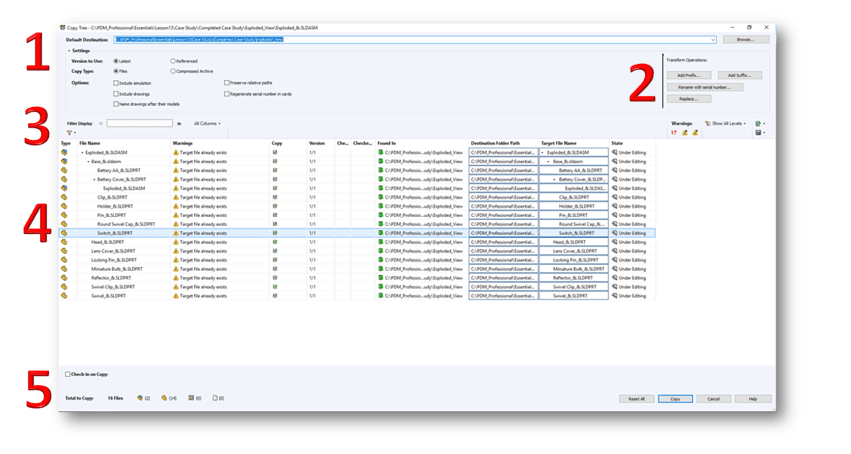
In the upper left corner of the wizard there is an Edit box for your default output destination, as well as a number radio buttons and checkboxes for different settings.
Default Destination: This box allows you to choose where you want all your copied files to go by default. You will have the option to change individual file destinations further down in the wizard. When you first enter the wizard, this box will automatically populate with the current file location. Enter in a new path or use the browse button to the right of the box to change it.
Version to Use: Allows you to choose between copying all child references at their latest version or at the version the file you are copying is currently referencing.
Copy Type: Select “Files” if you want normal files copies to the new location. Select “Compressed Archive” if you want the files to automatically be placed into a zip folder. Zip folders work best when saving them externally to the vault. If you need to save a zip file internally to the vault, then a Zip Program needs to be configured in the local settings in the Administration Tool for the machine. SOLIDWORKS PDM supports 7-zip and WinZip as programs for this. For more information on configuring these settings, check out the PDM Administration Guide. You can easily access this guide by going to the “Help” tab in the Administration Tool.
Include simulation/Include drawings: These options allow you to copy the drawings or simulation results that are associated with different files in the copy tree
Name drawings after their models: This option will try to automatically rename copied drawings to the name of their copied part/assembly. This makes is easier when renaming with a serial number or using a find/replace option to make sure associated drawings match the name of the file they are associated to.
Preserve relative paths: This option will allow you to preserve the folder structure of referenced files when you copy it to a new location, relative to the parent file. With this option cleared, all referenced file chosen to be copied will go into the same destination folder as the parent file, unless otherwise specified on the file list.
Regenerate serial number in cards: If there is a serial number in use on the data card of a copied file, this number will be regenerate to the next number in sequence with this option checked (PDM Professional Only)
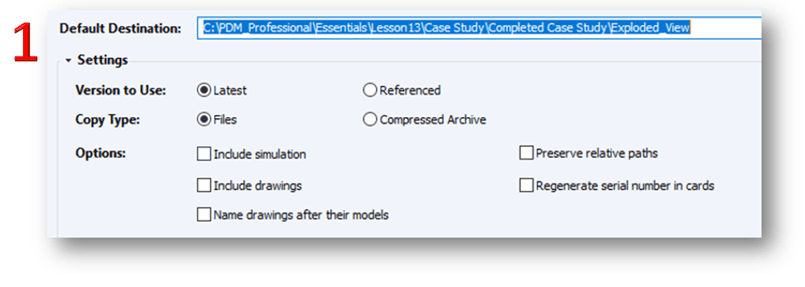
Moving to the upper right corner of the copy tree wizard, there are some Transform Operations. These options allow you to rename selected files easily based on some rules.
Add Prefix/Add Suffix: Use these options to rename all selected files with a prefix or suffix. These are cumulative, so you can choose to add both if needed
Rename with serial number: Use this option to rename all selected files with a serial number previously defined in the Administration Tool (PDM Professional Only)
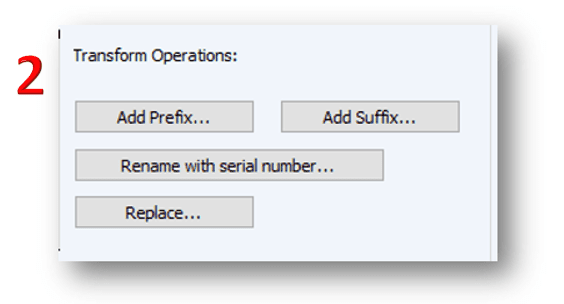
Replace: Replace a specific string in the file name or folder name with a new string. Under “Find What” type a sting you would like copy tree to look for in file names and/or folder names, and under “Replace with” type the string you want in its place.
Directly below the Settings in the copy tree wizard is an area that allows you to navigate the file list more easily. You can apply several different filters to the list as well as export it to another application for easier viewing.

Filters: You can add filters to narrow down the file list to easily find what you are looking for. Use the input box to search for specific strings in the columns. The input box also supports a number of different wildcard symbols (*, ?, %, -, . , “”). Use the dropdown box to the right of the input to apply the string to All Columns or a specified column. If you ever need to filter out a certain string, you can use the invert filter button to the left of the input box, or simply add a “!” symbol as a prefix to your string. The purple filter button under the input box has some additional filters for file types, files selected for copy, and files that are changing name.
Additionally, you can use the two buttons under “Warnings” to jump to the next or previous file with a warning message. There is also a dropdown menu that allows you to easily toggle between showing all referenced parts and just showing those in the top level of the reference tree.
Export Options: If you ever need to take a deeper look into the file list, you can use the buttons on the far right to open the list in excel or save out the list into a comma separated file.
The file list in the middle of the screen is great way to easily visualize everything you are copying, see any warnings for specific files, select files for copy, and modify the path and file name of individual files.
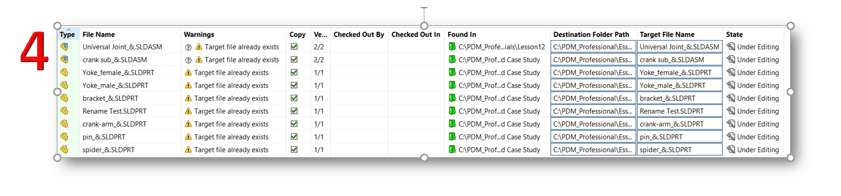
Destination Folder Path: Use these individual options to change the folder path of single files to something different than the default. Hovering over the individual boxes will make a browse button appear to easily select a new folder path.
Target File Name: Use these boxes to vary different file names outside the rules created by the transformation operations. By right clicking in the box you will get options to rename a specific file with a serial number or reset all transformations done on it.
Finally, at the very bottom of the wizard, there are additional options to complete your copy.

Check in Option: Check this box to automatically check in all files created by the copy tree.
Total to Copy: Before you complete the copy, you can verify the number of total files that are being copied as well as a break down files by filetype.
Once you’ve set all the options for your copy as you need, use the “Copy” button and PDM will get to work. If you need to start over with the different transformation options you have made, there is a “Reset All” option to set everything back. For additional help with any options, choose the “Help” button to navigate straight to the SOLIDWORKS help documentation on the subject.