Cost Optimizing Through SOLIDWORKS Costing
I recently moved to a small town outside the suburban metro/Minneapolis area. Thrilled by the offering of more space and a chance for a wood shop, I got to dreaming about what could be in the new space I call “home”. The first order of business – a custom desk for the new office space.
My design intent was relatively simple. I wanted to 1) spend as little as possible, 2) fit both my office workstation and my personal workstation on the same desk, and 3) create an L-shape desk that fits in the corner of the new office. Most important to consider here was the cost, however. As some may know, it is not always cheaper to build custom furniture. But I knew with the help of SOLIDWORKS Costing, I could optimize the price of the desk by using the least expensive materials to get the job done.
SOLIDWORKS Costing can help users calculate material costs, mold costs, labor costs, and manufacturing costs of the majority of manufacturing operations. Custom operations can be added to easily estimate material needs, as well. Since I will be doing the work myself, I’m choosing not to include labor time. Costing is available in SOLIDWORKS Professional for parts and multi-body parts, and SOLIDWORKS Premium for assemblies.
My goal can be achieved by starting with a wireframe desk design, adding detail work, creating a costing template to match similar local lumber store prices, running it through the costing evaluator, and then optimizing the design by modifying material and design parameters that meet all the criteria. By the end of the article, you will see the initial design, the costing template fixed with wood prices, and a finished model estimate. Stay tuned for part II to see how accurate this was, and to see the finished build!
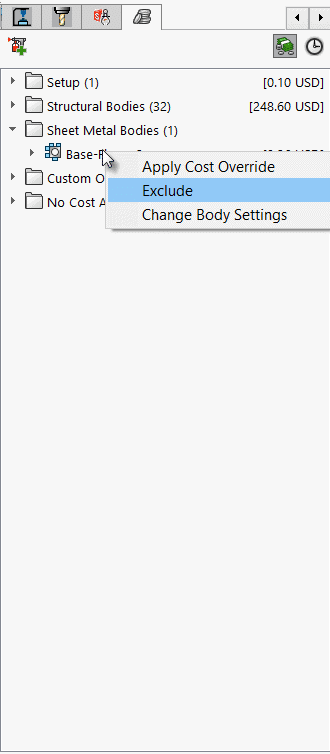
As I said, the goal of this project is to spend as little as possible. I have several salvaged wood pieces available that I have from leftover projects. The old desk and an old bed frame I can put to good use for the desk. In SOLIDWORKS Costing, I can choose to exclude specific parts from my cut list from calculation, something I will definitely take advantage of to speed calculation time.
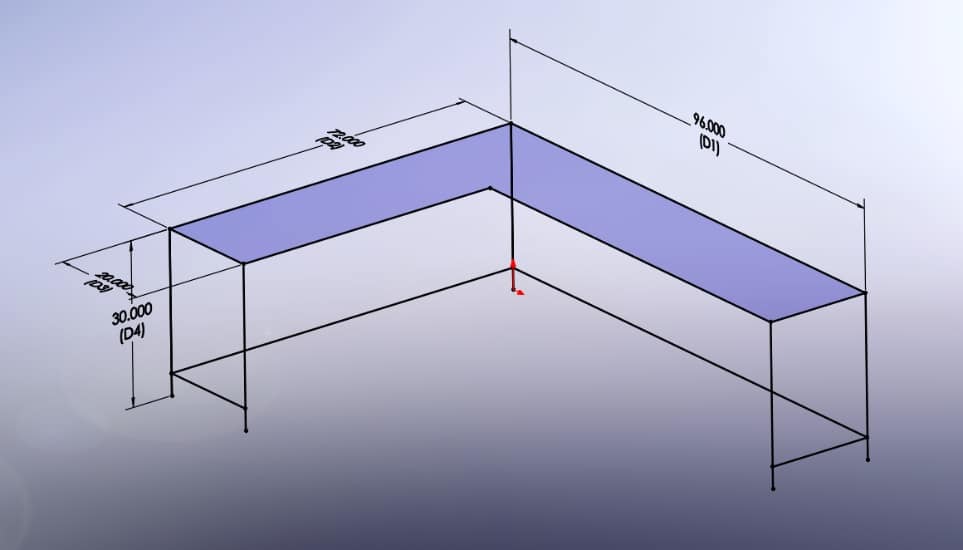
I start with a wireframe 3D Sketch, which includes all the important parameters that my design needs to fit within my design intent.
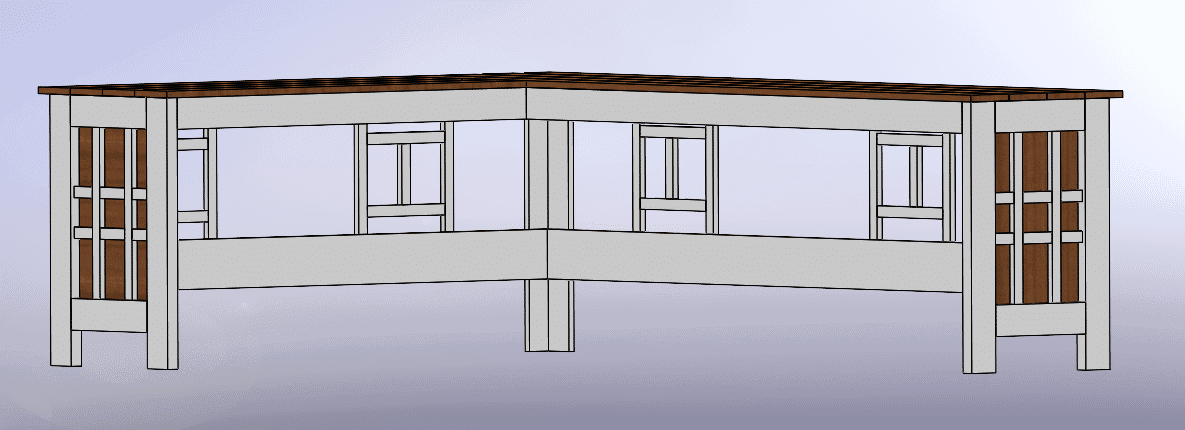
I already created a custom library of lumber profiles to help create the desk. If you are not sure how to configure custom profiles, be sure to check out this custom profiles blog article. SOLIDWORKS Weldments can help me to generate a cut list the components for the desk automatically. I then added detail work to give it more character. The wood from the old bed frame will be well-suited here. Parts of the old desk will be used to give the dark background behind the lattice work. The finished design is below:
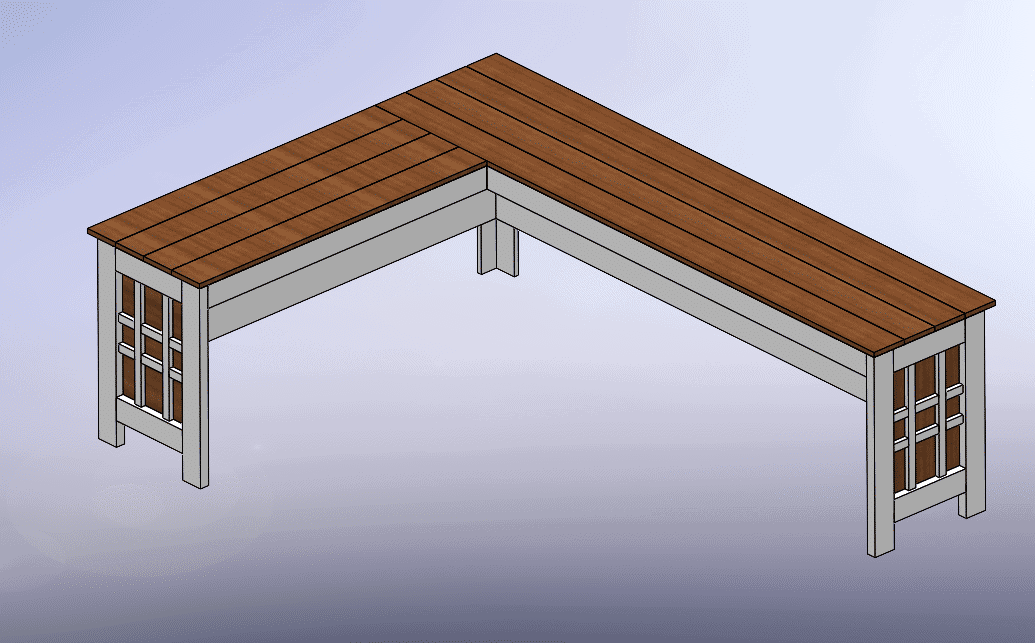
Another view below shows the wood lattice pattern I am using. This will be used to route cables while remaining invisible and create additional support for the 1″x6″.
Now that I have the initial design, it is time to go to the lumber store’s website for pricing. By launching the standalone app, SOLIDWORKS Costing Template Editor, I can input the costs for the various sizes and available material types of lumber that I might be using for the project. The template creation took about one hour. The Machining template contains costs for all structural members.
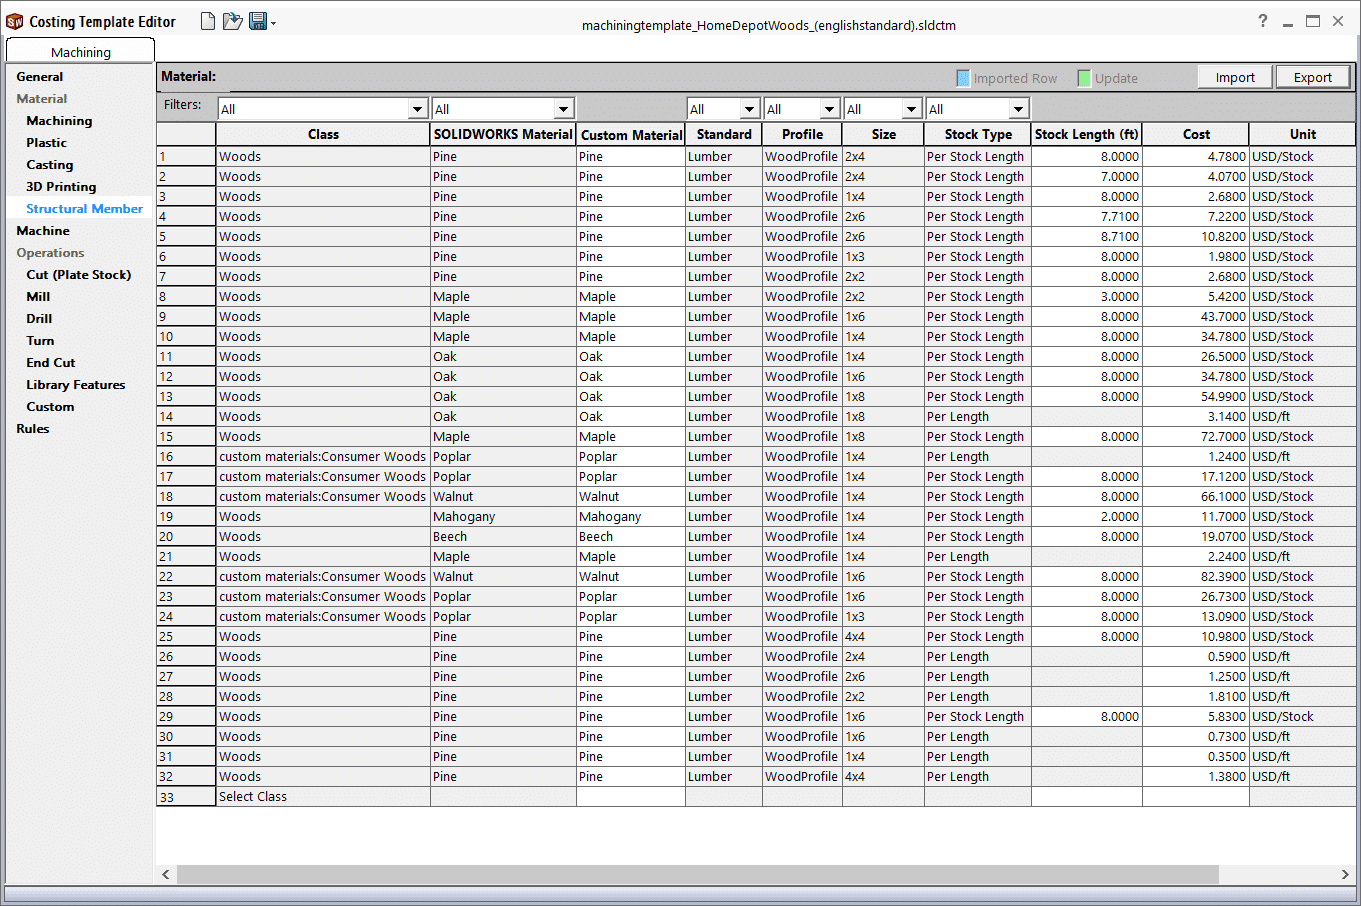
I have added costs for price per foot, as well as price per stock. SOLIDWORKS Costing gives you the ability to consider both stock costs and per foot costs. Stock costs evaluate waste consumption – product not used – to give a more accurate estimate of the cost. It is especially important to consider this with the hardwood countertop because of the high cost of hardwood. We will see how this affects us later.
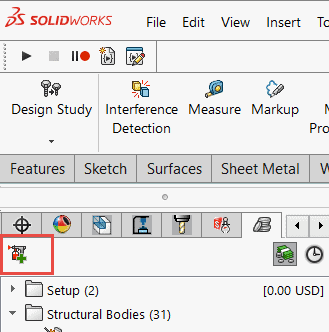
Now that I created the pricing template, I can now run it through the first pass in the Costing add-in.

I can see that the initial design will cost me approximately $337, after excluding the salvaged components from the bed frame. 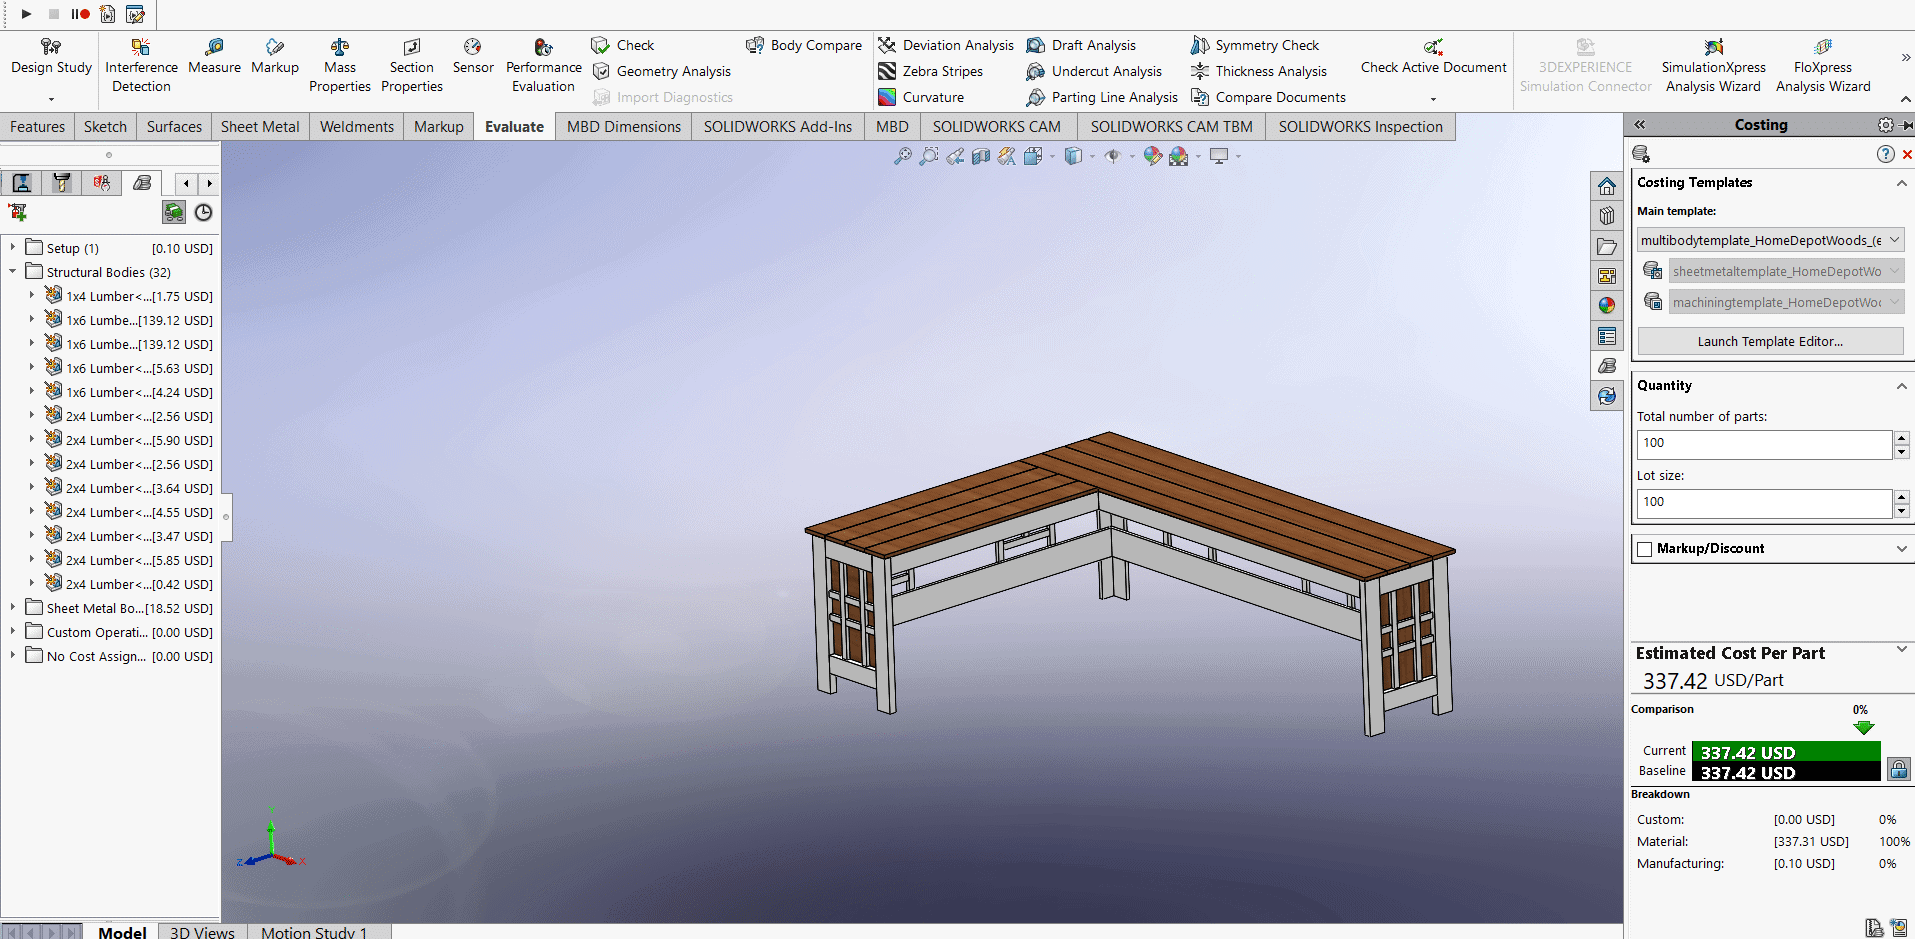
To no surprise, the hardwood oak tabletop is the vast majority of the expense ($279), so reducing this cost will take priority. I can either: A) shorten the length of the desk, and/or B) choose a different material.
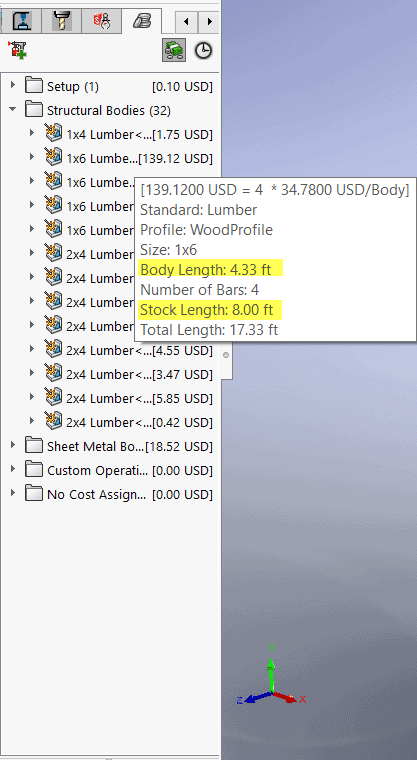
On the short end of the desk, the body length of each board on the tabletop is 4.33ft and comes in 8 foot stock lengths. I will shorten the end of one side by 4 inches so I can save significantly and eliminate waste.
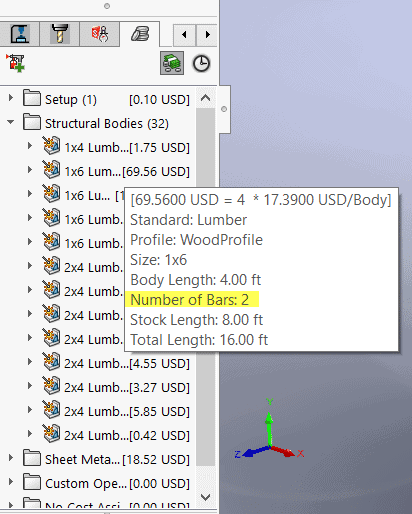
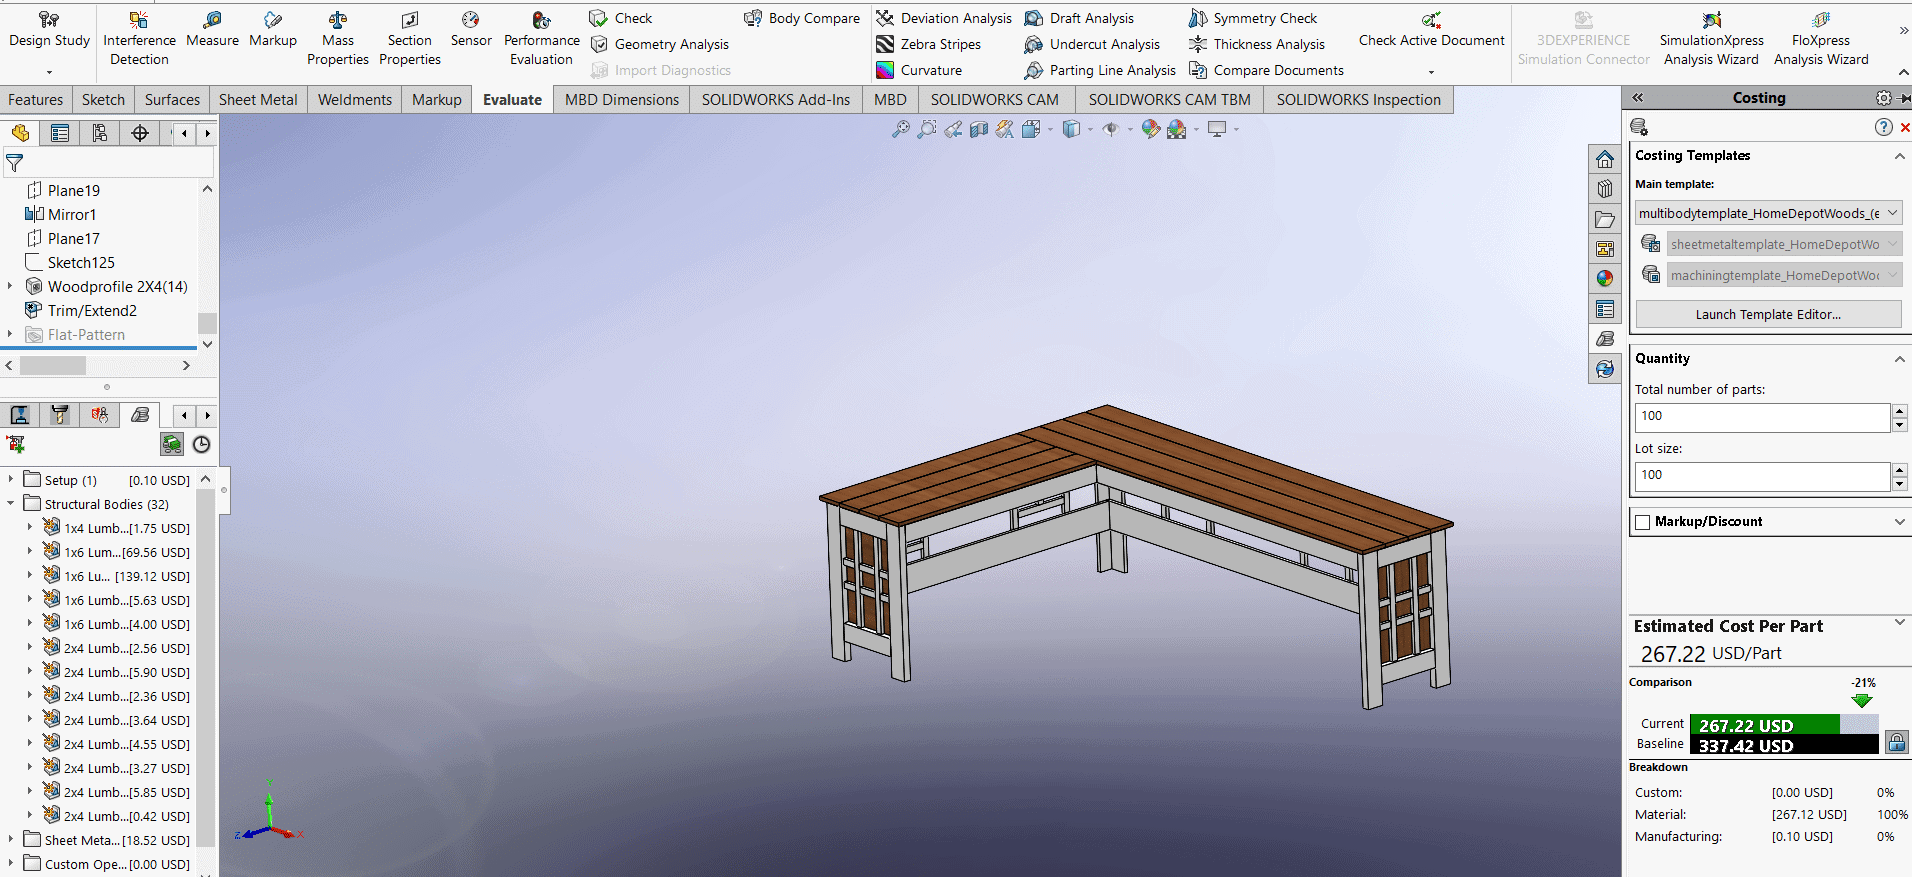
The subtle difference reduces the estimated cost by over 20%, to approximately $267.
 To save even more money here, I can compare the costs of different 1×6 hardwoods directly within the Costing add-in. After comparing all the choices, I’ve determined that poplar or beech wood are the most affordable hardwoods. By making both considerations, I reduced the cost of just my hardwood tabletop by almost 60% ($279 –> $114).
I forgot to exclude the contrasting boards from the original analysis, which are being salvaged from my old desk. SOLIDWORKS Costing makes this a forgivable mistake by allowing the user to right-click on the body and “Exclude” from the costing analysis.
The hardwood is, by far, the most expensive portion of this project. So, I am not going to optimize the pine 2”x4” and 1”x6” boards. I am doing this because I would only save pennies in comparison.
The cost for painting, priming, and staining the wood is the last cost that needs to be considered here. What is once tricky for carpenter’s and DIYers alike, becomes simple with SOLIDWORKS Costing. Costing can consider custom operations based on length of edges (in/mm/ft) to surface areas (in2, mm2, ft2) to part volumes, and more.
By clicking on the button above, I create a custom operation called “Paint and Prime”. On the manufacturer website, the 1-gallon bucket of paint can cover 200 sq. ft, with two coats. I managed to find a gallon of mistake paint at the local hardware store for only $5. Quick calculations can determine that it costs only $0.025 per square foot to paint. Next is stain: at $0.24/sq. ft. and lastly, coating in polyurethane: (In three coats). Total custom operation cost: Approximately $51.
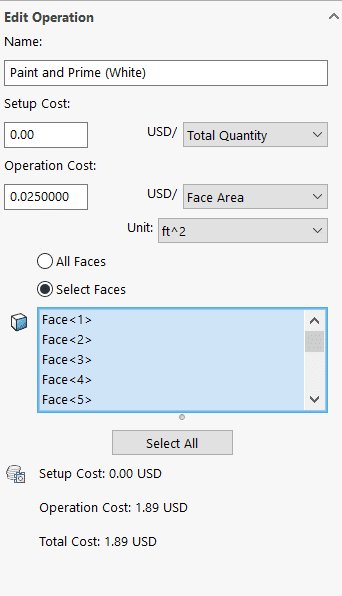 TIP: Create selection sets to select faces quickly for parts with multiple operation processes.
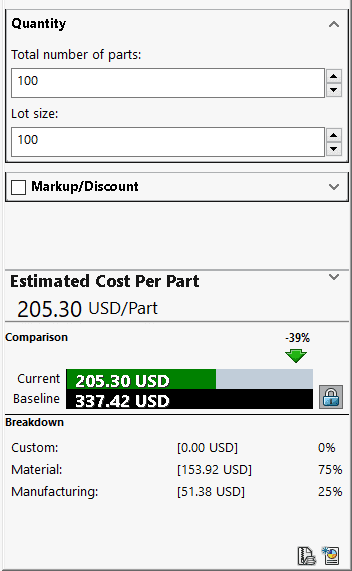
All of this leads to the grand total of about $205, almost 40% reduction of cost. On material alone, I saved over 50% (from $337 to $153). The changes made only eliminated about 1 square foot of desk.
Throughout this article, a wireframe model with basic design parameters turned into a custom desk through SOLIDWORKS Weldments. Custom costs were then assigned to weldment profiles in the Machining template of the SOLIDWORKS Costing Template Editor. I then showed how a designer evaluates their design in the Costing Add-in and makes changes to the design and material parameters. Custom operations like paint, stain, or polyurethane can be added to estimate manufacturing costs. Lastly, and most importantly, I showed you just how much of an impact these considerations can have. In this specific example, I was able to save almost 40% in costs while making very little design changes throughout the process.
I hope this gives you a better idea of the capabilities of SOLIDWORKS Costing. I am excited to share with you the actual product cost and finished product in Part II of this blog article!
Until next time!
Jordan Kleinschmidt, CSWE, CSWP-S
Application Engineer
Computer Aided Technology, Inc.