SOLIDWORKS Simulation Tutorial: Applying Non-Uniform Pressure
 When creating a simulation, it’s sometimes necessary to apply a pressure non-uniformly. This is most commonly found when dealing with liquid in a tank, however, other reasons may occur. Sometimes, (like in my example today) an accurate simulation can be made using modeled geometry such as modeling a solid in the shape of water in the tank, but this can add unnecessary complexity to a model and slow down a designer or analyst. Since this isn’t an everyday type of simulation for most of us, in this SOLIDWORKS Simulation tutorial I’m going to demonstrate a quick example to make it a little easier.
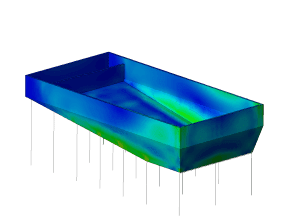
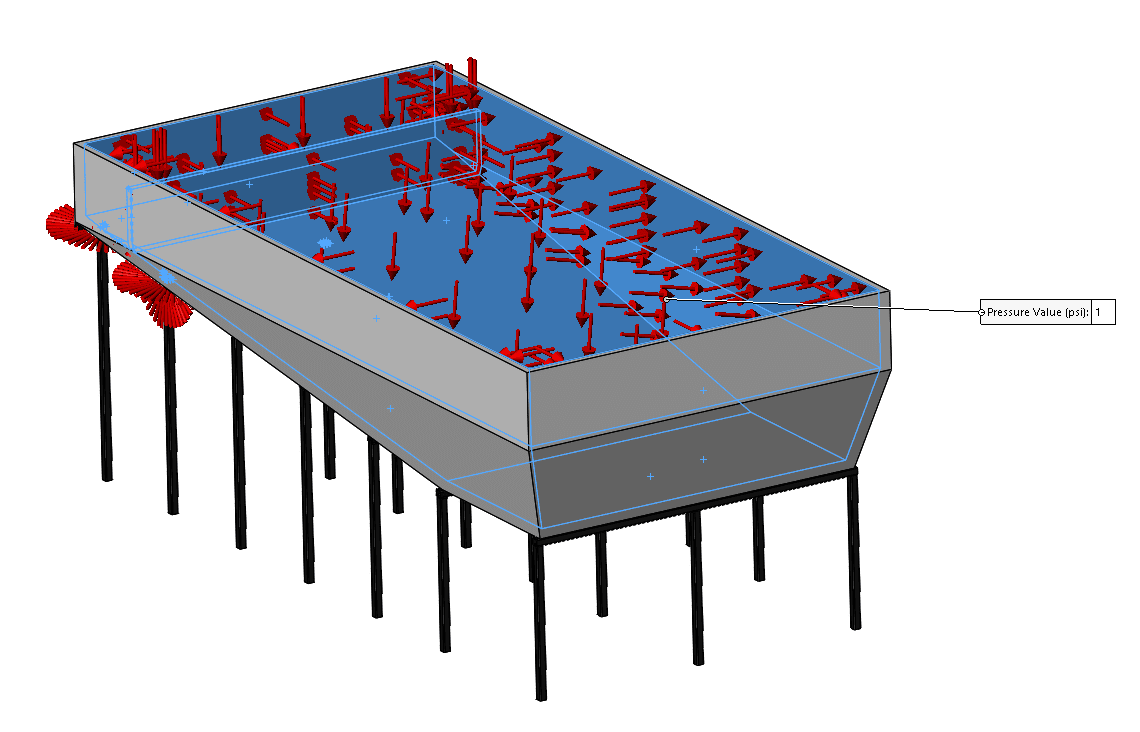
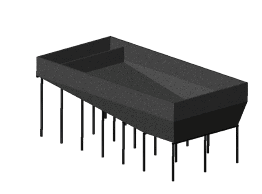 As you can see, I’ve modeled a settling tank. The design allows for dirty water to be pumped into the tank on one side. The volume is large enough that the velocity of the water is almost zero and the particulate matter (or dirt) has a chance to settle out of the solution. Water on the other side of the tank is mostly free of whatever the water was carrying, maybe stone chips from a drilling operation or solids from a sewage treatment plant.
The force applied to the columns is going to depend on how much water is directly above the column itself. It stands no reason that the less water above the column, the smaller the column can be – or the fewer the columns the designer can use.
In this model, I’ve used concrete for my tank material. I’m going to use a non-uniform pressure distribution which will allow me to get the same results as if I modeled the water, but without the baggage of extra mesh elements.
I’ve set up my model with Y being the vertical direction. I then added a coordinate system at the top of the tank.
I chose the top of the tank because I wanted to simulate a tank that was full to the brim and a tank at its maximum weight. If there is sludge in the bottom of the tank that is denser than water, it can technically weigh more, but t for this example, I’m going to disregard this additional weight and use a greater factor of safety in my design to account for it.
Applying my non-uniform pressure isn’t too difficult, however, it does take a little forethought. For example, because the water pressure is dependant on changes in elevation, the pressure has to change based on the changes in height because the surfaces at the top of the tank have less pressure than the surfaces at the bottom.
Determining the equation that dictates this pressure is extremely easy if you take advantage of how SOLIDWORKS Simulation allows the use of mixed units and the simplicity of the metric system.
One cubic centimeter of water has a mass of 1 gram. Since SOLIDWORKS Simulation allows the use of kilograms as a force, I can quickly get the pressure of any depth of water by multiplying the depth in centimeters by the mass of a cubic centimeter in kilograms. (1000 grams is the equivalent of 1 kilogram and 1 gram is equivalent to .001 kilograms).
This simplicity makes it much easier to imagine the pressure. The pressure on each square centimeter is equal to the number of cubic centimeters that can be stacked on top of it.
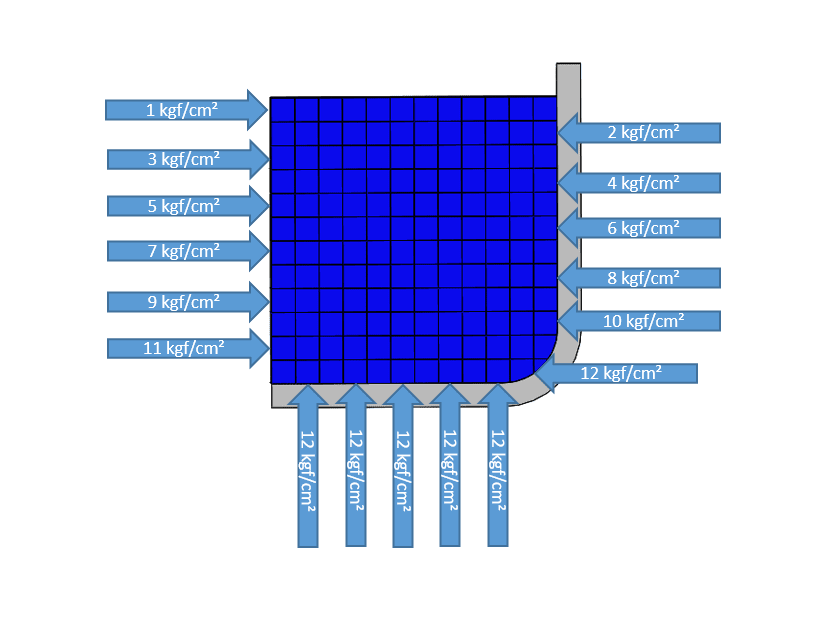
This makes for a very straight forward equation of Pressure (kgf) = Y(cm)*.001(kg)
Note: Even though the pressure equation is in an obscure kgf/cc unit system, all results will be reported in more familiar units such as psi or Mpa.
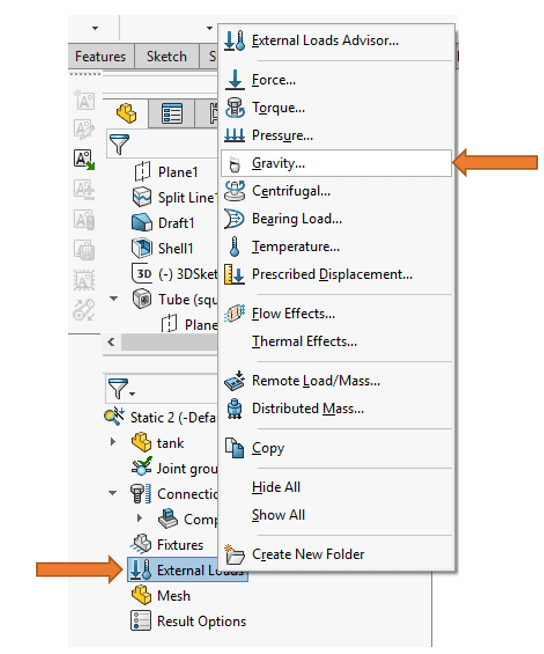
The final step in our SOLIDWORKS Simulation tutorial is to insert the equation in six steps.
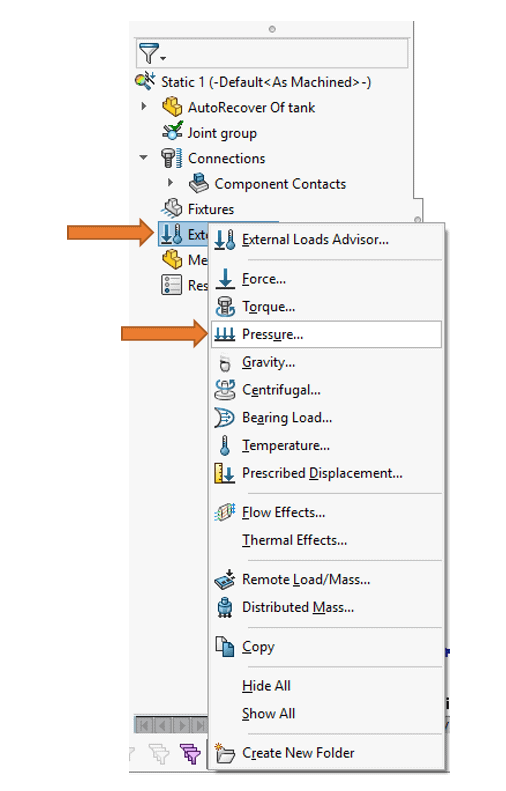
Step 1: Select Pressure from the list of external loads.
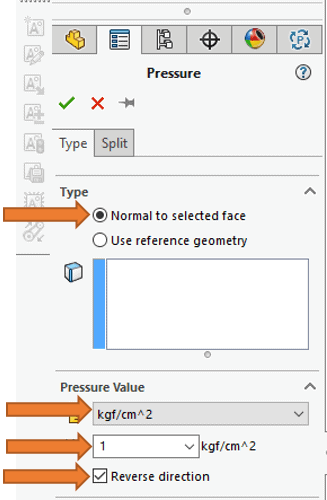
Step 2: Select “Normal to selected face” as the type, set the pressure to 1 kgf.cm, and ensure that the direction is reversed.
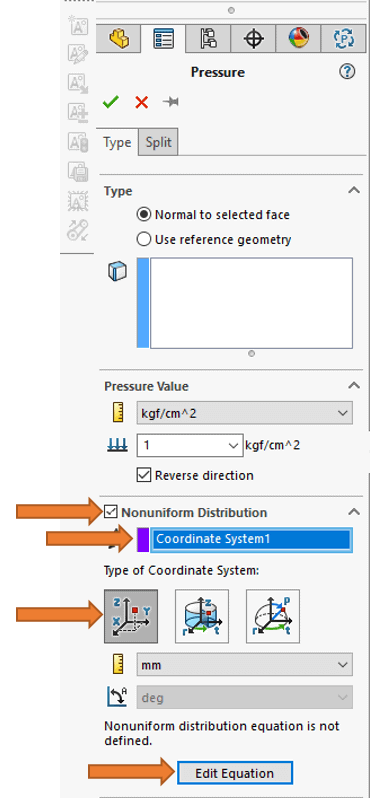
Step 3: Apply a non-uniform pressure by selecting the “Nonuniform Distribution” checkbox, add the coordinate system you added earlier, verify the cartesian coordinate system, and select the “Edit Equation” button.
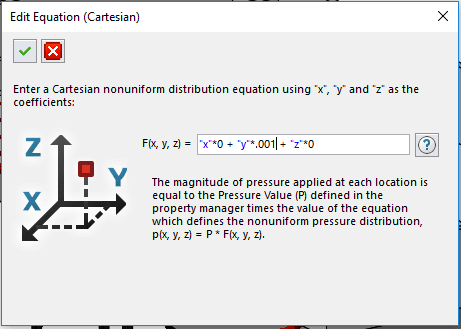
Step 4: Because the X and Z values don’t contribute to the pressure, multiply each of these values by 0. Multiply the Y value by -.001. This is equivalent to 1 gram for every centimeter of depth.
Step 5: Select all faces that would be touched by water.
Step 6: Add the fixtures and any other loads or connections necessary for your model.
I hope this SOLIDWORKS Simulation tutorial has you applying non-uniform pressure like a pro. If you’d like to further sharpen your skill set, check out our SOLIDWORKS training courses for a complete list of upcoming online classes or at a facility near you.

Related Articles
How to Change Units in SOLIDWORKS Simulation
Getting the Most out of a SOLIDWORKS Certification
Optimize Your Designs While Cutting Costs with SOLIDWORKS Simulation Tools
About the Author
 Nathan Sneller is a mechanical engineer, entrepreneur, and adjunct professor. Before joining Fisher Unitech, Nathan graduated from Michigan State University, taught Mechanical Design at Grand Rapids Community College and ran an engineering firm where he specialized in the development of electro-mechanical products. In his current role, Nathan advocates for incorporating simulation software into the design process to shorten the development cycle, improve product performance and maximum profitability.