Using columns with a search card in Solidworks PDM Pro and Standard
Using columns with a search card in Solidworks PDM Pro and Standard
So you’ve searched for something in the vault, but the results might not have all the information you’re looking for. Can something be done to the search results so that more information is displayed when a search is run? Can these results be unique depending on which search card you use? Well, you’re in luck, in both cases it can. So how would one go about changing the different results?
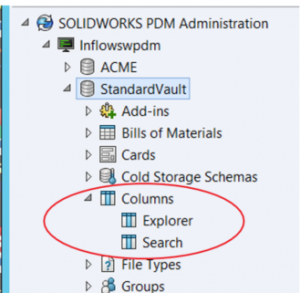
Image 2: In this screen shot to the left we have two columns, named Explorer and Search, you may have more than this and different names
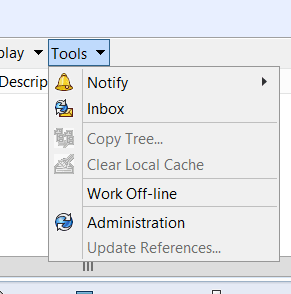
Image 1: The Location of the Administration Tool from within windows file explorer.
This is modified in the PDM Administration Tool (Start > Administration or Tools > Administration (see image 1)). If your logged-in user has the proper permissions granted (Can Update Columns) then you’ll be able to login to the admin tool and update what’s called a Search Column. Search Columns allow you to pick which metadata is returned, per column set, per search card. To modify an existing column set, expand the “Columns” node (shown in image 2), then double click on any of the column sets that show up, if any. See the image to the left for reference.
In this example, the column set named “Search” is a search result column set, so we’ll take a look at that. Once you open a column set, the column set editor appears, I’ve broken it down into sections for you.
From image 3:
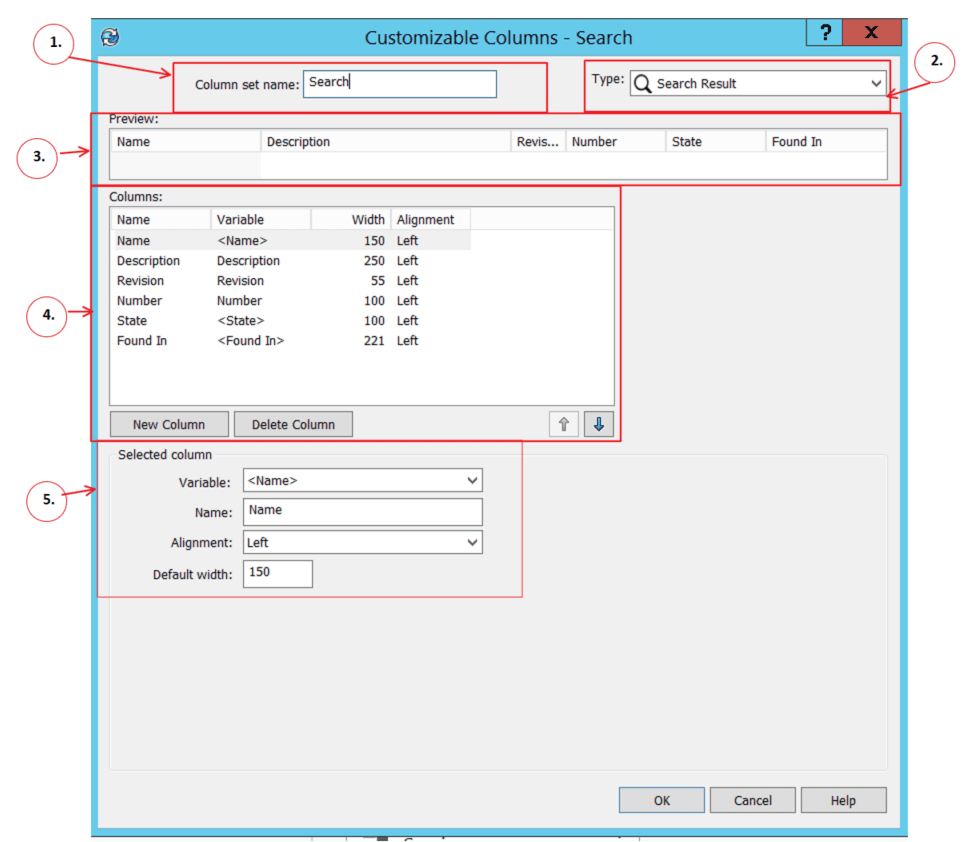
Image 3: The Column Set Editor, and it’s sections
- Section 1 is the name of the column set
- Section 2 is the type of column set
- Section 3 is the preview window of the columns
- Section 4 is the list of chosen columns and the variables they’ll be showing
- Section 5 is the editable fields for each column selected in Section 4.
SECTION 1: Column set Name
This is pretty straightforward, whatever name you want to use here for your column set. I recommend also noting in the name weather it’s a search or file column set, usually as a prefix I would use “srch-” or “file-” accordingly, because in the node browser it isn’t readily available info, you have to open the column set if you don’t remember or know whether it’s a search column or file column.
SECTION 2: Column Set Type
This is where you will tell the PDM system which type of column set this is, in this example we have a search column set. These columns will be shown as the results for any search card that selects this column set as their results.
SECTION 3: Preview Window
This will show you what the default column sizes and positions will look like in the search results. You can modify this window by hand by clicking and dragging the column edges to resize the column headers, or click and drag the column header to reorder the columns.
SECTION 4: Columns List
This section has all of the columns, and all the editable info for each variable/column shown in it’s own column. Section 5 is the area where the values here can be edited.
SECTION 5: Selected Columns edit fields
Here you’re able to edit the values of each columns default settings.
- Variable: This is where you pick the system variable, or metadata variable to show in the search results
- Name: This is the name as will be displayed on the column header in the search results. This is aliased because for example, you may want “Author” PDM variable to be displayed as “Drawn By” or “Created By” in the search results.
- Alignment: This is the text justification. Select which way you’d like that column justified. When “<reference count>” is used, but named QTY, it’s centered frequently from what I’ve seen.
- Default Width: This sets how many pixels wide the column will be.
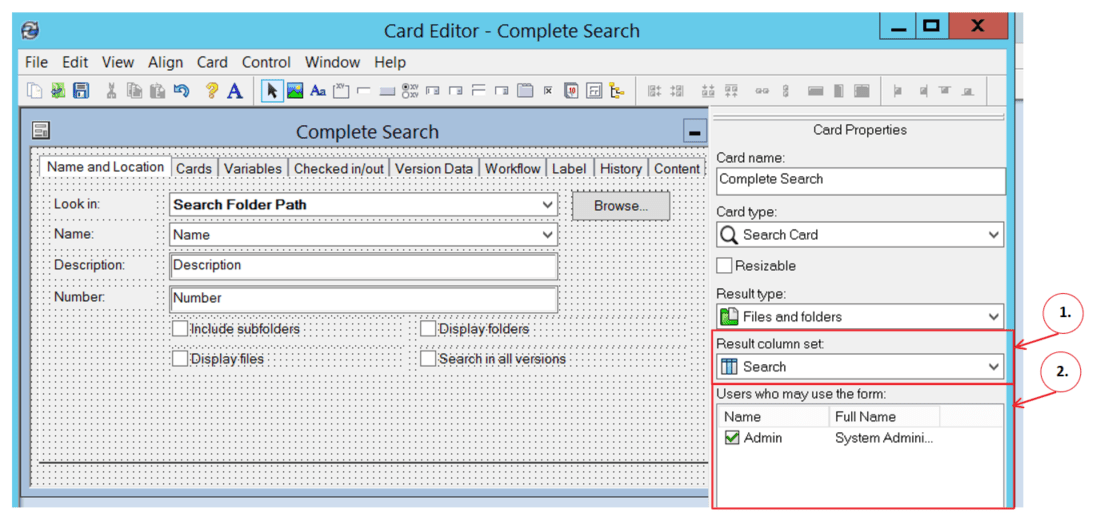
Image 4: The Search Card Editor Interface. From here the column set and permissions can be set.
Once all these are assigned and you have all the columns you need, you’ll need to select which search cards your team is using, would return this set of columns.
To do this, open up a search card (shown in Image 4), and select the column set in the properties, from the dropdown menu in Section 1. Below that is the permissions section in Section 2. From here you can assign which users or groups (they’re in the same list, groups are at at the bottom) have access to this search card, thus access to the column set you just created and assigned.
The final result is here, with a comparison of vault search results compared against the Column Set settings in the vault in the background, shown in Image 5.
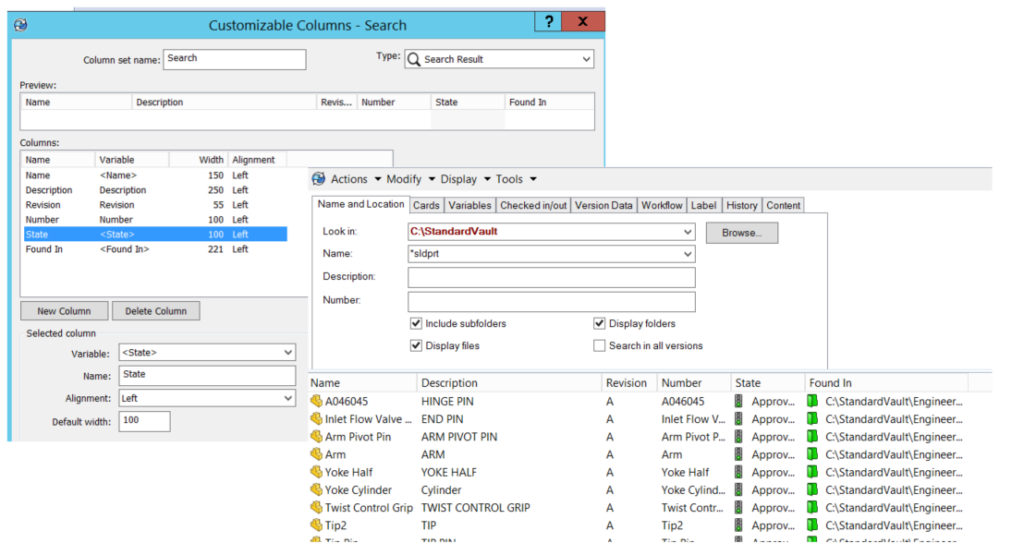
Image 5: The column set settings shown in the back, and the returned search results with the resulting columns shown in the front.