Stratasys Objet Desktop Pattern Test
Your Stratasys Objet Desktop should receive weekly, and sometimes even daily, maintenance. You should be printing a pattern test weekly using the pink paper provided with your start-up kit.
The pattern test is the basic verification of the printer’s ability to produce quality models, since it demonstrates the condition of the nozzles in the print heads.
To perform the pattern test:
Make sure that the build tray is empty.
Prepare a sheet of pink paper, approximately 21 × 14 centimeters in size (8.5 × 5.5 inches)—half of the standard A-4 or Letter size.
In the printer, tape the pink paper to the center of the build tray. 1. 2. 3.
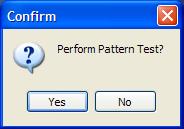
Press F3, or open the Options menu and select Pattern Test.
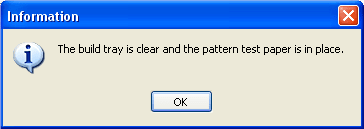
In the following dialog box, click OK to confirm that the paper is in place on the build tray.
The printer prints a series of lines on the test paper
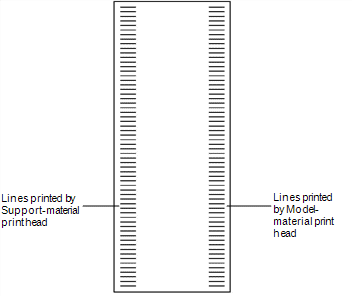
Carefully inspect the test paper to see if there are missing lines. Too many missing lines, especially if they are in the same area, indicates that the quality of printing when producing models will be poor. If this is the case, see “Improving Print Quality” on the next page in the start-up kit.
Note: Acceptable model quality is subjective and depends on the type and scale (size) of the models produced. As a rule, however, more than 10 missing lines in one area of a column is considered unacceptable. As a rule, however, if two consecutive lines are missing, or if there are more than 10 lines missing in either column, the model quality is usually unacceptable.
If the results of the last pattern test are poor:
From the Options menu, select Purge Sequence, or press F4.
In the confirmation dialog box, click Yes.
The print heads are purged of Model and Support material, and the wiper removes excess material from them.
Repeat the purge sequence and perform the pattern test.
If the results of the pattern test are still poor:
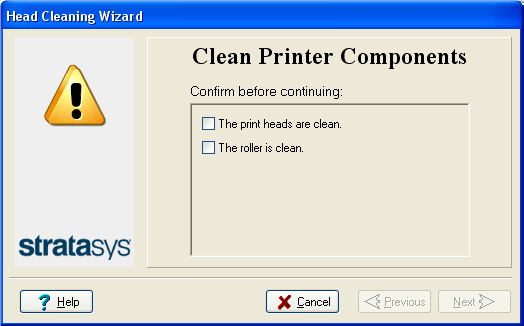
Manually clean the print heads (see “Cleaning the Print Heads and the Roller” on page 6-28).
Perform the purge sequence.
If the results of the pattern test are still poor:
Carefully clean the print heads again, making sure there is no residue left on them.
Perform the purge sequence, and perform the pattern test.
If the results of the pattern test are still poor check and or replace the rubber wiper. The rubber wiper removes excess material from the print heads after the purge sequence.You should clean the wiper and surrounding area daily. If the wiper is damaged or worn, replace it.
To inspect and clean the wiper:
Prepare— isopropanol (IPA—isopropyl alcohol) or ethanol (ethyl alcohol), disposable cleaning gloves, a supplied cleaning cloth or equivalent, a spare wiper and a M2.5 hex (Allen®) key
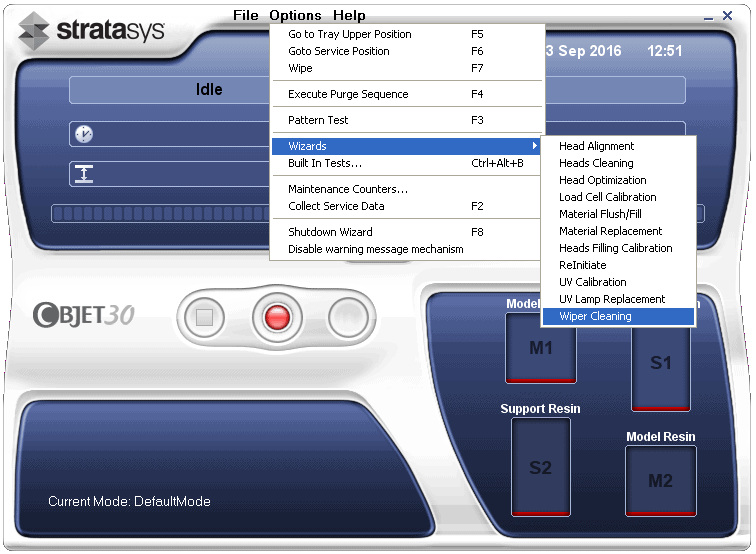
Wiper Cleaning
Start the Wiper Cleaning wizard from the Options menu.
In the opening wizard screen, click Next.
Make sure that the build tray is empty and close the printer cover.
Confirm this in the wizard screen and click Next.

5. When the following screen appears, open the cover.
6. Put on the cleaning gloves. Using a generous amount of alcohol on the cleaning cloth remove any material remaining on the wiper and the surrounding area.
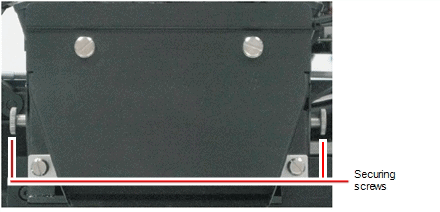
7. Inspect the wiper. If the wiper is scratched, torn or worn, or if you cannot clean it completely – replace it. With the M3 hex (Allen) key, loosen (but do not remove) the screw securing the wiper.
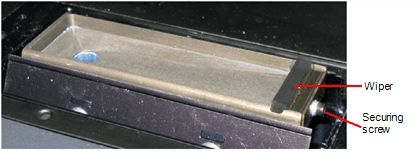
8. Grasp the wiper unit and remove it. Note: Do not remove the grease.
9. Insert the new wiper, making sure that it is level and tighten the securing screw.
10. Remove all tools and cleaning materials from the printer and close the cover.
Confirm this in the wizard screen and click Next.

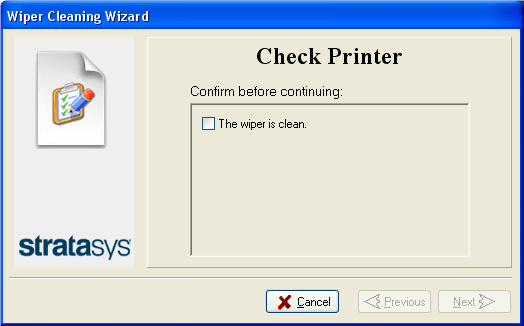
In the wizard screen confirm that the wiper blade is clean and click Next.
11. Click Done to close the wizard.
Remove and replace the roller waste collector:
Head Cleaning
1. Start the Head Cleaning wizard from the Options menu.
This wizard prepares the printer for removing the roller waste collector.
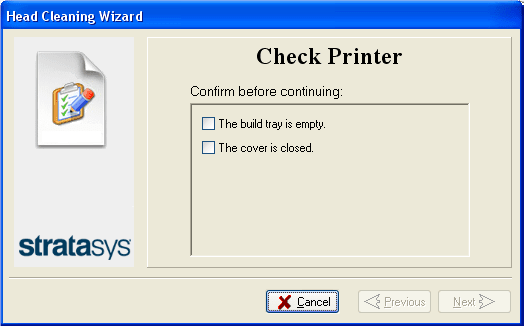
When the following screen appears confirm that the tray is empty and that the printer cover is closed then click Next.
The print block moves to the center of build tray, and the tray lowers.
2. When the following screen appears open the cover.
3. Put on protective gloves.
4. Loosen the two side screws securing the UV lamp assembly and place the assembly on top of the print block.
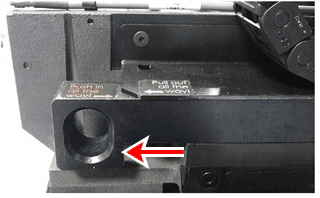
5. Pull out the drain-tube release mechanism to raise the tubes out of the waste collector. Pull out the release mechanism completely.
6. Support the roller waste collector with your hand under it and use a 3 mm hex (Allen) key to loosen the screws.

7. Pull out the roller waste collector, taking care not to touch or damage the scraper. (The scraper is very sharp! Proceed with caution.)

8. Inspect the roller waste collector.
If the scraper is damaged replace the entire roller-waste-collector unit. If the scraper is not damaged carefully remove any waste from the waste channel taking care not to damage the scraper. If necessary, use IPA or ethanol to dissolve residue material in the waste channel and on the scraper.
9. To install the roller waste collector:
Carefully insert the roller-waste-collector unit.
Secure the unit evenly, by alternately tightening the screws.
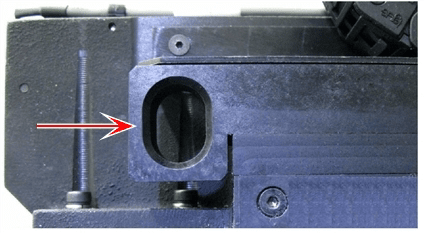
Return the drain-tube release mechanism to its original position by pushing it in all the way.
Move the print block back to the middle of the printer.
Replace the UV lamp assembly in the printer making sure that the cable fits into the slot together with the side securing screw.
Remove all tools from the printer and close the cover.
In the wizard screen, click Cancel to return the build tray to its former position.
John Dessoffy
Field Service Manager
Computer Aided Technology, Inc