Visualize Shortcuts for Beginners
If you are new to SOLIDWORKS Visualize and are starting to get more familiar with the tool, there are some important Keyboard shortcuts and workflows that you should know about right off the bat. We have blogged about keyboard shortcuts in the past, so I won’t go into every possible option. Instead, here are the ones I have found most useful and utilize just about every time I use Visualize. These will help you become more productive from the beginning and get you rendering content faster. Let’s dive in!
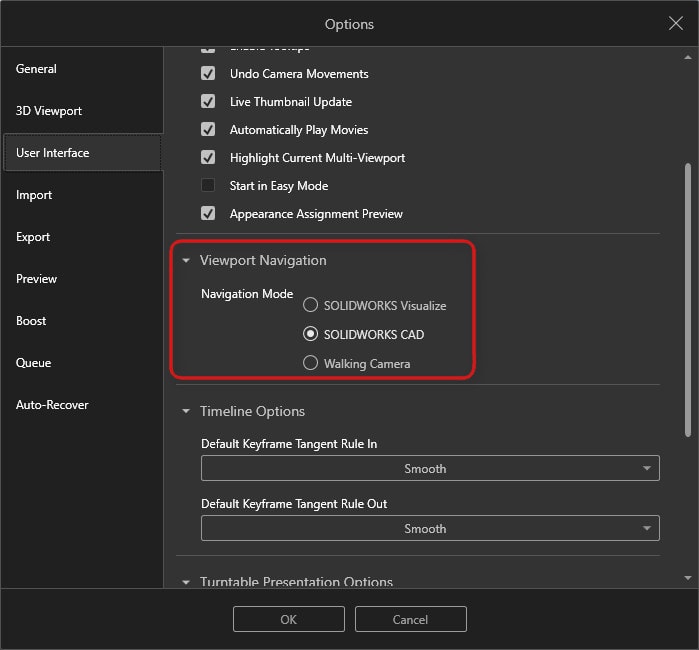
There are several keyboard shortcuts that I use not only with Visualize, but SOLIDWORKS too. Most of them are the same between applications and even Windows. CTRL+N (new), CTRL+S (Save), CTRL+W (close) and CTRL+Shift+S (Save as… (not a default SW command, however, I’ve assigned this since forever)) are the same with SOLIDWORKS. Common windows commands like undo/redo (CTLR+Z/Y), copy/paste (CTRL+C/V (not for appearances, more on this later)) and search (CTRL+F) also work and I use them just about every time I use most applications. Camera movements are also the exact same keys as SOLIDWORKS (MMB – Rotate, CTRL+MMB – Pan, ALT+MMB – Rotate about center of screen), If Visualize is not configured the way you would like, use CTRL+K to change your settings in options.
The CTRL key can be used to make fine adjustments inside numbered fields. Using CTRL reduces the step size to 1/10th the default step value and allows you to precisely position cameras, decals, textures, models, color values, appearance attributes, and <anything with a number box>. When adjusting these values, it’s easiest to use the preview mode if you have a slower CPU and GPU for rendering. When you are trying to find just the right color, or bump a texture over just a fraction, this one key will be your new best-friend.
Another set of shortcuts that I use most often are the ones that adjust the environment brightness and gamma. I noticed that in Visualize 2020, these values are not assigned by default. However, they are clearly documented as such in help. Below are the values that I assigned. (F12 – Edit Shortcuts) They are useful for adjusting the brightness of the ambient light produced by the environment and the gamma adjustment will increase/decrease the intensity of the lighting or contrast in the environment. Since adjusting these specific scene parameters can have a drastic effect on the lighting of the scene, it makes sense to have them assigned to shortcuts and I use them most often. Note too that if you need even smaller adjustment increments you can still use the CTRL key method I mentioned above.
| Ctrl + Shift + [ | Decrease environment brightness by 0.05 |
| Ctrl + Shift + ] | Increase environment brightness by 0.05 |
| Ctrl + Shift + ; | Decrease environment gamma by 0.05 |
| Ctrl + Shift + ‘ | Increase environment gamma by 0.05 |
| Ctrl + [ | Decrease environment brightness by 0.25 |
| Ctrl + ] | Increase environment brightness by 0.25 |
| Ctrl + ; | Decrease environment gamma by 0.25 |
| Ctrl + ‘ | Increase environment gamma by 0.25 |
Another useful trick is Copy and Paste appearance shortcuts. These shortcuts make it a snap to copy any appearance from one part to multiple parts; it’s quick and painless. Just make sure you are on the appearances tab before you try to use it. I’ve noticed too that to select an appearance you only need to use the regular selection with your mouse without holding shift. It works to select the appearance in the list too, and then use SHIFT+RMB over multiple parts to paste the appearance. For things like cameras and lights, the standard windows commands (CTRL+C/V) are used to copy and paste.
| Shift + Click | Copies appearance (when on Appearances tab) |
| Shift + right-click | Pastes appearance (when on Appearances tab) |
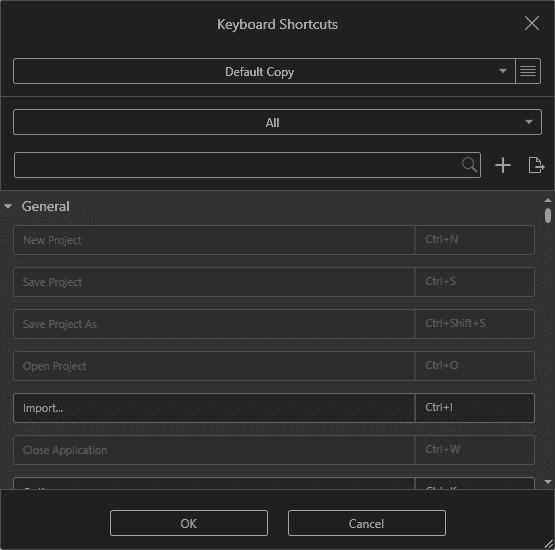
Of course, there are many additional shortcuts that you can use with Visualize, and if any of the currently assigned ones don’t meet your needs, you can change them to your liking. To make any changes to the keyboard shortcuts you will need to have a project open. Using F12 will open the dialog for shortcuts. From here you can search on commands, narrow down the list to categories, see what’s already assigned, and re-define existing ones.
I hope this helps you get in and start using Visualize as efficiently as possible. Feel free to reach out to technical support with any questions.
Alex Worsfold
Application Engineer – CSWE
Computer Aided Technology, LLC

What is innovate3D: bring your ideas to life? It’s a web-based event series focused on bringing you the latest information in design and manufacturing technology. We understand that many companies have had to adjust their plans for attending industry trade-shows and events in the wake of COVID-19 and we are here to help offset the impact. We’re bringing you the same great content that you would have seen at those events via online webinars and virtual product demonstrations. Click here to learn more!