Easy Inserts in GrabCAD
Using GrabCAD’s Insert function to save time modelling.
When it comes to 3D printing assemblies, we can make our parts stronger and more durable if we include mechanical hardware. Combining prints with screws, inserts and fasteners we can achieve exactly the part we need with capabilities that go beyond 3D printing alone. In this blog I will be going through some tips and tricks on installing heat set inserts to your prints.
While it is possible to thread bare plastic, repeated use can cause wear leading to threading failure. Heat-Set Inserts are designed to be heated past the plastic glass transition temperature and inserted into the plastic part. The heat is removed once the insert is fully seated. As the insert cools the plastic solidifies, locking the insert into place.
While specialized tools can be purchased for installing heat-set inserts, a soldering iron will do the job easily and quickly. If you are new to installing inserts check out this link for step-by-step instructions on how to get started.
Preparing a part for inserts has never been easier! The tried-and-true method is using CAD and designing the hole using exact dimensions from the manufacture. This can take a lot of time, especially if you have lots of inserts or lots of different size inserts.
Our solution? Use GrabCAD Print! GrabCAD now has functionality to input the correct dimensions you need for your insert in its Model Settings menu.
See the below steps on how to use this time saving tool:
- Have a cylindrical extruded cut feature in your CAD model where you need the insert to be- it can be any size, it will change to the correct size later.
- Open GrabCAD print and import your model onto a tray, check all your print settings are as you need them.
- Go to Model Settings > Face then selects your cylindrical feature.
- Once the face is selected the Apply Insert button will be illuminated, click on it to display the insert menu.
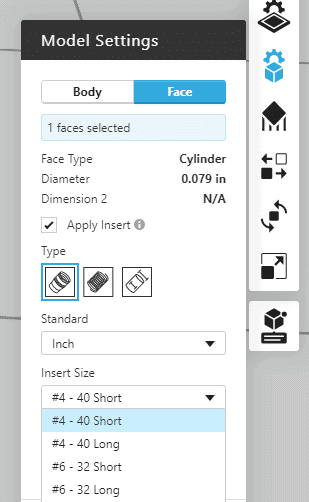
- In the insert menu you can specify the type of insert (Heat Set, Helical, or Custom) whether your hardware is in inches or millimeters, and the size of the insert.
A note on insert size in GrabCAD, the data for the inserts comes from McMaster-Carr catalogues and there are multiple lengths of the same threaded insert available for purchase. GrabCAD has the functionality for you to specify if the insert is short or long. The longer the insert, the more load it is expected to hold against pull out and therefore stress on it. For these longer inserts the tighter the hole needs to be. Similarly, the thicker the surround contours to hold the insert in place should be which is why the extra contour dimension, B, also gets higher, going to the longer insert.
- Select the insert from the drop down list and then update the model geometry by using the Update button at the top of the window
- Your model will automatically update the hole size to the correct geometry*
* This feature will only work when there is adequate diameter and boss length to create the hole. If your hole placement is too close to another feature GrabCAD will give an error saying it cannot update the model geometry. To fix this go back to the model and ensure adequate spacing from other features or side walls.
Sam Cheney
Application Engineer
Computer Aided Technology, Inc.