How to Install the Collaborative Designer for SOLIDWORKS Add-in for the 3DEXPERIENCE Platform
First off, Collaborative Designer for SOLIDWORKS is the add-in inside of SOLIDWORKS that allows you to save and load data from the 3DEXPERIENCE Platform. Along with that loading and saving there is a lot of data management things you can do like ownership, revisions control, change, and task management. We will not be discussing anything of those things today. Instead, we will answer the simplest of questions, “Where is it and how do I get it on my machine?”
First off, we need to establish a software conduit to connect our data to that platform up in the sky. We will be doing this with Java, specifically Java 11. Now, if you have already tried to install the SOLIDWORKS Add-in and hit the following window above. You’ll want to stop your installation and pay attention to the next section, don’t worry, what we are going to share will resolve the window below. If you have not attempted the install yet, you too are going to want to follow the Install Java 11 guide below, before you log in and try to install the SOLIDWORKS Add-in.
Installing Java 11
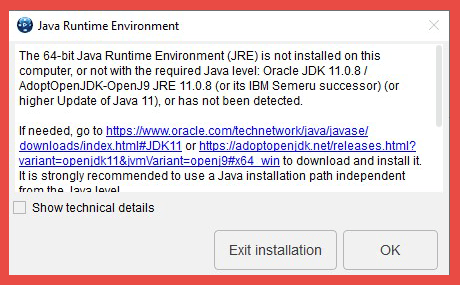
The dialog box about says the following.
The 64-bit Java Runtime Environment (JRE) is not installed on this computer, or not with the required Java level: Oracle JDK 11.0.8 / AdoptOpenJDK-OpenJ9 JRE 11.0.8 (or its IBM Semeru successor) (or higher Update of Java 11), or has not been detected.
If needed, go to https://www.oracle.com/technetwork/java/javase/downloads/index.html#JDK11 or https://adoptopenjdk.net/releases.html?variant=openjdk11&jvmVariant=openj9#x64_win to download and install it.
It is strongly recommended to use a Java installation path independent from the Java level.
Once done, click OK to auto-detect the Java path.
Note: With the simple Java unzips, it will be needed to restart the installation with the JAVA_HOME environment variable set.
First off, you’ll notice the Java Runtime dialog states you can use either Oracle JDK or AdoptOpen JDK. Computer Aided Technology recommends that you go with the AdoptOpen JDK as it is open source and widely used by our user base. This tool is being developed and maintained by IBM now so we recommend you use the following link to download from.https://developer.ibm.com/languages/java/semeru-runtimes/downloads/
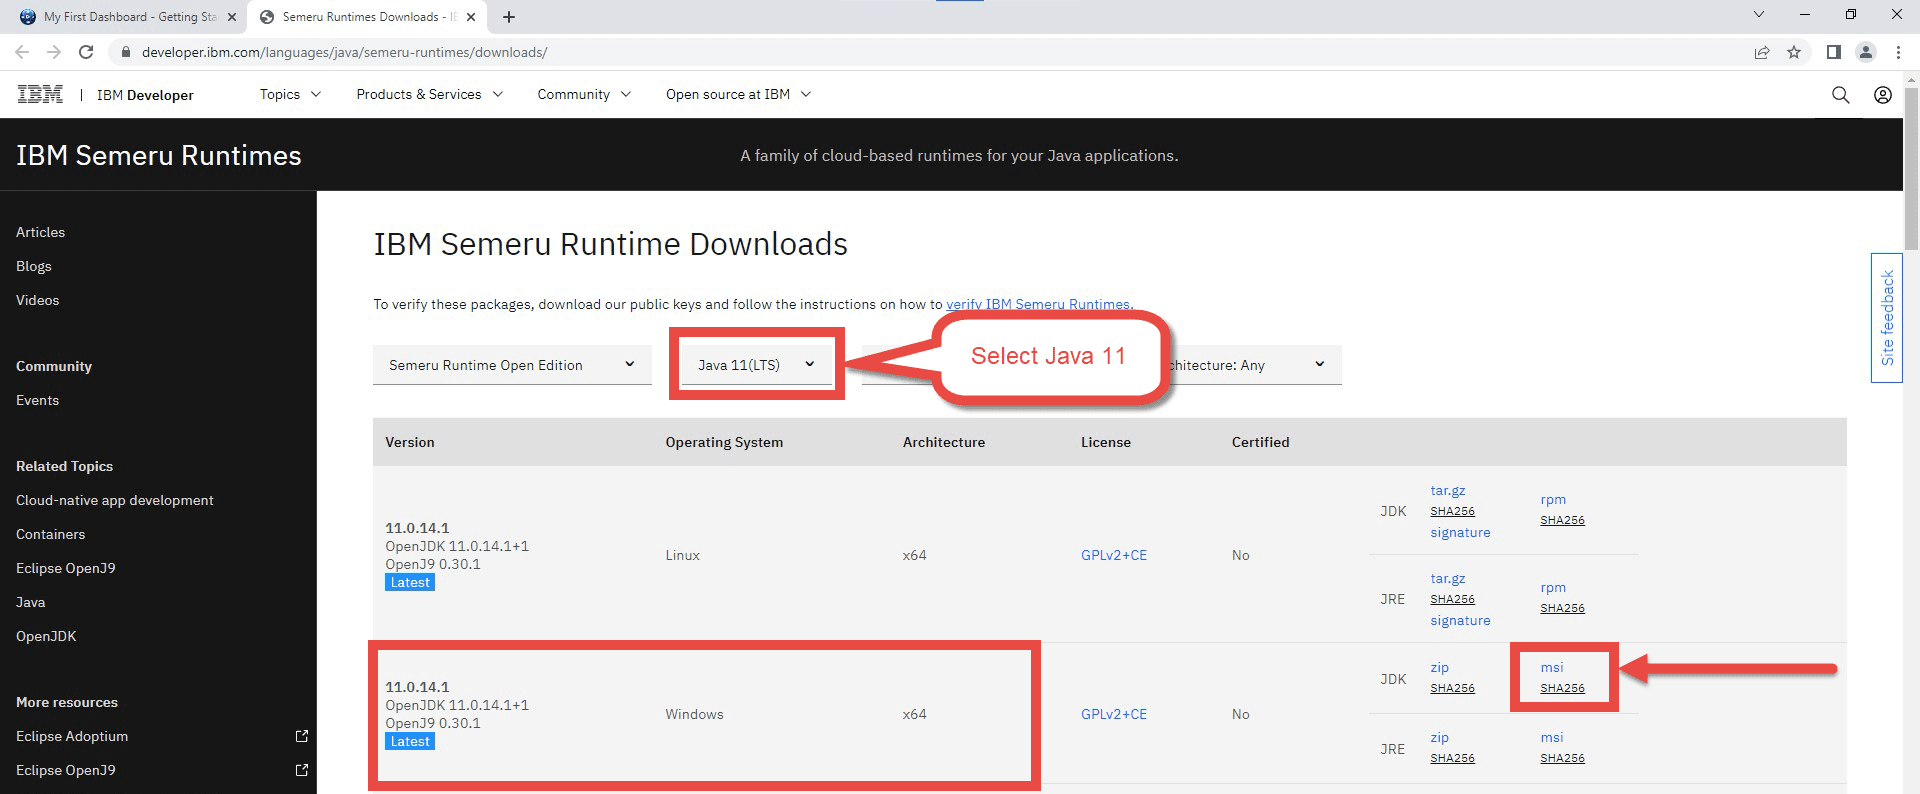
On this IBM Developer page, you will want to select Java 11 from the second pull-down for the version. From the Operating Systems, you will want to make sure you are downloading Windows. You will want to download and install the JDK MSI packet on the far right of that row. There is a zip file version of the file but that would then require a manual setup. When installing the Java JDK you will want to make sure to select the option “Make sure to select Set JAVA_HOME Variable”, from the custom setup screen. This will ensure that Windows knows which version of Java to use for the communications. Ok, this was the potential hard bit. But the rest of this from the 3DEXPEREINCE Platform side should be smooth.
Installing Collaborative Design for SOLIDWORKS Add-in (UES)
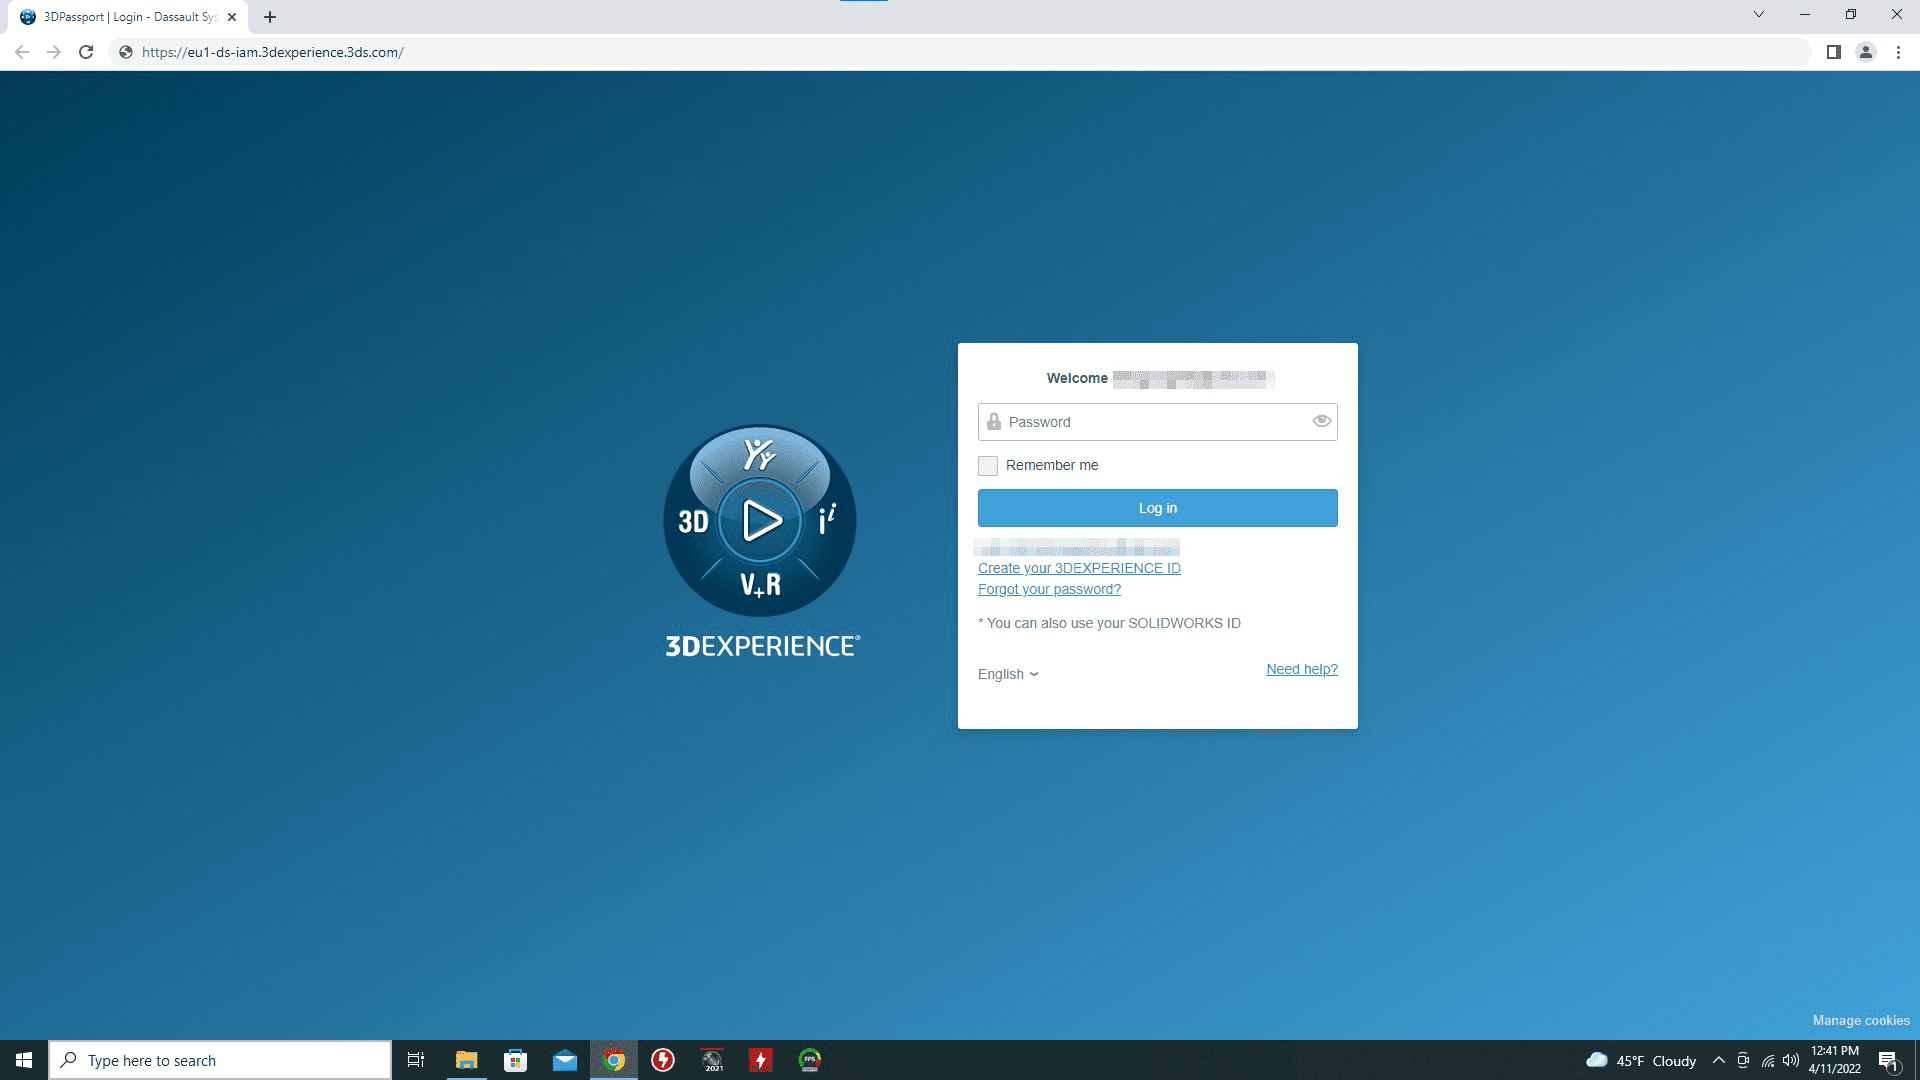
First off we need to open your favorite web browser to the following web address.
https://eu1-ds-iam.3dexperience.3ds.com/
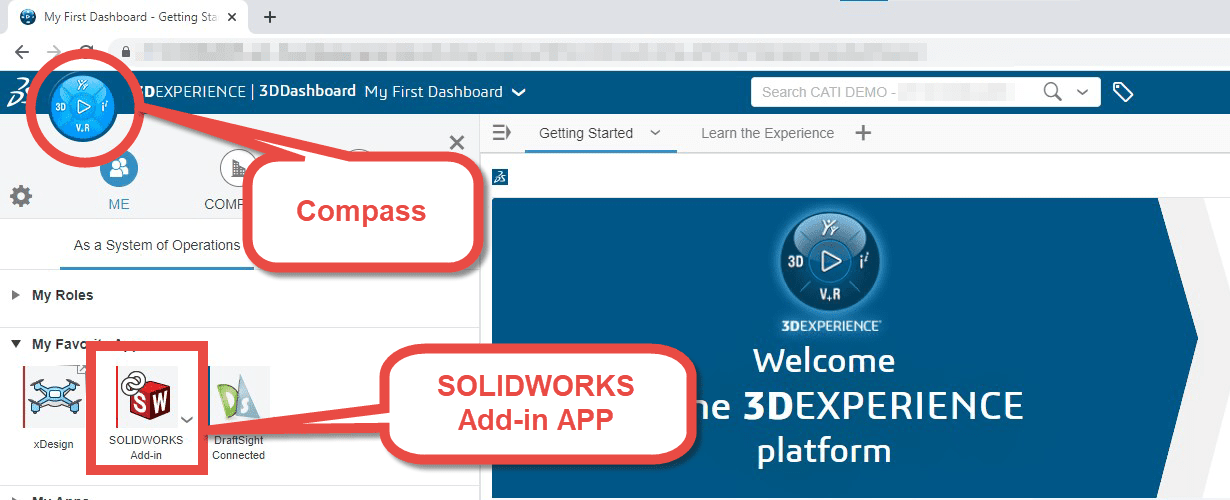
Once you have logged into your tenant and have your dashboard up on the screen, you’ll want to go to the Compass ( the blue circle with the play button in the middle). From the flyout menu on the left, you will look for the SOLIDWORKS or SOLIDWORKS Add-in APP.
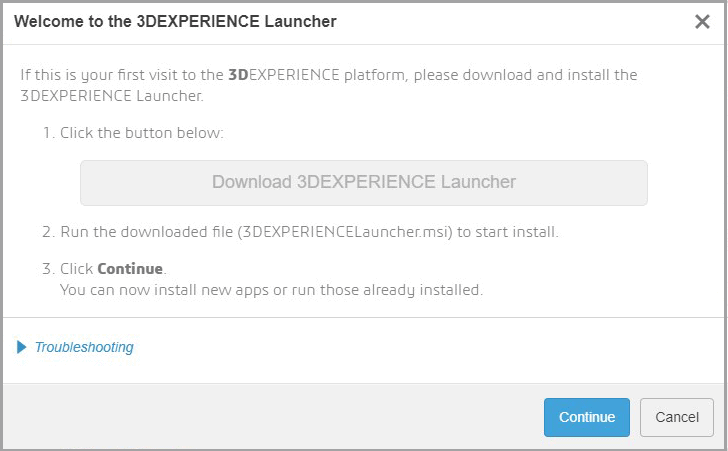
If this is the first time installing anything from the platform you will need to install the “3DEXPERIENCE Launcher”. This will happen automatically when you click the APP for SOLIDWORKS. The Launcher will download itself to your windows download folder. Run the installation and then click continue.
Once the Launcher has completed its installation, you will click on the SOLIDWORKS Add-in app icon again and you should be presented with the following screen. With two options, Install All Granted Roles and Install All Roles Containing SOLIDWORKS Add-In we recommend just roles containing the SOLIDWORKS Add-in for now.
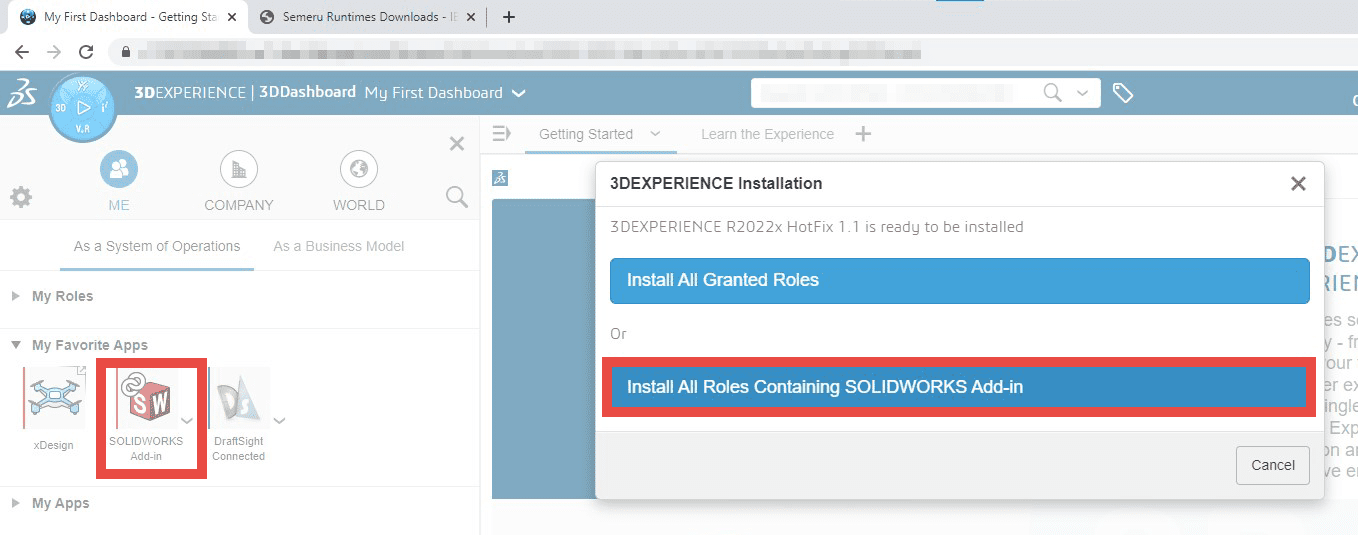
When you select the second option, two installations will fire in succession. The first is the SOLIDWORKS Add-In and the second is the 3D Drive tool
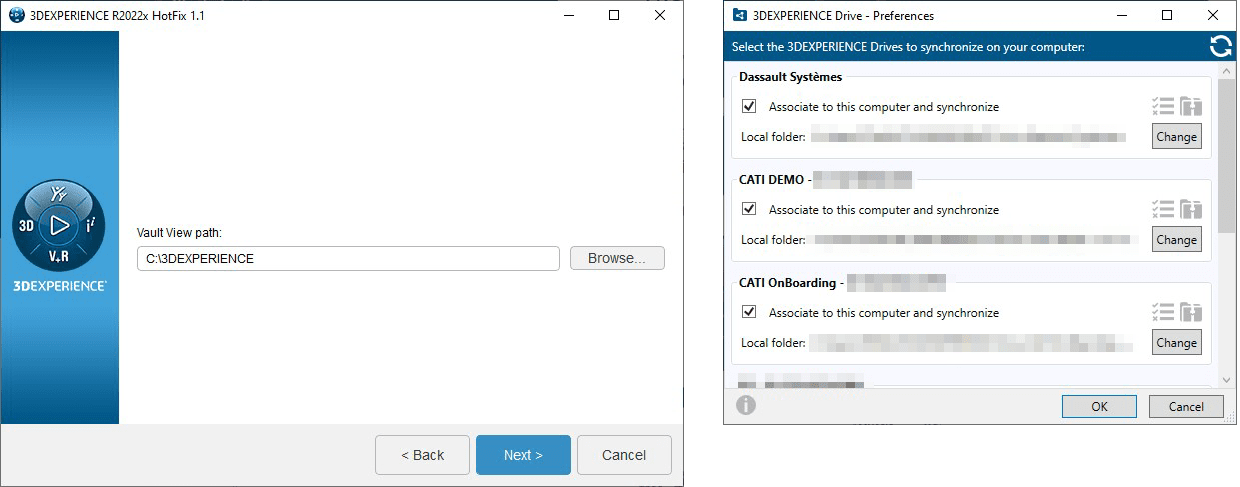
For the SOLIDWORKS Add-in installer, you are given the option to change the install location and the Vault View Path. The Vault View Path is the location of your local cache when opening SOLIDWORKS data from the platform. The 3D Drive installation shown below on the right asks for the drive location to sync files from the 3d Drive locations. If you are not using 3D Drive you can cancel the installation and it will not affect your SOLIDWORKS Add-in.
How to link SOLIDWORKS to your tenant the first time.
Now that you have finished your installation of the 3D EXPERIENCE Launcher and SOLIDWORKS Add-in for your SOLIDWORKS, your first thought would be to execute SOLIDWORKS from your desktop icon as you always have. But this time will need to be a little different. If you try that the first time, you’ll see a message that a connection has not been formed with your tenant. To do this, we go back to our dashboard in our browser, click on the compass again and click on the SOLIDWORKS Add-in App icon. This will execute SOLIDWORKS and form the needed connection between SOLIDWORKS and the platform.
Bob McGaughey
Sr. Application Engineer, Strategic Solutions
Computer Aided Technology