Stratasys 3D Printing: Objet Pattern Test
Objet Pattern Test
The Polyjet rapid prototyping machines are Stratasys’ highest accuracy and highest detail machines. To keep the accuracy and reliability of these machines so high, we will have to do some preventative maintenance checks and calibrations on them occasionally. One of these tests is the ‘pattern test.’
The pattern test is quick, less than 5 minutes, preventative maintenance check that is recommended to be performed about once a week, or before a really large build. The point of the pattern test is to gather information about the health of your print heads. We want to make sure that they are still in good working condition and to know when we should change the print heads out for new ones.
A little background on the print heads first. The polyjet machines work similar to an injet printer. The print heads on the desktop machines have 192 nozzles on them, and there are two print heads total – one for model material and one for support. The print heads will jet out a liquid resin exactly where the material needs to be, like it was printing a picture, and a UV light will cure everything. Now if a nozzle were to get clogged, it could pose a big problem, but there is a lot of built in intelligence into the software to mitigate how much of an issue clogged nozzles will cause. The printer has a ‘random scatter’ amount programed into it where the print head will shift randomly up or down a few nozzles after each pass. This alleviates any issues that could be caused by a few bad nozzles by spreading the error around enough to have the other working nozzles compensate.
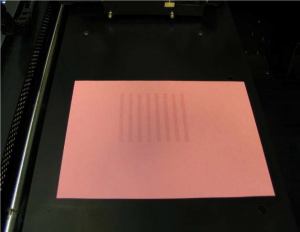
Let’s take a closer look at the pattern test. Like all of the other calibrations and preventative maintenance on the Stratasys Polyjet machines, there are built in Wizards to guide you through the process. All we have to do for the pattern test is tape a piece of pink paper onto the empty build tray. The reason we use pink paper is specifically because it offers really good contrast to see the printed marks. Now we will go to Options>Pattern test. With the cover closed, it will heat up the print heads and print a small swath of resin from each nozzle onto the paper. The UV lamp does not turn on for this because it is only doing one small pass with no overlap so we can distinguish the lines easily with the naked eye.
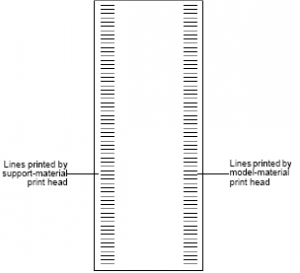
Once the pattern test is done, we will take off the sheet and get a reading from it as to how healthy the print heads currently are. We are looking for two things. One, there should be less than 5 missing nozzles in one chunk. And two, no more than 12 missing nozzles overall on the print head. These rules apply independently to each print head.
If the results were below acceptable, we will want to do another heads cleaning wizard and try it again. If it is still bad, try running a reinitiate and head cleaning to open up some nozzles. Usually some of the nozzles are not permanently closed off and will come back with a little extra cleaning. If after trying everything we can to open the nozzles back up, this could also include flushing the system with cleaning fluid, we will then want to replace the print heads.
Jake Nixon
Application Engineer, Additive Manufacturing
Computer Aided Technology