Self Upgrading SOLIDWORKS PDM
If you choose to self upgrade your SOLIDWORKS PDM Products there are a few things that are commonly missed and some fundamentals that should be considered for healthy system and minimal downtime. Also don’t forget to check the SOLIDWORKS PDM System Requirements!
1) SOLIDWORKS PDM Products are highly configurable to suite many types of business and company practices. This can make upgrading SOLIDWORKS PDM to a new version of software less than intuitive.
2) Each Version can introduce new challenges or practices. Make sure your Installation guide and reference material is up to date. The Whats New guide for PDM Standard and PDM Pro can help you understand new features or developments for each new version of the software being applied.
These guides will typically be in your installation Files folder: Support\Guides\GB (This is English).
Or the current version is in your installation folder, typically C:\program files\solidworks pdm\lan\GB.
3) Your environment is a big factor to consider when upgrading. Operating systems, clients and companion Software must maintain compatibility with newly installed software and features.
Setting Expectations for Upgrading SOLIDWORKS PDM
Attempting a self upgrade of SOLIDWORKS PDM is more complex than upgrading a typical application.
- First, this is a project with multiple facets and it may impact and require several types of expertise to bring to fruition. Engineering, Information Systems and your user community are typical stakeholders and task owners in the effort. A staff member attempting this solo can often be outside their comfort zone in one or more aspects of the work. Make sure to leverage the help from your VAR support with up front questions or concerns going in. A 15 minute conversation or a reference document can go a long way to avoiding pitfalls or delays.
- Second, this is not an intuitive process. What your VAR partners can complete in a few hours as a result of training and experience, may take the first timer many hours and a great deal of patience to navigate the learning curve. Preparation and planning is paramount and especially for first timers.
Risks Associated with Self Upgrade
Like any project, risk management is essential when self upgrading SOLIDWORKS PDM. Upgrading can encompass several different options based on your needs and installation. The least risky upgrade is moving to a new service pack for a given version of SOLIDWORKS PDM (i.e. 2017 sp 1.0 to sp 2.0). Other needs or Installation options can greatly increase the complexity and risk. Replication, server moves, storage changes, are a few of the types of activities that can make self upgrading a more risky project.
In these instances, I would urge first timers to Explore Var assisted options to reduce risk and accelerate the learning curve. Here are some of the undesirable results that upgrading makes you susceptible to.
- Systems are subject to downtime or information loss related to learning curves
- Opportunity costs related to lengthy downtimes can push out projects and interrupt operations
- Loss of information can strain staff and create redundant effort.
High Level Best Practices
- Upgrade your SOLIDWORKS Network License Manager and validate any new or invalid licenses right away. This will give you some time to resolve any license issues with SOLIDWORKS prior to launch day.
- Download software (full set of files Option) from www.solidworks.com. Do not use disks unless you are comfortable upgrading to service pack zero. A full download of install files will currently look like this. It is not recommended to run the SOLIDWORKS installation manager for server upgrades.

- (Optional) Create a Test Environment and perform User, Administrator and IT (if appropriate) Validation.
- Prior to performing the upgrade, ensure users check in all files and then disable login/services make the PDM system Backups. SQL Databases, Archive Files and backup.dat (archive configuration tool).
- Go Live: Upgrade Your Server Application.
- Go Live: Upgrade Your Databases with Upgrade.exe from your installation files.
- Go Live: Upgrade Your Add-ins or customization.
- Go Live: Enable logins/services and make any new setting or Permission Changes.
- Go Live: Upgrade the toolbox on the first Solidworks client to upgrade if applicable.
Deciding on a Test Environment for a SOLIDWORKS PDM Upgrade
Consider creating a Test environment with the new software that mimics your production environment when upgraded. This will give you an opportunity to perform tests to see how changes impact your users and what technical issues you may experience in your customization and environment. This step is more critical the more users you have and the more you need to minimize risk.
This step requires considerable knowledge and experience with SOLIDWORKS PDM but can be crucial to minimizing risks when moving servers, jumping a few software versions or managing user expectations and needs.
Preparation and reference Material
Ensure system prerequisites and application compatibilities. All new PDM products require 64 bit operating systems for clients and servers for example. Currently .net 3.5 and 4.5 is a required prerequisite on any machine running PDM software.
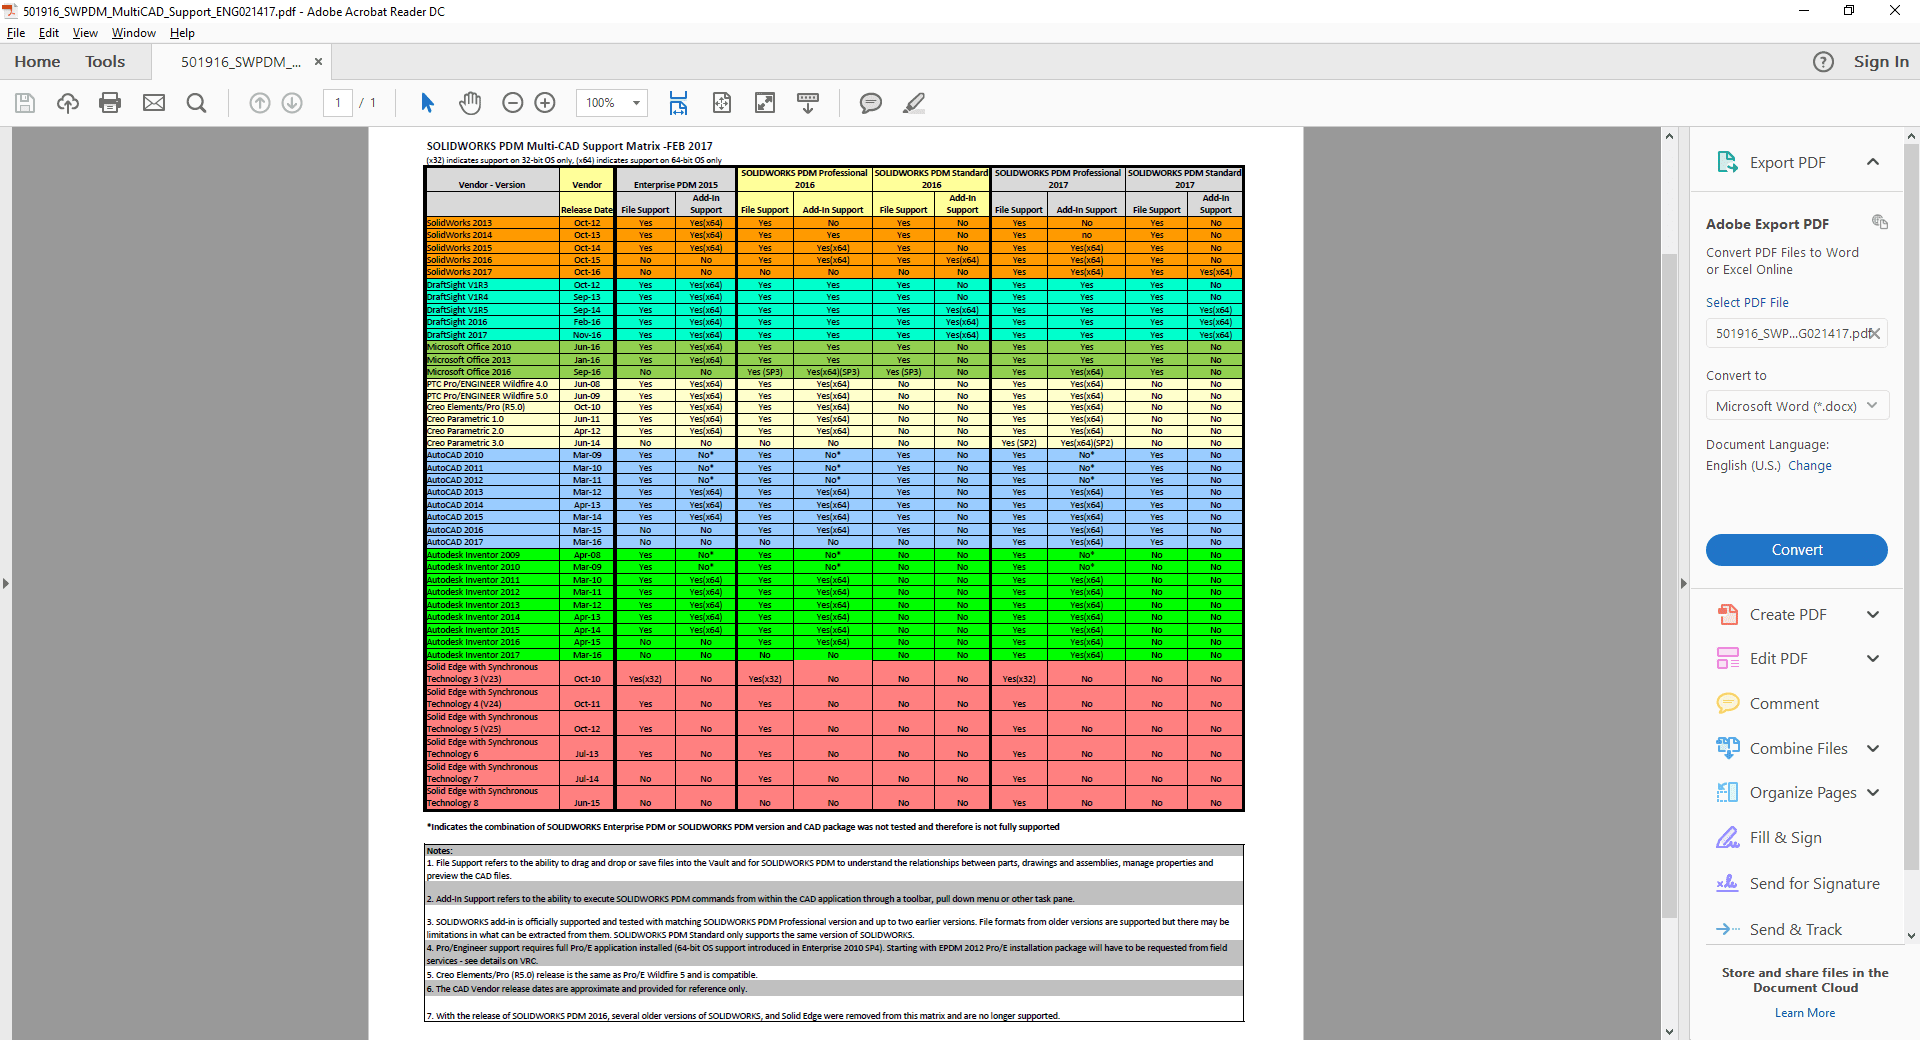
You will want to check your other software for compatibility with your new SOLIDWORKS version like Pro/E, Inventor, MS Office, etc. These things are documented in a few places outside of the installation guide mentioned previously.
Ask us if you need help accessing a reference item or get stuck on a specific activity.
SOLIDWORKS Support
SOLIDWORKS Online Help
SOLIDWORKS PDM System Requirements
CAD Compatibility Matrix (sample of pdf)
Terry Griffith
Inflow Technology
www.inflow-tech.com