Stratasys 3D Printing: UV Lamp Replacement/Calibration
UV Lamp Replacement/Calibration
You will need to replace your uv lamp in your Objet printer if the lamp goes bad or if when calibrating the lamp the software tells you that it needs to be replaced. To replace and calibrate the lamp follow the steps below.
1. Shutdown the printer using the Start-Shutdown option.
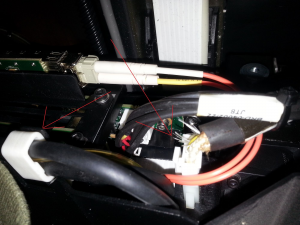
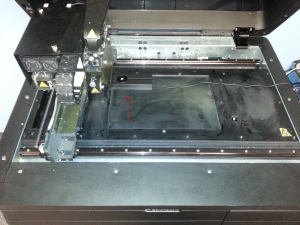
2. Find the two cables that go to the UV assembly and disconnect them.
See the picture below:
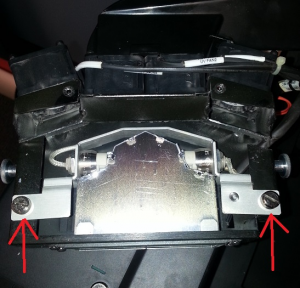
3.Find the two thumbscrews on the sides of the UV assembly and loosen them.
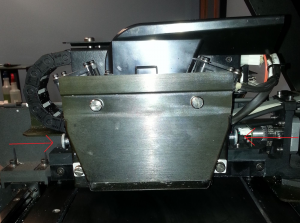
4. Lift the assembly up and off the block.
5. Loosen the screws on the front of the UV Asm and remove the front plate.
6. Loosen the two screws holding the lamp asm and wire ties if present.
7. Remove the lamp asm.
8. Put the new UV Lamp in its place and reassemble.
9. Plug in the two cables coming from the lamp asm.
10. Follow the calibration procedure.
To calibrate a UV lamp on V1 or V2 printer
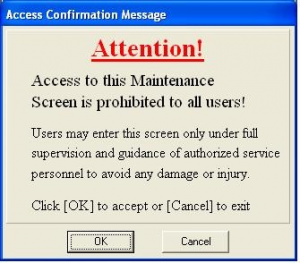
Put the machine in maintenance mode. Place the mouse cursor in the bottom right hand corner of the screen and press CTRL + ALT + M. A window will pop up. Click ok.
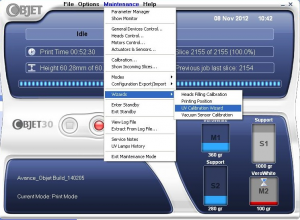
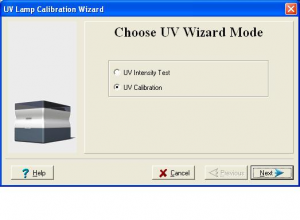
You should now see a “Maintenance” option on the top of the screen. Click “Maintenance” > “Wizards” > “UV Calibration Wizard”.
Version 1 and 2 printers require an external meter to calibrate the UV Lamp.
We will send the meter to you to calibrate these printers.
The wizard will guide you through the process. Click next. Make sure that UV Calibration is selected, not intensity test.
Follow the instructions in the wizard.
Clean the tray and close the cover.
Wait for the printer to finish moving the axis. Place the UV sensor on the back left corner of the tray.
Close the lid. Turn the UV meter on. Make sure that the switches are both in the up position. Click next and wait for the UV lamp to warm up.
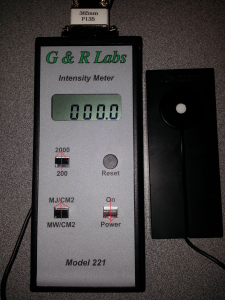
Wait for the wizard to prompt you for a UV lamp power reading and then enter the number from the UV meter. Reset the meter and then click next. The wizard may have you reset the meter and run through the power reading again, if an adjustment needs to be made. If it does, enter the new number from the UV meter.

If the meter calibration completed successfully, you will see a screen with a green check mark. If your UV meter cannot be recalibrated to the strength needed, there will be a red x and you will have to replace the assembly.
For V3 printers
Go to Options-Wizards-UV calibration wizard to calibrate the lamp.
Select UV Intensity Calibration. Click Next.
Select the internal sensor if you have not been sent a UV meter to calibrate the printer with.
Make sure that the build tray is clear (empty). Confirm this in the wizard screen and click Next.
The wizard will have you check that the UV Sensor cover is open. The sensor cover is to the right of the build tray and slides open exposing the sensor.
The sensor glass is clean. You can check this when you slide the cover open.
The UV glass is clean.
Check these and click next.
When you click Next, the UV lamp powers up and stabilizes (this takes
several minutes). Then the print block passes over the sensor and the
wizard compares the measured radiation to the recommended level.
If the UV level measured is not acceptable, the wizard calibrates the UV
lamp by adjusting the current supplied to it and then tests it again.
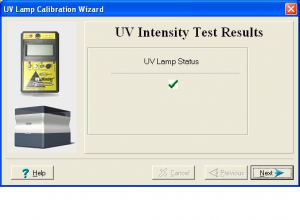
When completed, the wizard displays the condition of the lamp, after
calibration.
If it shows a green check mark it is good. You can close the sensor cover and click next.
If you get a red x, it is not able to calibrate the sensor.
Recheck that the cover is completely open and the glass on the sensor and uv assembly are clean and try again.
If it still will not calibrate, call support.