Creating SOLIDWORKS Library Features From Scratch
6 Easy Steps to Create SOLIDWORKS Library Features From Scratch
Creating Library Features from scratch is a VERY valuable technique to know. It can save you tons of time when you have “common features” that you want to reuse over and over again.
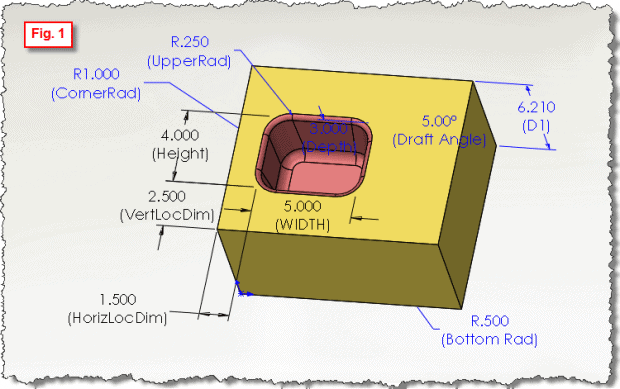
In this case let’s say we have a drafted, filleted, pocket that we are tired of creating over and over every day. (Fig. 1) We would like to “capture” this feature into the Design Library so that we can just Drag & Drop it into any model.
1. MODEL THE FEATURE ONE TIME…
Yes. You do actually have to build it one time. When you do, consider if you want it to be “locked down” with some locating dimensions, or if you want it to remain “free” to position anywhere. If you do add dimensions to locate the feature (from the side and bottom edges in this case) then you are laying an extra requirement on the end user that they will have to identify those references (edges in this case) when they use it. This action is really repairing the dangling relation/dimension that comes in with the feature.
2. (optional) RENAME THE IMPORTANT DIMENSIONS TO LOGICAL NAMES…
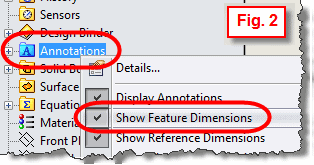
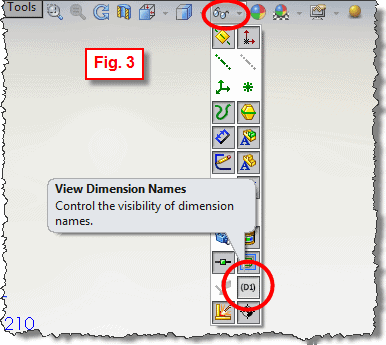
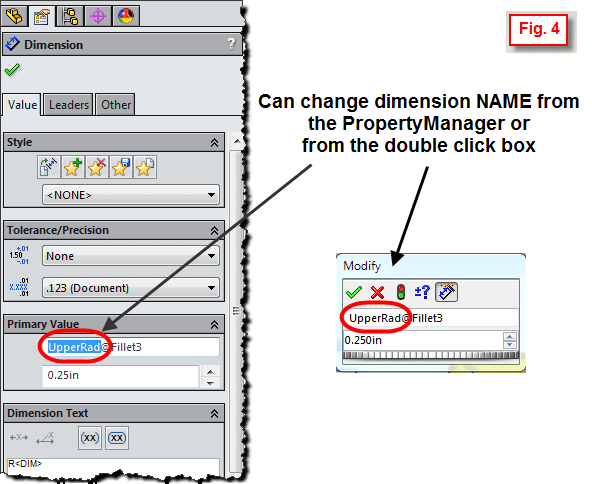
This step is totally optional, but sure does make the part a lot more user friendly. If you just leave everything named “D1@Sketch3” and “D4@Cut-Extrude2” that isn’t going to make a lot of sense to anyone who goes to use this Library Feature. If you right click on the Annotations folder in the Feature Tree and turn on “Show Feature Dimensions” (Fig. 2) this will display ALL of your part dimensions on the screen. Then if you also turn on “view dimension names” from the heads up view toolbar (Fig. 3), you can see the names that were auto assigned. Now you can just select a dimension and over in the Property Manager give it a new name. Or you can double click a dimension and change its name right there. (Fig. 4) You of course only need to worry about renaming the dimensions that you are actually going to use in the library feature. In this example we wouldn’t need to worry about renaming any of the dimensions in the big block. Only those in the “pocket” features.
3. (optional) CHANGE THE COLOR OF THE ACTUAL FEATURE(s), AND ORIENT…
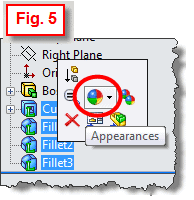
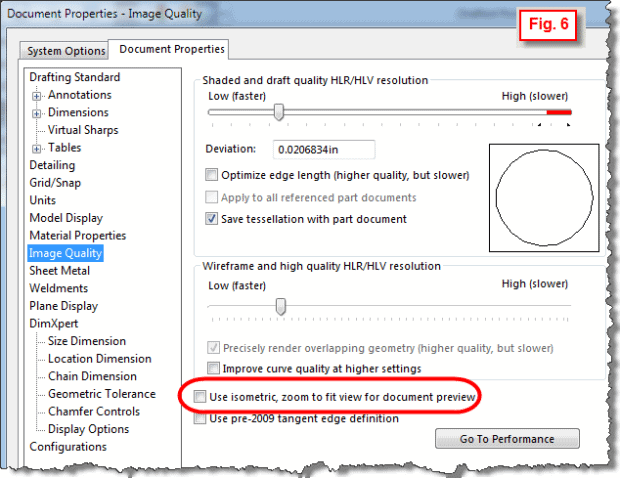
In the Feature Tree, Ctrl+select the features that make up the library feature you want to create. After you let go of the Ctrl key, on the pop up toolbar will be an appearance icon (color ball). (Fig. 5) Use this to change the FEATURES to something that stands out. You could also change the rest of the part to something like gray or white. This is just going to make the thumbnail graphic show better in the Design Library. Next you would want to orient your model to however you want the thumbnail graphic in the Design Library to look. However, there is a setting you most likely want to turn OFF. It is Document Properties—Image Quality (Fig. 6)
4. ADD TO LIBRARY…
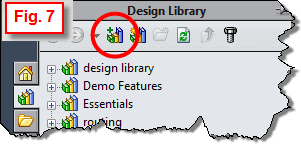
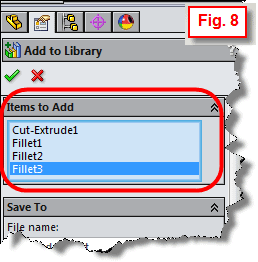
Open up the Design Library in the Task Pane and navigate to the folder you want to store your new library feature in. Hit the “Add To Library” button at the top. (Fig. 7) In the property manager that comes up on the left, under “Items To Add” (Fig. 8), BE SURE to select which features you want included in the Library Feature! (use the flyout feature tree). For example in this model we would select everything EXCEPT the first feature (the big block that we cut the pocket into). If you included that block then it would also get inserted when you used the Library Feature rather than just the pocket with the fillets. A lot of people miss this step. By the way, you could of course PRE-select the features in the feature tree BEFORE hitting the “Add To Library” button if you wanted… Hit OK to finish adding the features to the library.
5. ORGANIZE/CLEAN UP THE LIBRARY FEATURE…
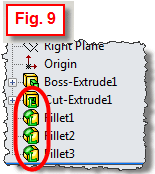
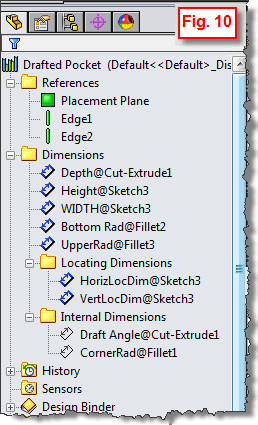
You should now be in a “.sldlfp” (library feature part) file now. Look in the Feature Tree. There should be green “L”s on all of the features that you intended to be included in the library feature. (Fig. 9) The library feature is really ready to use, but there is some “clean up” work that should be done in the file first. Open up the “REFERENCES” and “DIMENSIONS” folders in the Feature Tree. (Fig. 10) The References folder shows what the user will have to “satisfy” when using the feature. In this example the user will drag & drop the feature onto a face to satisfy the Placement Plane, and then they will select two edges to position the feature. These two edges are required because we DID put positioning dimensions to some edges of the block in the original part. If we had left the original feature “free” to move, we would not have this requirement in the Library Feature. In the Dimensions folder, drag any dimensions that are considered “locating dimensions” into the Locating Dimensions folder (i.e. the two dimensions from the edges of the block). By default when the library feature gets used, any of the other dimensions listed in the Dimensions folder will be able to be modified as the feature is placed. This is very nice to be able to modify the feature on the fly on a case by case basis. However, if you want to lock the user out of being able to modify certain (or all) of the dimensions of the feature, drag those dimensions into the Internal Dimensions folder. In our example we have locked the user out of being able to change the Draft Angle and the Corner Radius of the pocket. (Fig. 10)
Now Save the .sldlfp file one more time, and then close all open files.
6. YOU’RE DONE! TRY USING YOUR LIBRARY FEATURE !!!
Have fun creating an infinite number of Drag&Drop features in your library to save you tons of time!
Have you every used Library Feature? Let me know in the comments why you used it or if you wish you knew about it before now. For more SOLIDWORKS Tips and Tricks follow us on Twitter for weekly Tech Tips.