Save a Life – Optimize that Design with SOLIDWORKS Simulation
The beads of sweat drip off my forehead as I drill my climbing anchor into the rock. I maneuver the rope through the anchor’s 9mm slot for the rope to fit through. After the rope is tucked through the anchor, I place the strap through my carabiner and secure it, then begin my climb upwards. As I move upwards my left foot slips on a piece of shale, and my hands lose their grip. I fall backward hoping my carabiner and anchor system holds. Thankfully, the carabiner’s suggested 9 KN engineering rating holds fine, and I fall only five feet instead of the 100 feet to the mountain floor.
I realize many of you may not spend your free time hanging out on the side of a mountain 100 feet in the air on a small rock ledge—trusting that engineers adequately designed a four inch curved piece of metal to hold your weight. Regardless, we all rely on products we use daily that have been designed and optimized by engineers for our safety.
In the past, optimization required engineers to build numerous prototypes and to then physically test their products. This process of optimization required extensive time, money, and effort. With the advent of finite element technology, engineers are now able to optimize their designs virtually.
In this blog post, I will demonstrate the process of optimizing an engineering design using my carabiner within SOLIDWORKS Simulation. It is important to note that optimization is only available within the SOLIDWORKS Simulation Professional module.
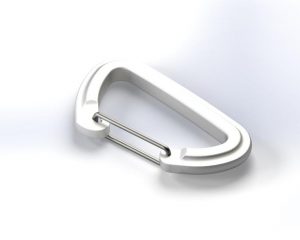
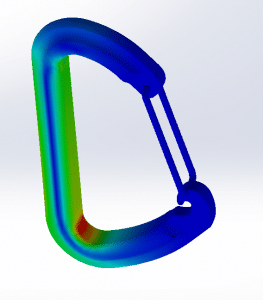
Optimization within SOLIDWORKS Simulation can be run for Static, Frequency, Buckling, and Thermal Studies. For this study, we will optimize the design of a rock climbing carabiner for its material properties. The dimensions are set in stone. We want to see what material alloy is the strongest within the requisite dimensions. Below I have a rendering, done in SOLIDWORKS Visualize, of the carabiner we will analyze.
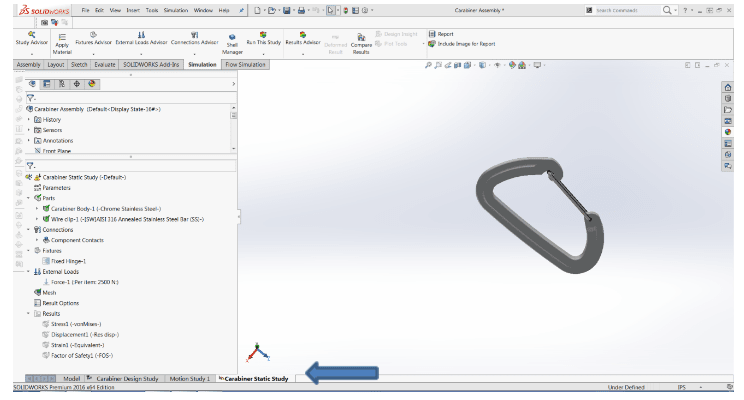
Whenever conducting an optimization study, you must first setup the initial study you will reference when running an optimization study. The optimization study will then reference the required fixtures, loadings, and mesh, you input for that study. Since we are conducting a structural analysis until material failure, we select the linear static solver. If you were doing any of the above-mentioned optimization studies, your initial study would reflect this (i.e. Frequency optimization, then you would have an initial frequency study).
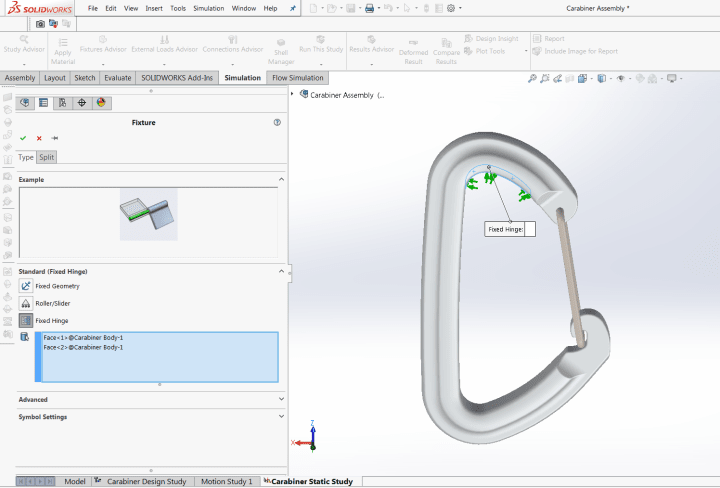
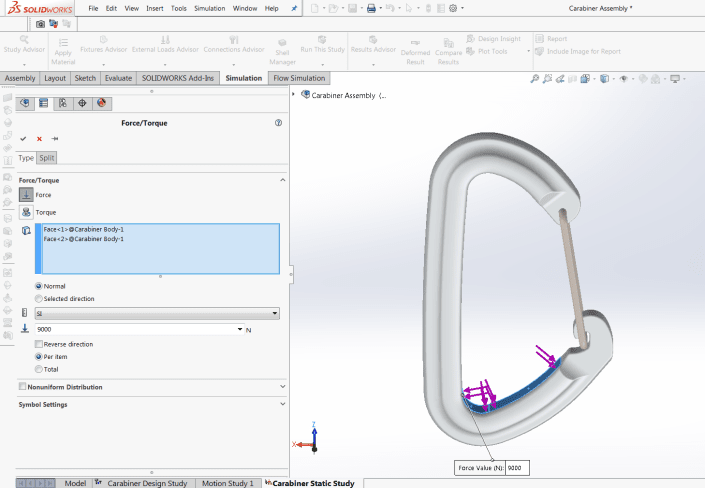
Upon starting the initial study, the process is similar to every other FEM study, applying the appropriate fixtures, loadings, and mesh, and then running the analysis. First, the carabiner will be fixed in the global y direction on the inside top face, and the force will be applied on the inside bottom face, this will represent the realistic loading behavior incurred on the carabiner.
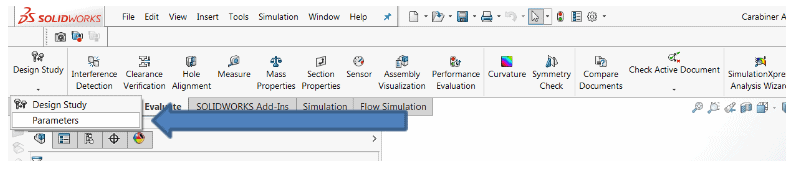
The following step is to apply your material and mesh your model. It should be noted that since we are going to run an optimization study, there is one final step before running your model. An optimization study makes use of parameters (variables) which you can adjust. Since for this study we are interested in the effect of different materials, we have to bring up the parameters interface. The parameters interface can be accessed by clicking on the evaluate tab, then the design study drop box and clicking on parameters.
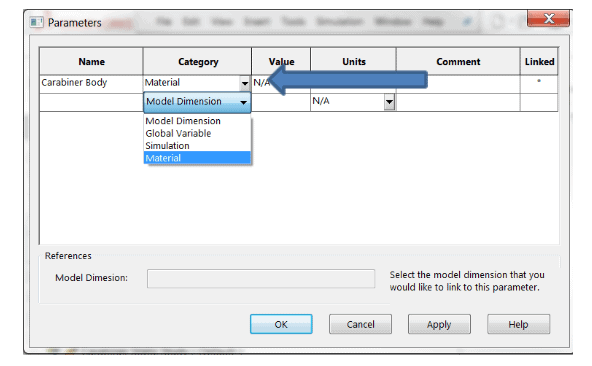
Upon doing this, the parameters box will appear. Within this screen, you will have the option to edit whatever design variable you are interested in. In this case, we are only interested in optimizing the design around materials so we select the material variable. However, you also have the ability to optimize designs around dimensional quantities, simulation variables, and global variables. We type in a name for the category Carabiner Body and make sure we have selected Material for the category. It should be noted that in an optimization study you have the ability to define numerous variables for optimization, you are not limited to one variable. Click ok and close the parameters list, you are now able to run the initial static study.
Upon completion of the static study, feel free to check out the initial stress to make sure the deformation and stress value makes sense. For this example, we expect a maximum stress at the location where the climbing rope would be situated. We see on the figure the maximum stress is located where we expect it to be, so the initial fixtures and loadings we have applied are appropriate. It is always important before beginning an optimization study, that your study makes sense; otherwise, the optimization study will be of no use.
Since our static study corroborates the results we expected we can begin the optimization study. Click on the evaluate tab then click on the design study icon, for our study we will name it Carabiner Design Study. You will notice that when you create a design study, it will bring up the pane shown below. Within this pane you will see there is an optimization button, make sure this button is checked. You will also notice that there are three boxes: variables, constraints, and goals. I will now walk through the process of what variables, constraints, and goals are.
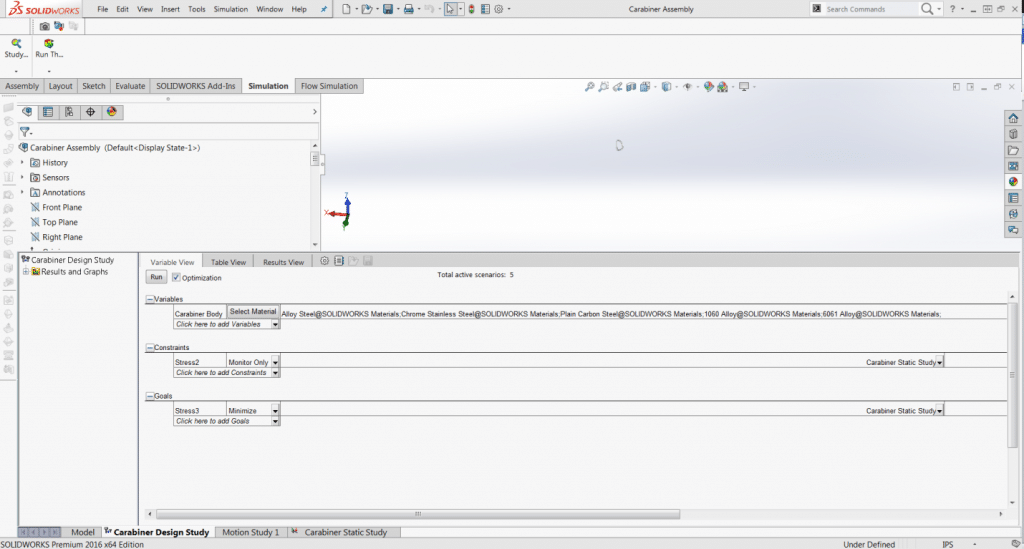
The first box you will see is the variables icon. This box corresponds to the specific variables you wish to study. For our study we are interested in running a variety of different materials, so we select the material box, and then manually enter in all of the materials we want the optimization study to run. It should be noted that you can enter in a variety of different variables into this box, and they do not have to be solely material (as indicated in the preceding paragraphs). For our study, we will vary the material properties for five common machined materials utilized for carabiners: alloy steel, stainless steel, plain carbon steel, 1060 aluminum alloy, and 6061 aluminum alloy.
Within an optimization study, you must tell the program what you are monitoring, that is where constraints comes into play. The constraints icon corresponds to the sensor you are interested in monitoring. You can monitor whatever specific sensor you are interested in setting, and it can be for the entire global model or a localized region. You are only bound by the sensor settings within SOLIDWORKS Simulation. In our study we to see what is the strongest material, so we want to therefore, monitor stress. A sensor was already defined to monitor the global Von Mises Maximum stress, so we select that sensor under our constraint box. Within constraints, you also have the ability to specify a range in your constraints box for your specific sensor. For instance if you wanted to say that the stress must be less than a particular value, you can specify that in the drop down box, you also have the ability to specify a range, and a maximum as well. You have total flexibility in regards to the constraint box. For this design, we want to see the entire range of the stress so we select monitor only.
The final step in running an optimization study is to provide the goal you are interested in. The goal is what the optimization study points to, to provide the optimized study. The goals dialogue box allows you, the user, to optimize a design around specified goals. In our study our optimum part is the part with the smallest stress, so we select stress minimize. It should be noted that if you were varying dimensions in your variables tab, for the goal you would select mass and then minimize. Within the goals pane you have a variety of options to play around with, in regards to optimization. You should plan to check out all of these remaining options on your own.
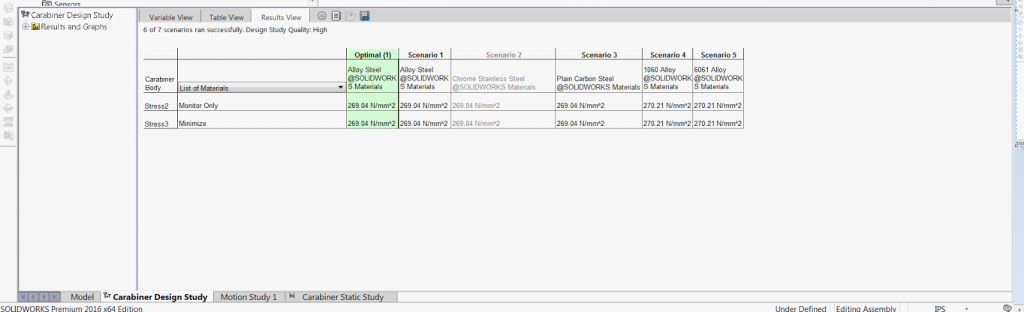
Once all variables, constraints, and goals are entered, you can then run the optimization study. For this particular optimization study, we have five active materials we are going to run. Upon selecting run, SOLIDWORKS Simulation will run all possible combinations and upon completion provide you with the optimum design. One of the great features about optimization is it will automatically highlight the optimum design in green upon completion. For this optimization study, it is indicating that the optimum material is an alloy steel. It should also be noted that if you have an optimization scenario that is red, then that scenario is not meeting the specified criteria you are indicating, in this study no scenario is failing since we selected monitor only for the stress constraint.
As a designer, I can now see that the alloy steel material is the strongest carabiner, and I have saved substantial time from an optimization standpoint. I did not have to spend weeks making various types of prototypes and then spend time with costly testing. Optimization allows designers to quickly and effectively validate their designs, and it is an extremely useful and powerful tool within SOLIDWORKS Simulation. I know the next time I am out on a mountain ledge, I can trust the engineers who made that four inch piece of metal, because I optimized their design and I know they most likely did too.