How to use GrabCAD Print: FDM
GrabCAD Print is the latest 3D Print-Preparation (aka “slicing”) software from Stratasys. Today, it supports all current Stratasys FDM (Fused Deposition Modeling) machines, as well as the J750 Polyjet machine, offering an intuitive user interface with improved scheduling functionality. Read my Introduction to GrabCAD Print article for a high-level introduction to the tool. In today’s blog, we’ll discuss using GrabCAD Print for FDM in practice, with a real-world example.
Before we begin, a bit of context is in order, to understand where GrabCAD Print fits into the 3D Printing workflow:
There are 3 steps to bringing an idea to life with 3D Printing.
1) It starts with the design, fleshed out using Computer Aided Design (CAD) software like SOLIDWORKS to create a digital model.
2) The next step is a planning phase, where we make decisions about how the part will be constructed by the 3D Printer, and generate the machine code to do it. This is where GrabCAD Print comes in.
3) Finally, GrabCAD Print sends the code to the printer, and is used to monitor the job’s progress.
GrabCAD Print is free to download, install, and use; just sign in to print.grabcad.com to get started. The print server software and SOLIDWORKS add-in are there too, but we’ll discuss them in another article.
If you’re connected to the internet when you launch GrabCAD Print, you’ll be prompted to sign in (you’ll need to sign in to take full advantage of GrabCAD Print’s cloud functionality, but the steps below still work if the machine is offline). This is what you’ll see (I’ve identified the UI areas we’ll be focusing on):

I’ve designed this container in SOLIDWORKS.
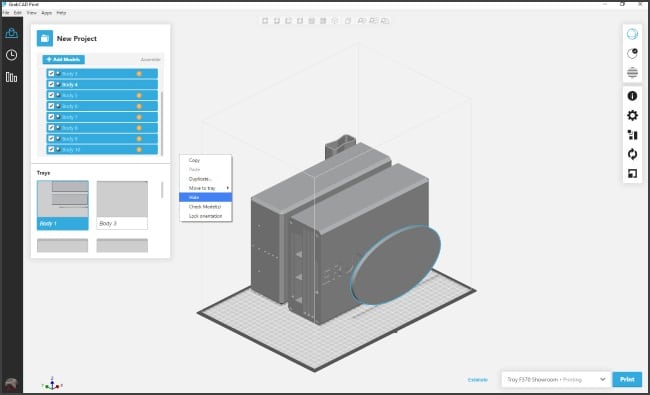
With GrabCAD Print, there’s no need to convert to STL, I simply click the button to “Add Models” and select my part; or just drag and drop the file into the GrabCAD Print window. My model is a multi-body part file, so GrabCAD Print interprets it like an assembly, displaying all the bodies as sub-components. They’re separated by default, with extra trays added automatically to accommodate them. Since I imported native CAD geometry, units and scale are implicitly defined, unlike with STL models. Some of the bodies are quite large (indicated by an asterisk), but I won’t need to print them anyway. I’ll right click and hide all the components I don’t need.
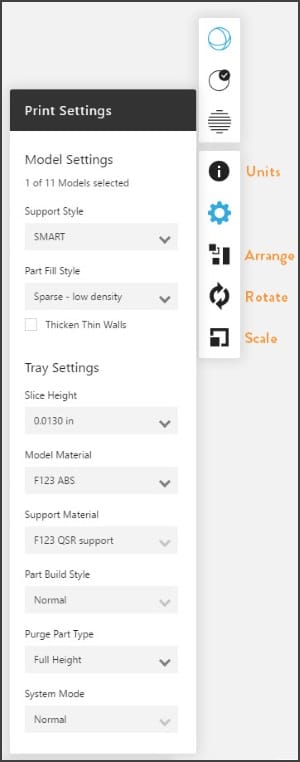
At this point, both bodies fit on a single F370 tray. I could print now, but I’ll spend a few more minutes to manipulate the models and optimize the print settings. I want these to print as fast as possible, so I’ve increased the Slice Height for the tray, and set the fill style for each part to a low-density sparse infill (so the parts are printed mostly-hollow).
Then I estimate the build.
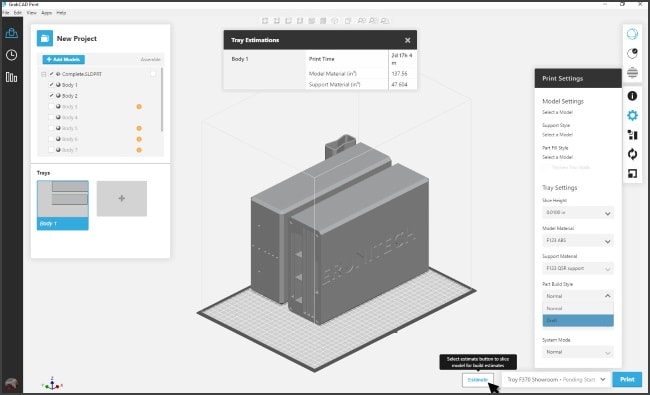
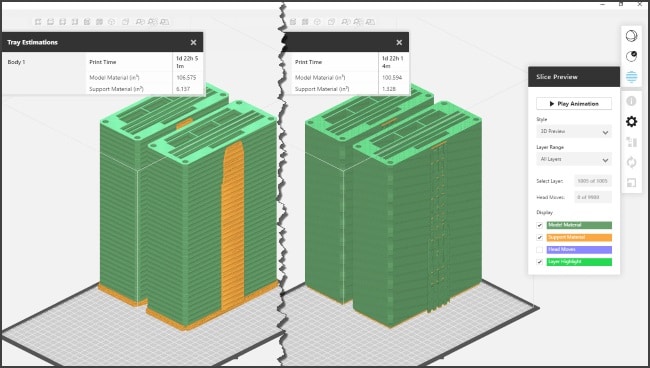
Three business days is a bit longer a build than I would have hoped, and uses lots of support material, which will need several hours to soak off in the support removal tank. I’ll try to reduce the build time by re-orienting the models with the openings facing up.

That shaves off a day and most of the support material. But I can do better still using Draft Mode, which is a 0.010in slice option. As we can see in the Slice Preview, Draft Mode replaces areas of support structures with model material, and reduces support on shallow overhangs. This means I’ll be easily able to remove it all by hand. And it takes less time to build, with a better surface finish (0.010in vs 0.013in layers). Sold!
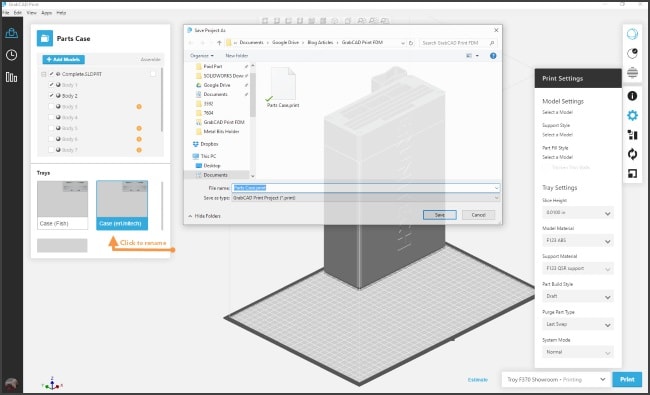
Rather than wait two days for two parts, I’m going to build these models separately. I’ve added a tray for the second part, and assigned the same properties to it. And by saving the .Print file, I have everything I need (all my models and trays, with all their settings) all in one small file.
All that’s left is to click print, to add each tray to a build queue. In the Schedule View, I can see that if I start this build on Monday morning, it’ll be ready for me first-thing Tuesday, and I can still have the second part by Wednesday morning.
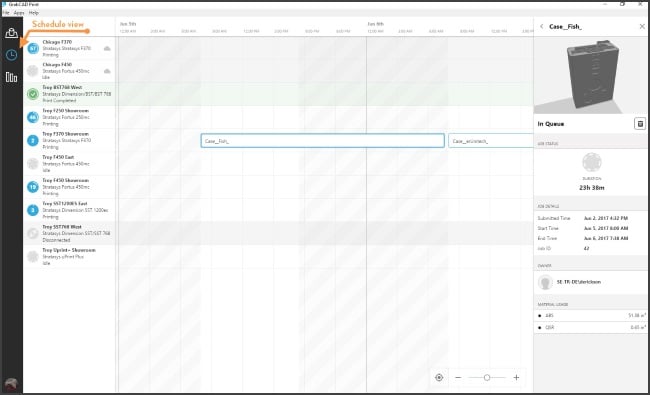
I see that I have some other machines available here in our Troy office, so I could print to one of them and build both trays simultaneously. And I can see an F370 is available in Chicago (hosted on a GrabCAD Print Server), so I could print the job there too (from here)! But GrabCAD Print Server is a topic for another article. Until then!