SOLIDWORKS 2018 What’s New – Changing the Transparency of an Assembly or Multibody Part – #SW2018
SOLIDWORKS 2018 What’s New – Changing the Transparency of an Assembly or Multibody Part – #SW2018
With SOLIDWORKS 2017 and earlier, to change the transparency of multiple components within an assembly or multiple bodies within a multibody part, you had to select on the multiple components/bodies and then change the transparency—which can be cumbersome if there are a lot of components/bodies within your assembly/multibody part.
SOLIDWORKS 2018 offers a new functionality in which you can now change the transparency of all components within a multi-body part or assembly with one single button. Multibody parts and assemblies that are displayed in Shaded or Shaded with Edges change from opaque to transparent.
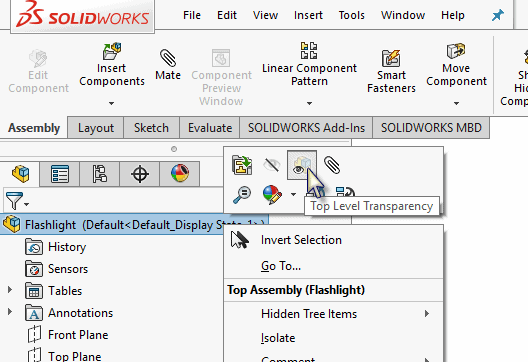
To change the transparency, right click the name of the multibody or assembly in the FeatureManager Design Tree and click Top Level Transparency on the context toolbar.
For bodies or components that already are transparent when you change the assembly/multi-body to transparent, when you change the transparency of the top level back to opaque, the component will remain transparent.

I hope this part of the What’s New series gives you a better understanding of the new features and functions of SOLIDWORKS 2018. Please check back to the CATI Blog as the CATI Application Engineers will continue to break down many of the new items in SOLIDWORKS 2018. All of these articles will be stored in the category of “SOLIDWORKS What’s New.” You can also learn more about SOLIDWORKS 2018 by clicking on the image below to register for one of CATI’s Design Innovation Summits.
Nathan Marsh
Application Support Engineer
