Objet 30 Print Head Checks and Replacement
There will be times when you will need to replace the print head or print heads in your Stratasys Objet 30 printer. If you are having a print quality issue there are a few things you can do to test whether the heads are working properly.
The first thing you should do is run a pattern test. You can find the pattern test instructions here
The next thing you should do is try to calibrate the heads by running the weight test calibration. The instructions for running the Weight Test Calibration can be found here
If one or both of the heads are missing too many nozzles and you cannot get the head to calibrate properly after following these procedures you may need to replace the print head. You can verify if the head is the issue by swapping the two heads around. If the issue follows the print head after swapping them around then you will need to order a new print head. You can order new print heads at the CATI online store.
Replace the print head or heads using the instructions below. After the head is replaced run a reinitiate (options-wizards-reinitiate) and a few purges (options-execute purge) then repeat the pattern test and calibrate the heads again using the calibration instructions.
To swap or replace the heads follow the removal and installation instructions below.
First shutdown the printer. Options-Shut Down Wizard
Select Run Wizard Unattended
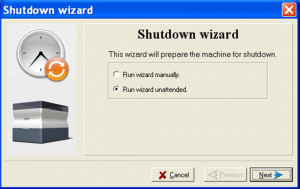
Click Next
After the printer shuts down switch off the printer and unplug the power cable.
Allow the heads to cool down before trying to remove them.
Move the print unit to the middle of the tray.
Remove the screws holding the print head cover on.
V2 printers will have 2 screws
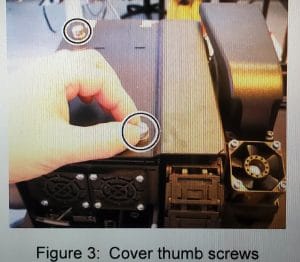
V3 printers will have 5
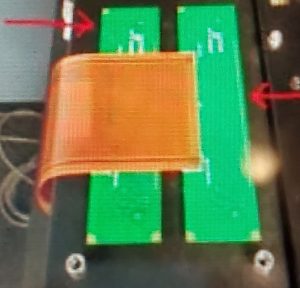
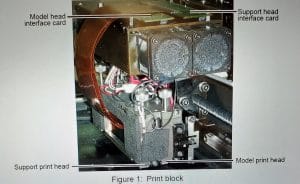
Once you have the cover removed you will see the print head cards.
You will need to remove the Support Head first even if it is the Model Head that is bad.
Carefully lift up on the print head cards to disconnect them.
The support head card is the one on the right.
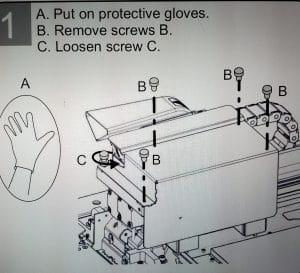
Once the head card is disconnected loosen the two thumb screws securing the Support print head to the print
block.
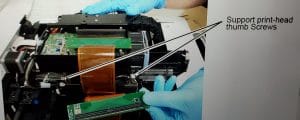
Press down on the thumb screws to release the print head from the print block.
The print head can fall when you release it from the print block. Hold the print head as shown to prevent this.

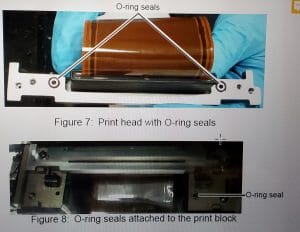
Make sure that you remove the two O‐ring seals along with the print head.
If an O‐ring seal is missing:
a. Using a mirror and flashlight, inspect the bottom of the print block.
b. Remove O‐ring seals that are attached to the bottom of the print block
If you are re‐installing the Support print head that you just removed cover the print head to protect it from UV light.
If you are not reusing the support head you can dispose of it.
If you are just replacing the support head you would install it now.
The instructions to install the head is below.
If you are replacing the Model head remove it from the printer now using the same procedure as the Support head..
To reinstall the heads install the Model head first.
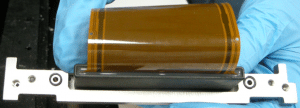
Inspect the print head and make sure that the O‐ring seals are in place.
With the print head in its installation jig, align it with the print block.
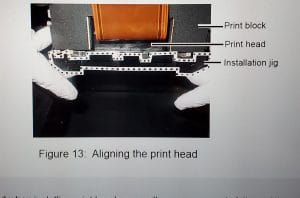
Using the jig push the print head upwards in the back where it is marked “PUSH FIRST” you should feel it click into place and
then push up in the front where it is marked “FRONT

Fasten the print head to the print block by tightening the two thumb screws.
Plug in the print head card into the Model connector. (left side)
Press the Release tab to remove the jig from the print head
Follow the same procedure to install the Support head.
Attach the print head cover and tighten the thumb screws.
Plug the printer back in and power it on.
Open the printer software.
Purge the printer a couple times. Options-Execute Purge Sequence
Perform the Pattern Test. Options-Pattern Test
Perform the Weight Test.
If you have any questions you can contact our 3D printing experts at hardware_service@cati.com or call 888-285-2284.
Paula Durham
Field Service Engineer
Computer Aided Technology, Inc.