Common Workflows for Getting SOLIDWORKS Geometry INTO the 3DEXPERIENCE “xApps”
In the 3DExperience Platform, when we speak of an “xApp” we are referring to the xDesign, xShape, xSheetmetal apps (and more coming all the time) that run in a browser and are available anywhere, anytime, on any device.
Today I am going to discuss some different workflows of getting CAD data into the 3DExperience “xApps”.
Which method is the “best” all depends on what you need to do with it.
Sometimes you may just be wanting to “build around” an existing SOLIDWORKS part/assy, or use it as reference.
Examples of this would be designing a stylish, ergonomic, enclosure with xShape over the top of an existing electronics assembly designed in SOLIDWORKS. Or maybe just a simpler sheet metal cover over that same assembly with the xSheetMetal app. Or perhaps you want to use xDesign to create a simple fixture to hold an existing SOLIDWORKS part/assy.
For all of these cases, the simplest way to get the SOLIDWORKS geometry into the xApp is by using the assembly method. This is done by creating a new physical product in the xApp, inserting your SOLIDWORKS part/assembly (using the ASSEMBLY—INSERT command -OR- by dragging and dropping a file in from a search result and choosing INSERT), then using the ASSEMBLY – INSERT NEW COMPONENT command to create the new xShape, xDesign, xSheetmetal, etc part in that assembly as well.

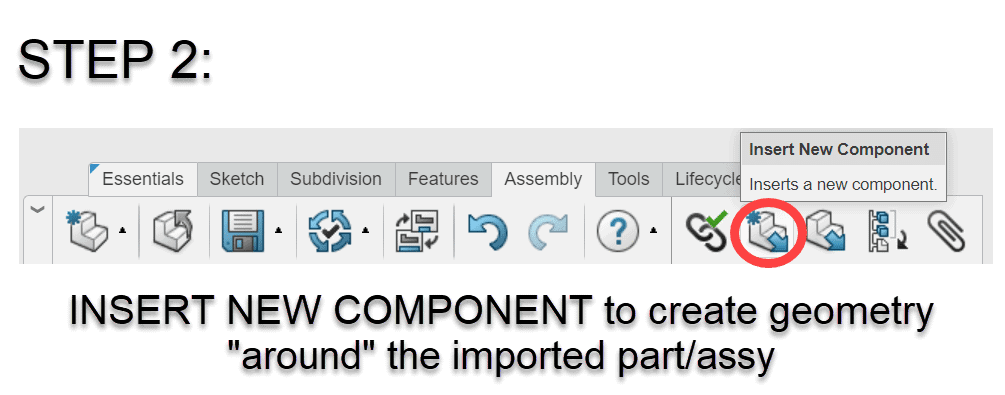
Then you design what you need to and use the underlying SOLIDWORKS model as a reference to build around. Depending on how the SOLIDWORKS model was saved into the platform (more on that later) you can even align points to edges/faces and dimension off of items in the SOLIDWORKS model.
If the underlying SOLIDWORKS model ever changed, updates would pass through to the assembly that you have created.
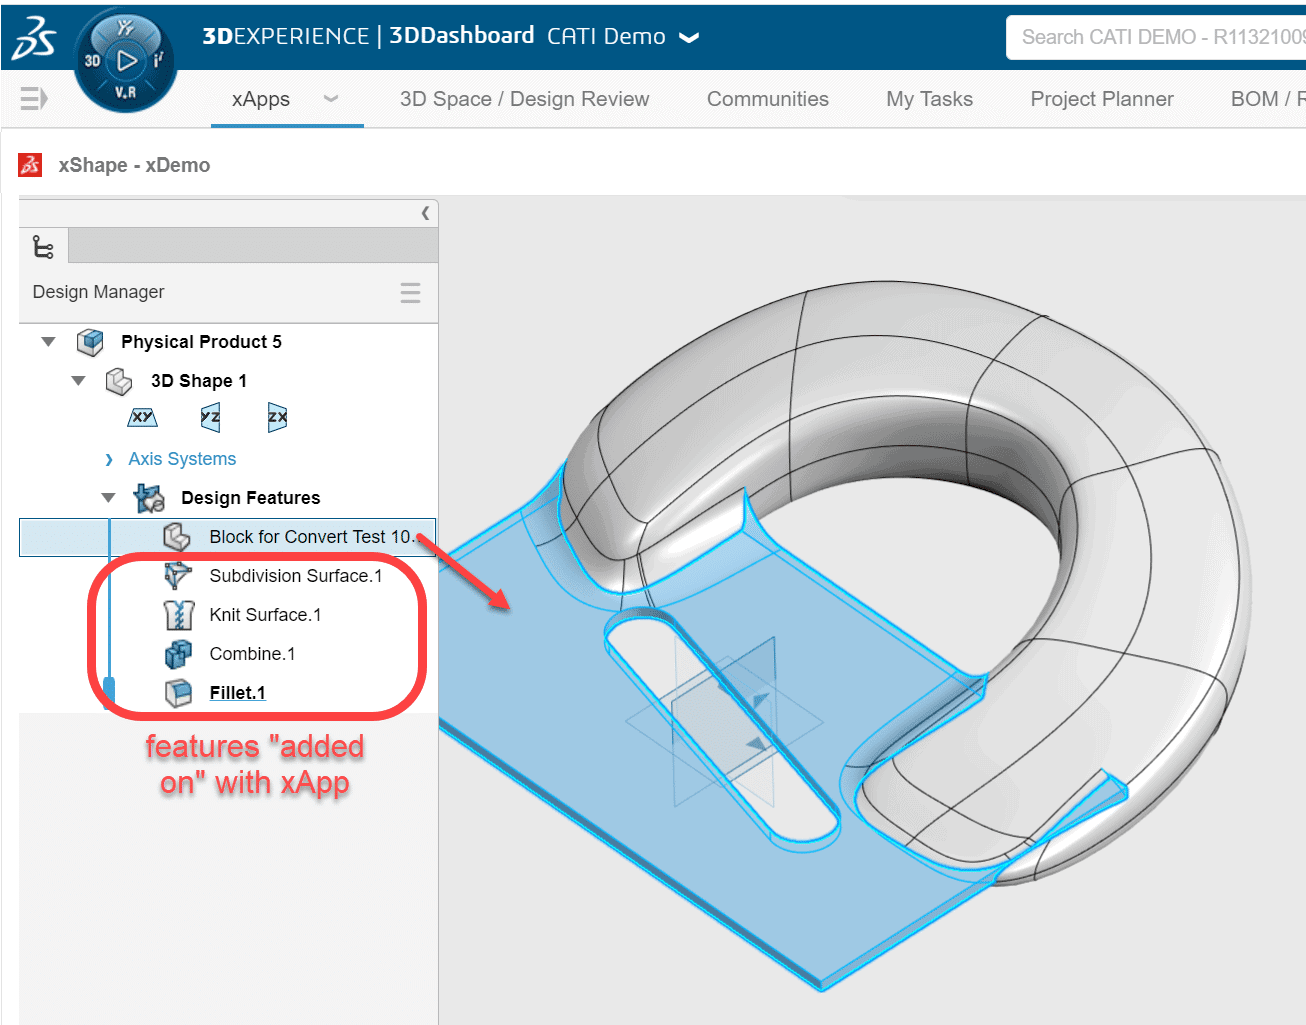
Sometimes what you may want to do is a little more complex however. Maybe you would like to start a design in SOLIDWORKS and then “add on” a stylish handle with xShape to finish it. In this case you don’t want the SOLIDWORKS model to just be sitting there as a part in an assembly. Instead you would want it to be a BODY in the SAME file that you are working on so that you can merge the two items together and have it be one solid model that blends together nicely.
Here you have two choices… You can IMPORT (non-associative) or INSERT GEOMETRY (associative). Both result in the imported model being a solid body rather than an individual part.
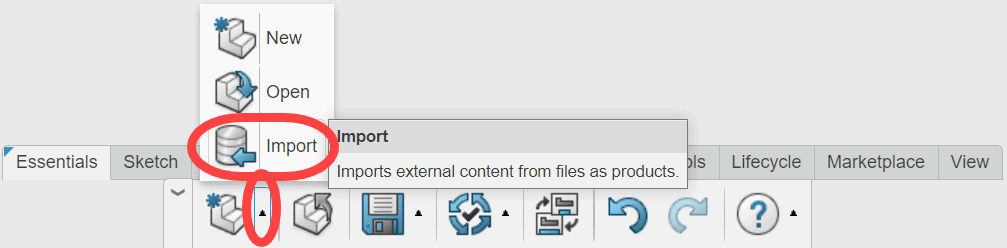
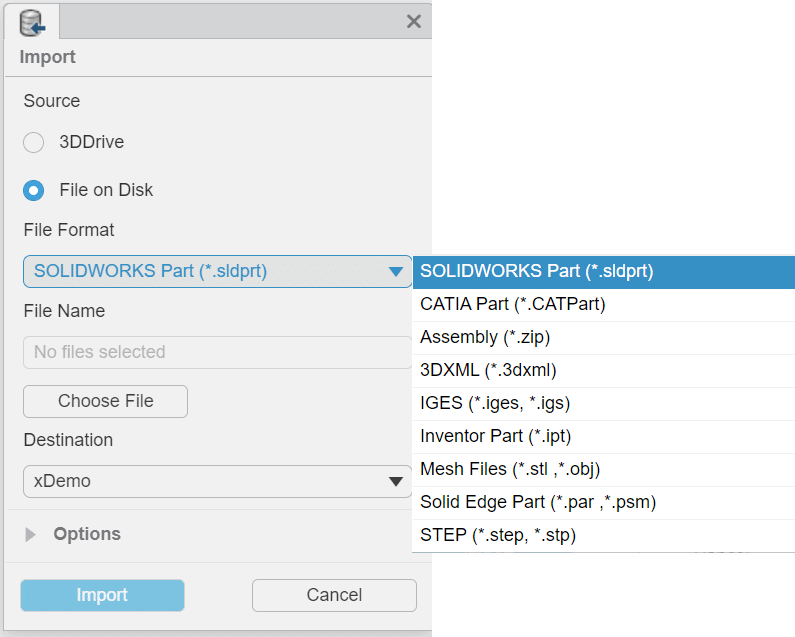
The IMPORT method (ESSENTIALS—IMPORT) is for bringing in a file from your local hard drive or from a cloud 3DDrive. You can import the most common file formats (see image).
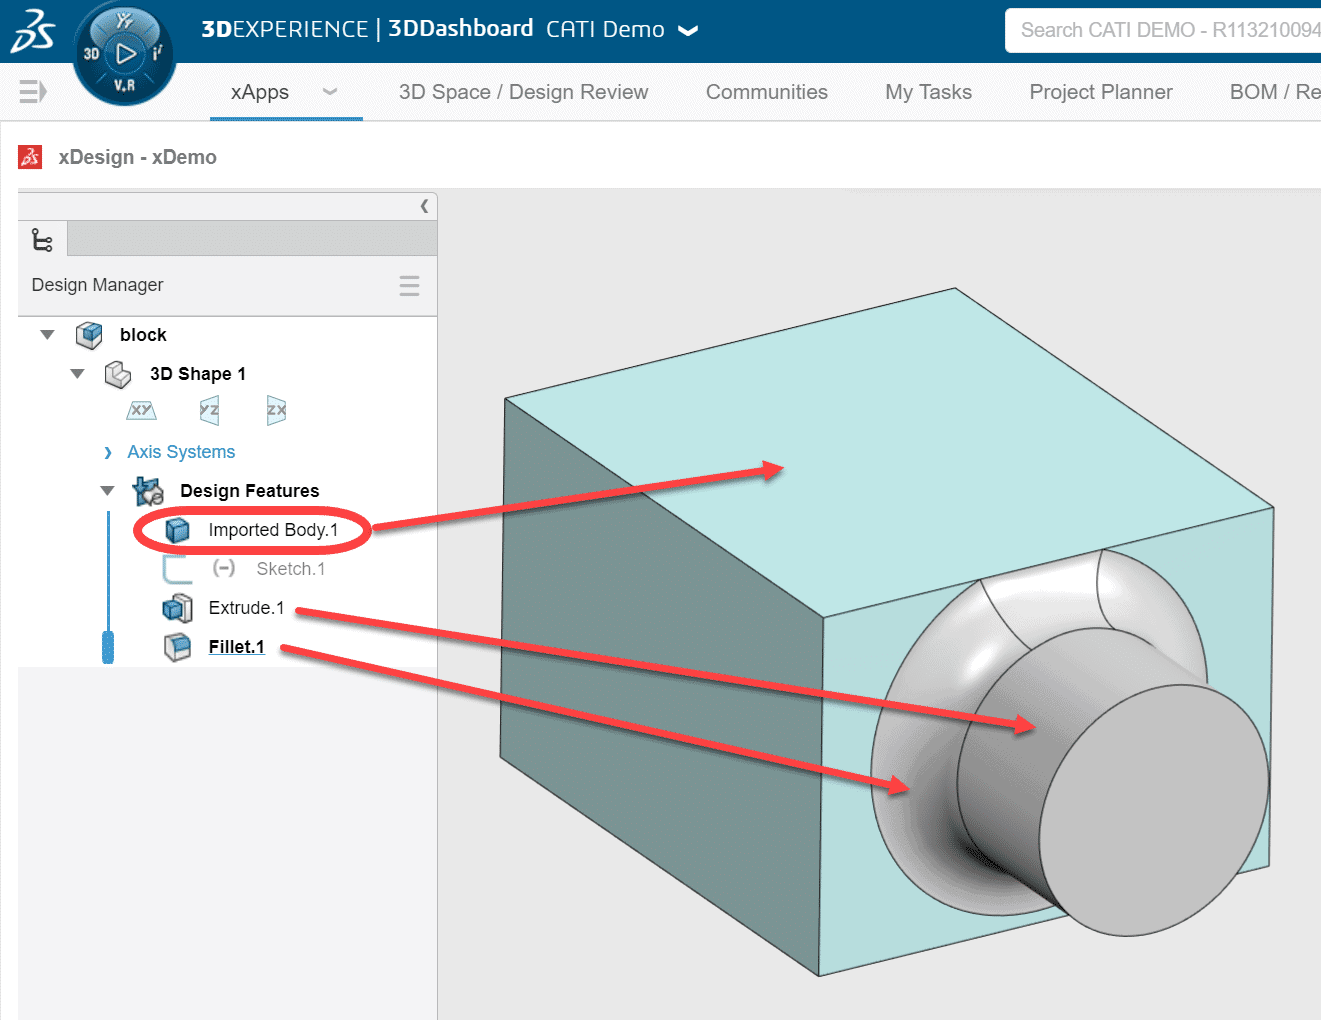
Files brought in with this method show up in the tree as an “Imported Body” inserted inside of a new physical product, and are what most people would refer to as a dumb solid. You can model right on top of (or through) them with the xApps, reference and dimension off of edges and faces of the imported model, and even choose to merge with the imported body so that it remains one body as you add to it. Because it remains one body, fillets could be applied to blend together the shapes if desired.
This method is fast and easy, however, this method should be considered a “one shot deal”. It is non- associative. If the imported model (SOLIDWORKS or otherwise) is ever modified, the new file you are working on in the xApp would NOT know this and CANNOT be updated to show the changes. You would have to do all the work again. Also, another potential downside of this method is that it only can import files from your local hard drive or from 3DDrive. It cannot import an already existing model saved to a collaborative space on the 3DExperience Platform.
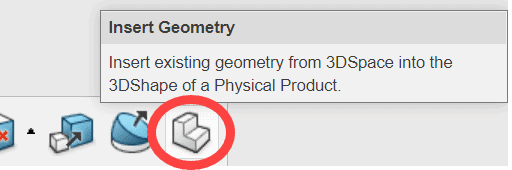
The INSERT GEOMETRY method (FEATURES—INSERT GEOMETRY) allows you to browse/search for a file that has already been saved up to the platform (exclusively), and will allow you model on top of the geometry that was inserted and merge with it to maintain one body just like with the Import method. Most importantly, this method WILL maintain an associative link to the inserted file because it knows how/where to find it on the platform. If there are changes to that file in the future, it will update in new model where you are continuing the work. In most cases this would be the preferred method over the simple Import method.
Since the Insert Geometry method requires that the file already be saved up to the 3DExperience Platform, you need to consider something with HOW the file was created and added to the platform. If it is another xApp file, then there are no special considerations. Those files already have all the “exact geometry” they need to be able to be inserted and continue to be added to with the other xApps. If it is a SOLIDWORKS file you are wanting to insert, then that file needs to have had the “exact geometry” created for it with the Derived Format Converter when it was saved to the platform! If this did not happen, you will get the following error…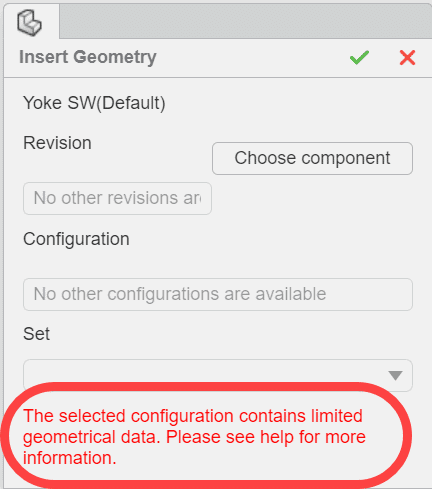
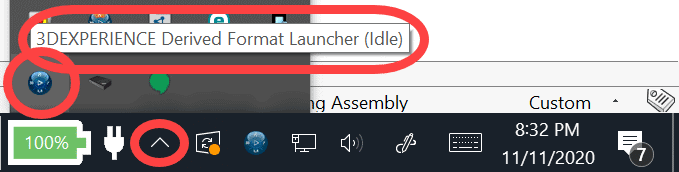
The Derived Format Converter is a service that runs on your local machine and performs the “exact geometry conversion” in the background when saving a file up to the platform with the SOLIDWORKS 3DExperience add-in (also referred to as the SW Connector).
Three things need to happen for this to work successfully:
- The converter needs to be installed on your local machine! This is a manual process that does not happen with an install of the SW Connector. This can be done from the compass on the platform, searching for “derived” and going through the download and install process by clicking on the icon.

- The converter must be running and ready (idle) in your taskbar tray icons down by your clock.
- Inside of SOLIDWORKS when you perform a SAVE (to the platform) with the SW Connector you need to check ON the box for “convert”.
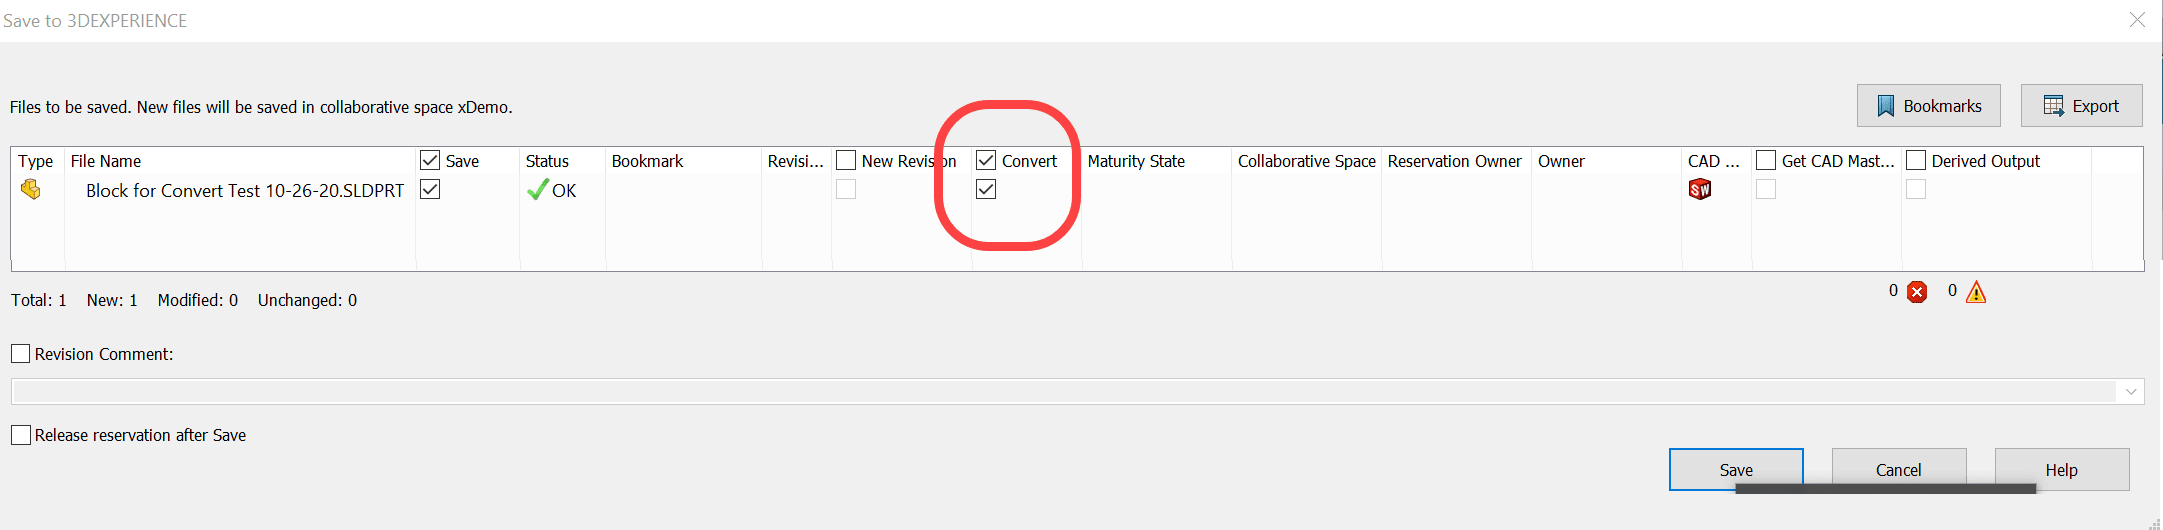
Oddly enough, even if you have not performed the local install of the Derived Format Converter, you will still have the checkbox for “convert” in the save dialog, but it simply won’t do anything. It does NOT warn you about this, and most users assume they did what they needed (by just checking the box in step 3) until they get the “limited geometrical data” error shown earlier when trying to use Insert Geometry on that file. The plan is to eventually get this service to run on the cloud rather than on your local machine and then just checking the box in the save window would be all you need to do. But for now you need to complete steps 1 and 2 first!
I hope this helps clear up some workflow possibilities for bringing SOLIDWORKS models into the xDesign, xShape, xSheetmetal, and other “xApps” on the 3DExperience Platform. I plan on doing a webinar/presentation on this sometime in early 2021. Stay tuned!
Randy Simmons
Sr. Application Engineer, Emerging Products
Computer Aided Technology, Inc.