A Beginner’s Look at SOLIDWORKS SimulationXpress. Part Two
Welcome back! For a refresher on SOLIDWORKS SimulationXpress and setting up a simulation study, click here. Today we’re going to cover running a simulation study, reading the results and optimizing the design.
4. Run the Study
After applying fixtures, loads and materials you are now ready to run a study! Without getting too in depth, SimulationXpress takes your part file and divides the whole component into simple triangular volumes, also known as elements, that are connected at common points, or nodes. The software uses the sum of the elements, also known as the mesh, to predict the behavior of the part.
SimulationXpress lets you control the size of elements in the mesh by adjusting the slider.
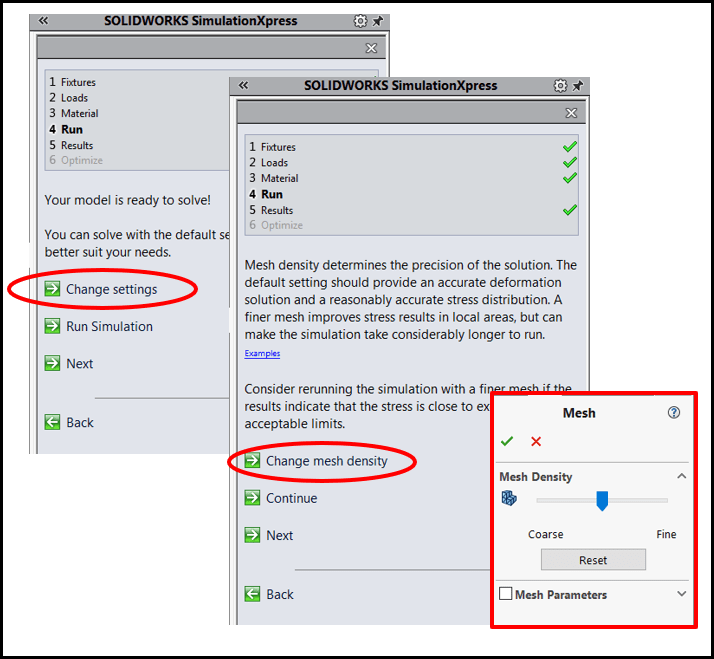
Typically, the default settings are usually appropriate when running the first simulation of any given test. If more accurate stress results are needed, consider rerunning the study with a mesh size approximately half the default and examine any changes in stress and displacement.
In most cases, a smaller element size allows for a more natural deformation while larger elements can over stiffen the part. But don’t just crank the dial to the finest settings! While a finer mesh will give you more accurate results it will also take longer to analyze.
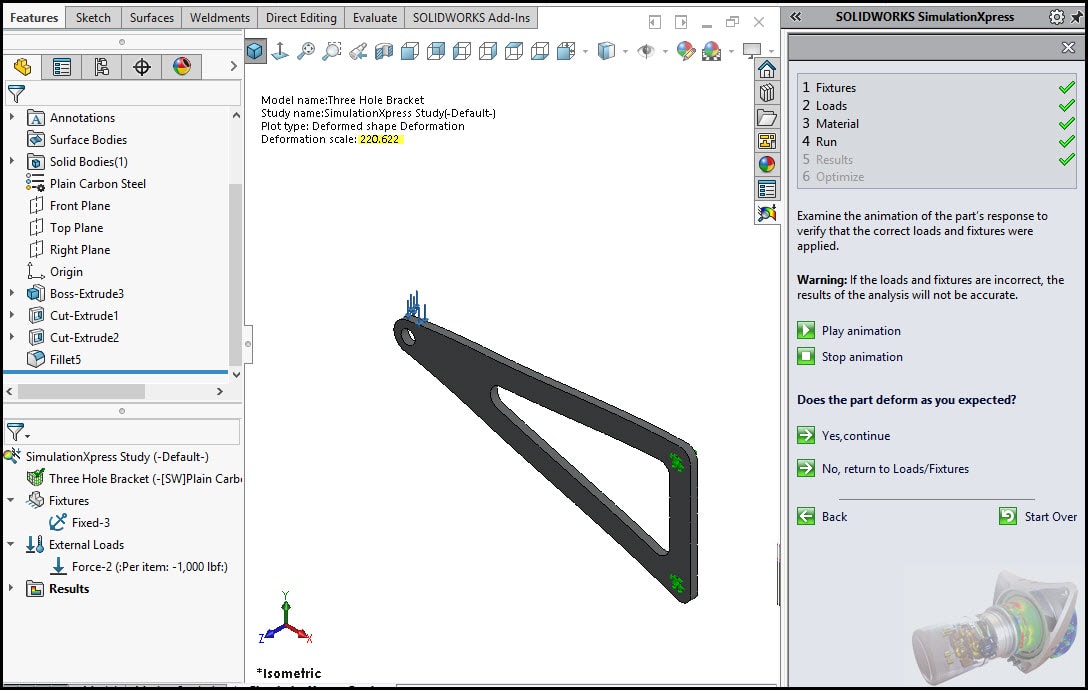
After completing the analysis SimulationXpress displays an animation of the part’s deformation. If the animation seems a bit extreme, don’t worry, that’s intentional. By overly exaggerating the deformation you can easily verify the loads and restraints have been properly applied.
If the part does not deform as you expect you can adjust the fixtures and loads, then re-run the analysis. Here the deformation has been exaggerated over 220 times the actual deformation. Imagine if the results were to appear at a 1:1 scale, it might be too small to clearly see how the part will behave.
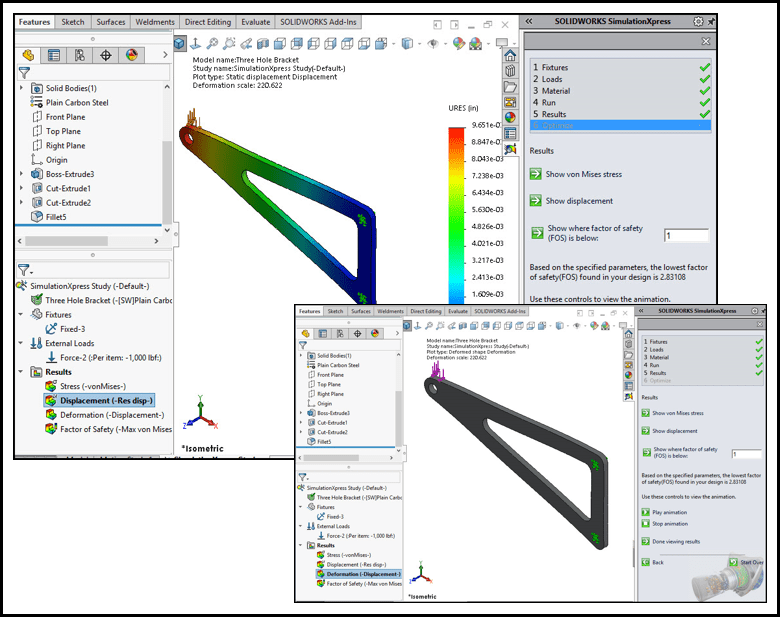
5. Results
SimulationXpress provides a variety of results for you to analyze. Listed results include the von Mises Stress, displacement, and factor of safety.
The von Mises Stress results are used to determine the minimum and maximum stress the part is experiencing under load. You should see a color-coded plot showing the stresses in the model. First instincts may tell you that areas in blue are good and areas in red are bad. While this may be true in most studies it is important to fully understand the values in the legend and the listed yield strength.

Both displacement and deformation results show how the part deforms under load. The displacement results include a plot graph displaying values and locations for the actual minimum and maximum displacements, while the deformation results omit the color coding to give you a better view of the deformed shape at the same deformation scale.
Watching the animation can provide valuable insight on how to improve the design but do keep in mind, as we saw earlier in the von Mises Study, the deformation has been exaggerated for better visibility.
The Factor of Safety result helps you determine how well a model will perform with respect to the material’s yield strength. This will help you understand how much stronger a design should be for the intended purposes and to account for unexpected loads, misuse, emergency situations, and degradation.
As a designer, it is up to you to determine the appropriate factor of safety for your design. SimulationXpress calculates the factor of safety distribution by dividing the yield strength of the material by the equivalent stress at a point. In this study, areas that are determined to be safe are shown in blue and areas where the material has failed and are not safe are shown in red.

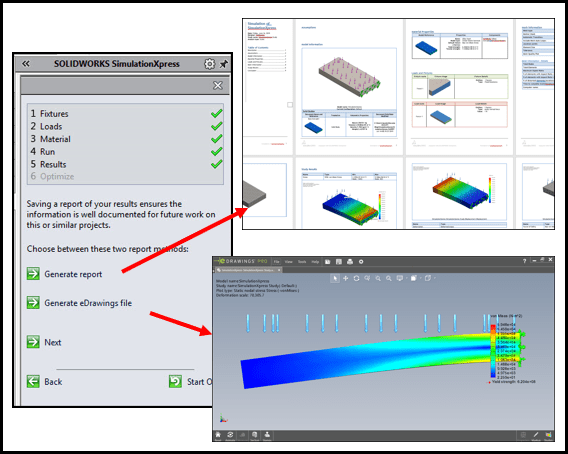
5. Sharing Results
You have a couple of options if you want to share your results with others, even if they don’t have access to SOLIDWORKS. Options include a word document or an eDrawings file to share, while SimulationXpress does not support customization of the report the full versions of Simulation are extremely customizable.
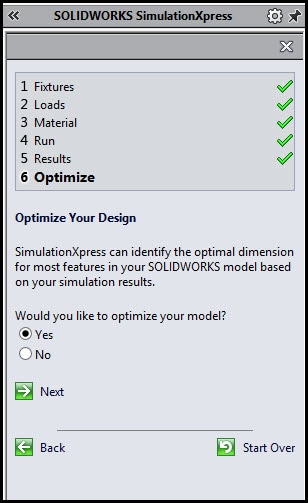
6. Optimize
If you find your design does not meet the set requirements you could be faced with countless iterations of the process described above. Alternately, you could use the built-in capabilities of the software and save yourself many headaches and a ton of time. Using the optimization analysis automates this process even if your design meets or exceeds the intended factor of safety. In those cases, optimization can help you make your design leaner and reduce material costs.
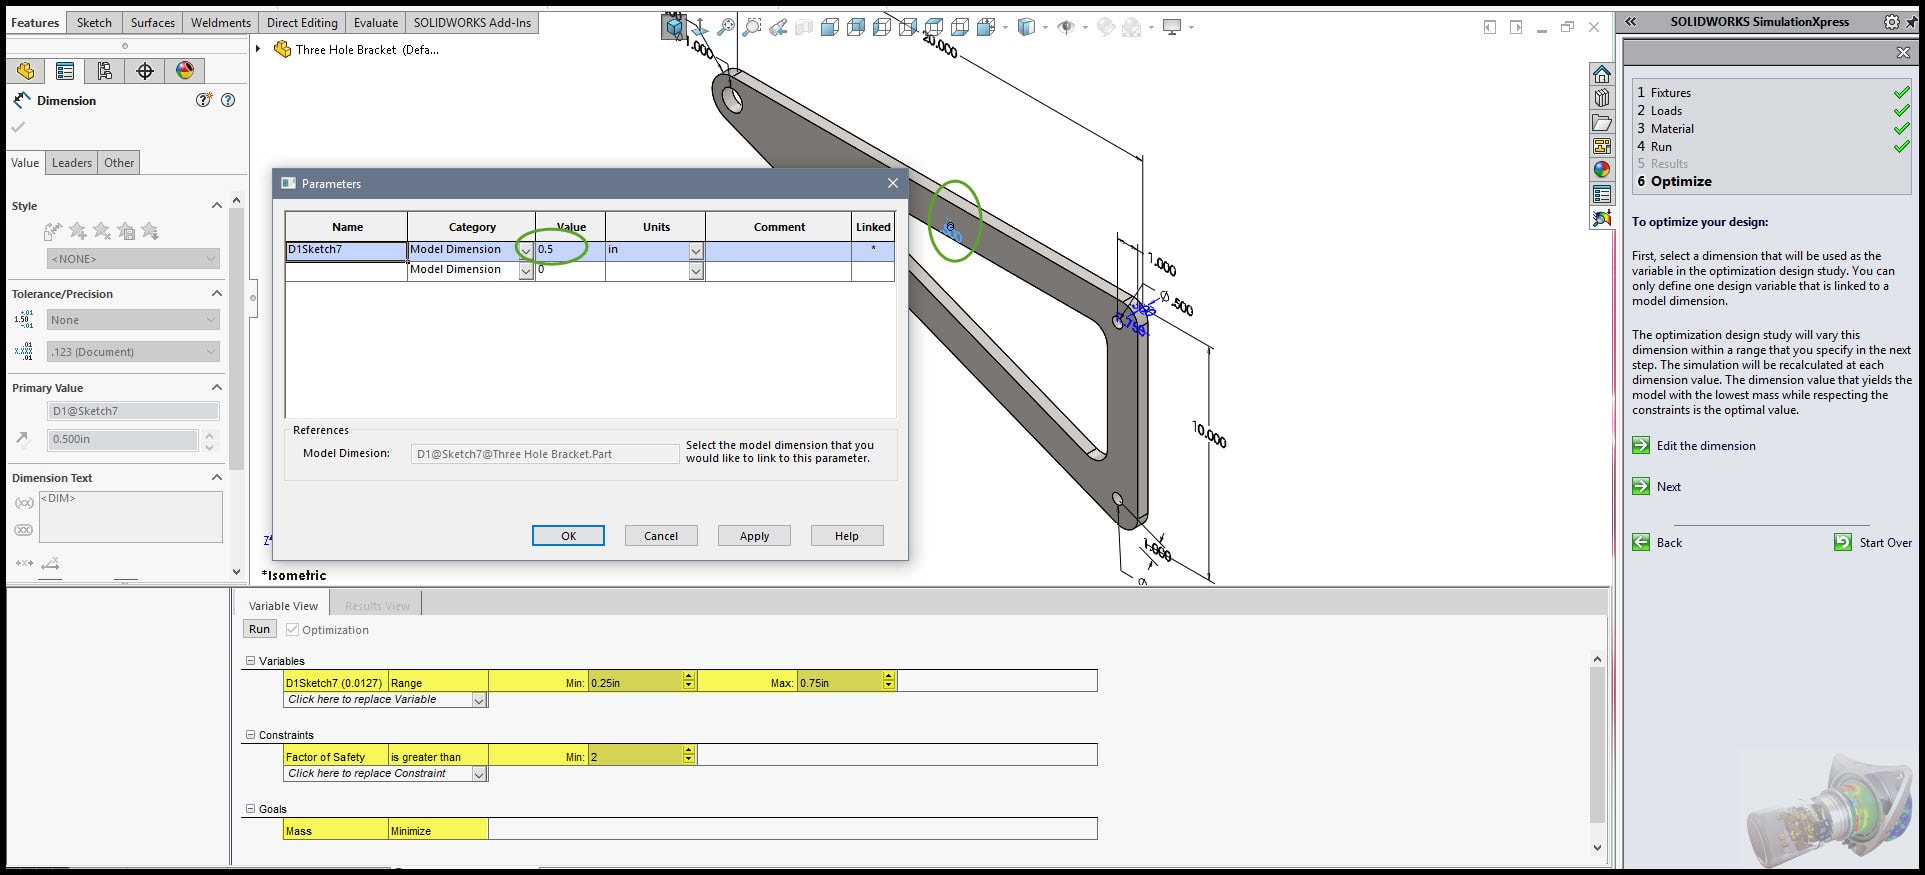
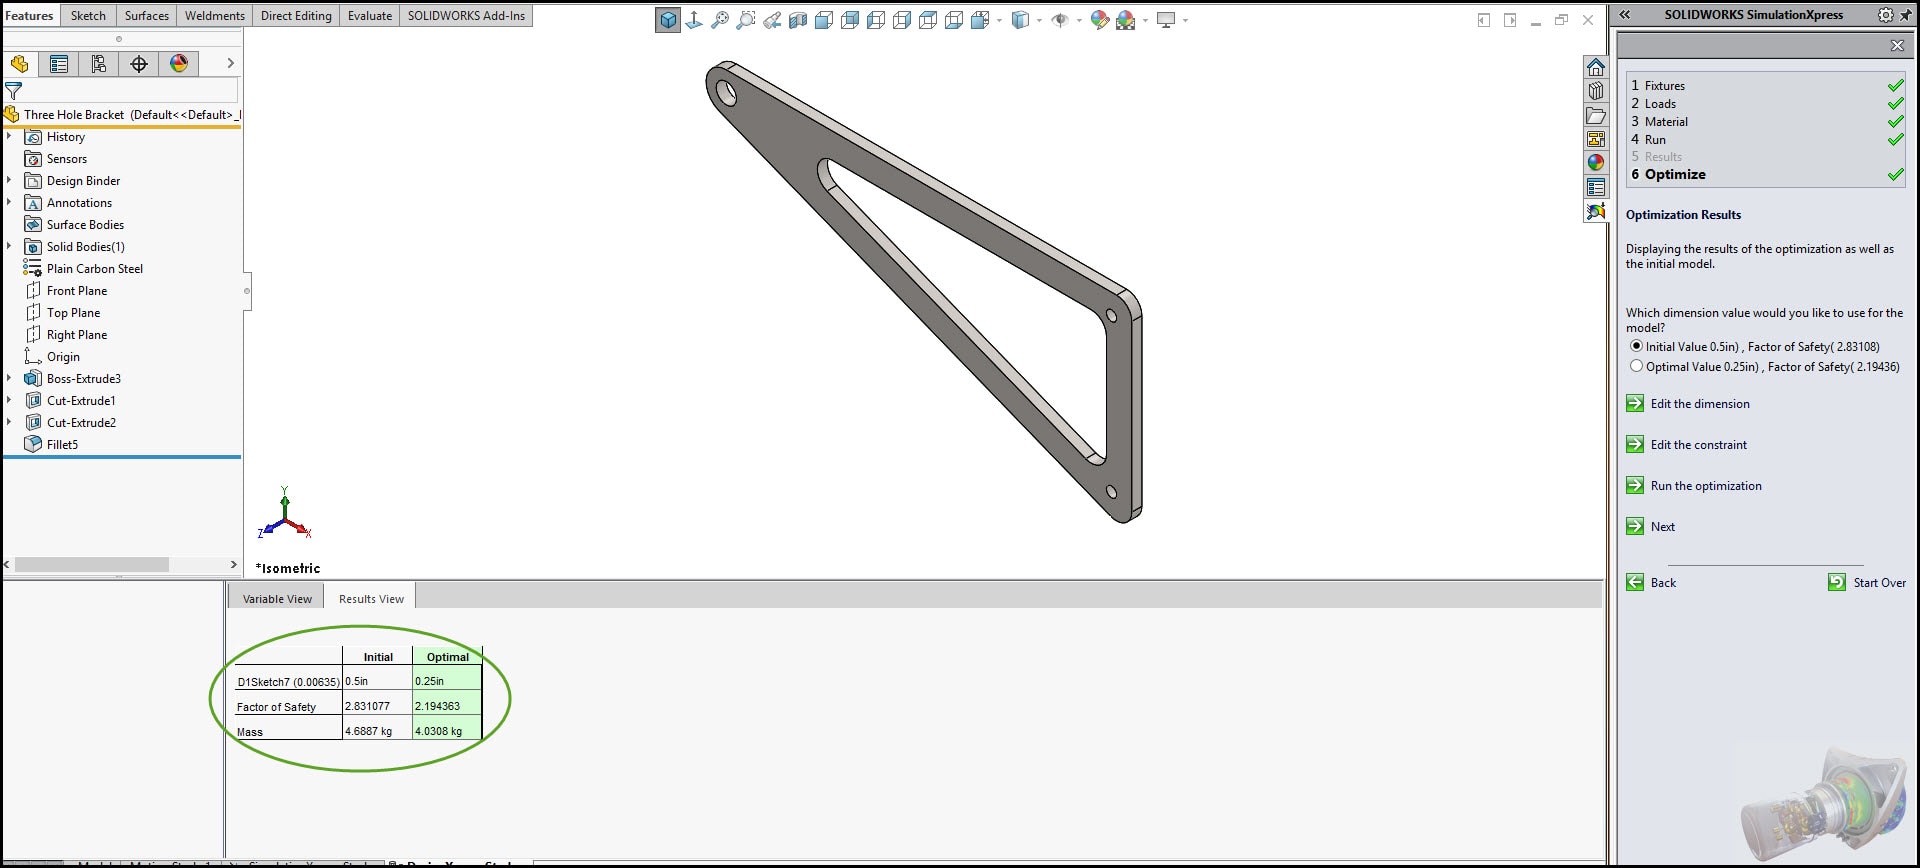
Using the optimization dialog, you will select the dimension to be used as the variable then define the range of acceptable values. You will then define the constraint, or what you will be optimizing the value in respect to. The optimization study will vary the dimension within the specified range until finding the dimension that yields the model with the lowest mass while respecting the constraint.
For more information on SOLIDWORKS Simulation fundamentals click here or check out the free online training link on the SimulationXpress Welcome screen!
Rhonda Jacobs
Application Engineer
Computer Aided Technology, LLC