Pause for Captured Inserts
Captured inserts can add functionality, durability, even a pop of color to FDM prints. But it’s important to have a good grasp on the basics before tackling advanced applications. In this series, I’ll cover everything you need to know about building parts with captured inserts, from the basics to advanced toolpath tweaks.
Today, we’ll start at the beginning, with how to make your Stratasys FDM machine pause mid-print.
All FDM/FFF machines have some ability to pause, and then resume a print; the trick is in getting it to pause automatically at the right time. Thankfully, the Stratasys slicers Insight and GrabCAD Print both include the ability to visualize the layer stack-up, and insert a pause at a specific layer. If you have a Fortus or F370 FDM printer, it’s worth becoming familiar with Insight. However, GrabCAD Print has the edge when it comes to managing pauses. I’ll explain both processes here for reference, but future installments will refer only to the GrabCAD Print method.
First, a quick note about where the Pause should go. To avoid confusion, focus on what you would like to have happen before the Pause, and insert the Pause afterward. So, while viewing a layer preview, scroll through the layers (from bottom to top) until you find the last layer you want the machine to finish; then insert the Pause on the next layer.
INSERTING A PAUSE USING INSIGHT
Insight only works with STL files (if you need one, you can use this one weird trick). Open the STL in Insight, adjust its orientation as needed, and click the Green Flag to process it (or process as you normally would).
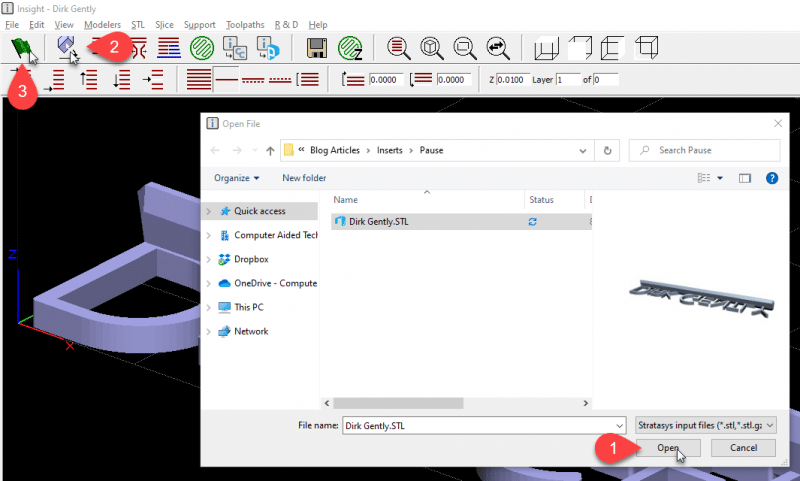
Open the STL file in Insight
Activate the Insert Pause command from the Toolpaths menu, navigate to the layer at which you’d like the machine to pause, select a curve (any curve) on that layer and press OK.
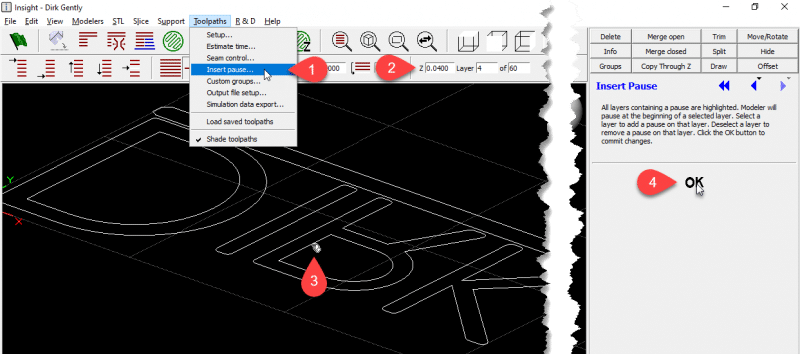
Start the Insert Pause Command
You will notice that pressing OK has no apparent effect; don’t worry – you did it right! The selected curve simply remains highlighted while the Insert Pause command is active, and ONLY while the command is active. When it isn’t active, there is no way to know that a pause exists. This is why I suggest not relying on Insight for Pause management.
INSERTING A PAUSE USING GRABCAD PRINT
Once an STL has been processed in Insight, click the button in the Main Toolbar to send the job to GrabCAD Print.![]()
OR open the file in GrabCAD Print and adjust the print settings as needed, or Import an existing CMB.
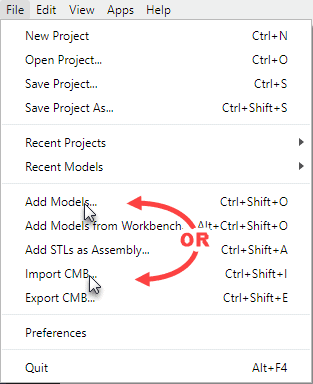
Add Models or Import CMB
Click the “Show Slice Preview” button, drag the layer slider on the left (or use the up/down arrow keys) to the desired layer, then click the “Add Z Pause” button. Add as many as you like.
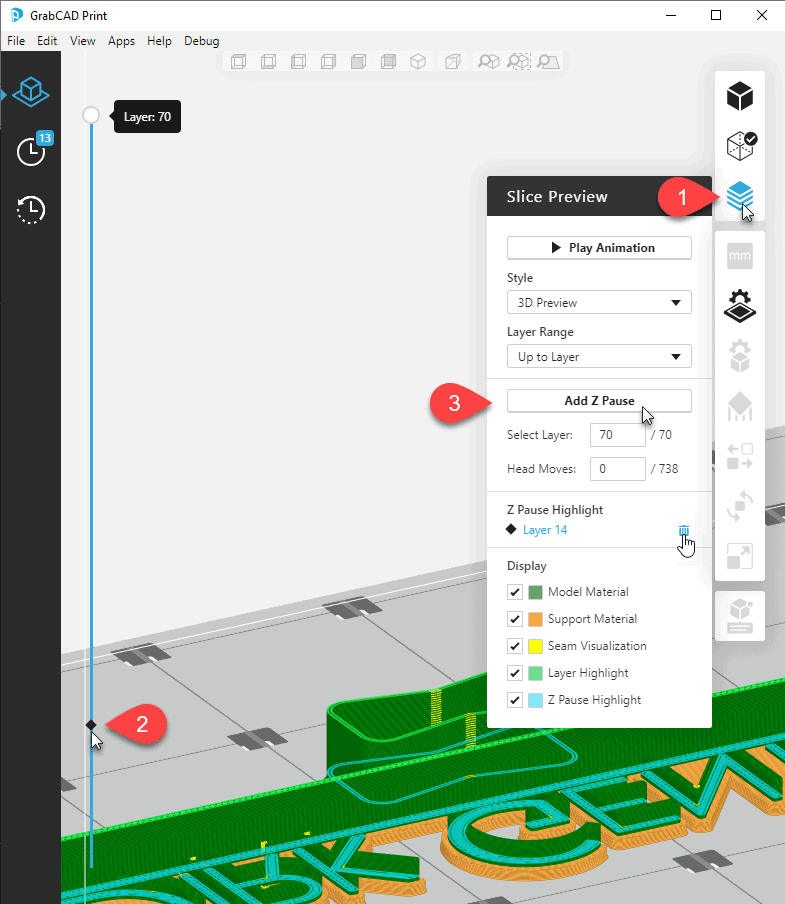
Pause management in GrabCAD Print
Any Pauses will be listed just below, as well as graphically indicated by a diamond on the layer slider and (optionally) a bright blue layer highlight. If any CMB with Z Pauses were loaded, those will be listed here as well. Finally, a warning is displayed prior to queueing the job when the Print button on pressed.

The file used in this article is a simple nameplate (available from the GrabCAD Library), requiring a material color change only. But the process of inserting Pauses is the same regardless of the end goal, and mastering that process is foundational for more complex prints with captured components.
Dan Erickson
Manufacturing Solutions Printed Part Team Lead”
Computer Aided Technology, Inc.