Cost Optimizing Through SOLIDWORKS Costing PART II
If you missed it, please check out Part I Cost Optimizing through SOLIDWORKS Costing first. Part I covers the design goals of an L-shaped desk. Design decisions are made to help optimize costs of the desk.
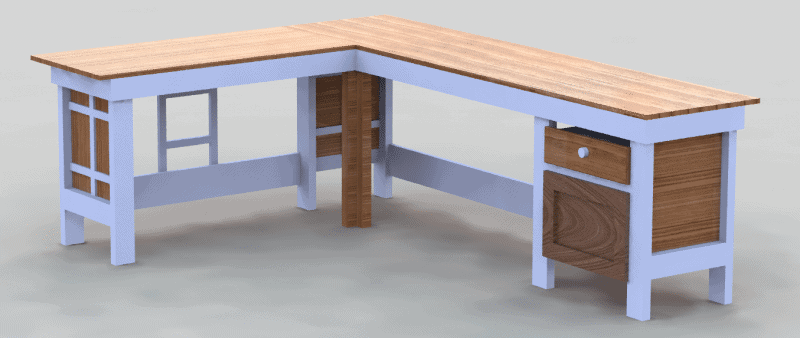
Some projects start with an idea and end quite differently. This build was no exception. Since the last revision, I realized I would need desk storage. I also wanted to ensure the desk was structurally sound and added reinforcements.
Yes, this is much better…
The changes made introduce purchased parts for the drawer system. I needed drawer slides and knobs. In the Costing Task Pane, I can assign a custom cost for their purchased value. Another option would be to assign a custom property, “Cost”. I would use this method if I added the hardware at the assembly-level.
The Costing evaluation can be run again after assigning the custom costs.

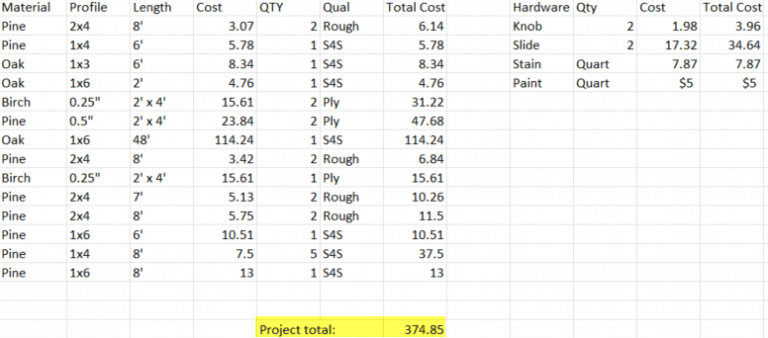
Before I give away the approximated costs, let’s just talk about the actual costs I incurred for the project.
The total actual cost of this build was approximately $375 for material. Manufacturing costs are included to estimate the cost for paint, stain, and polyurethane.
Here’s a full breakdown of the costs incurred. Anything that I had already was excluded in the study.
Now, let’s see what Costing evaluated the build as…
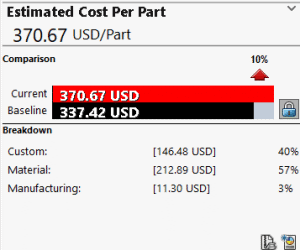
That’s only a 1.2% margin of error!
Notably, this price evaluation is based from a template created in early 2021, which reflected a time where wood was more expensive. Additionally, although the desk build was optimized to mitigate waste, I approximated my waste between 10-15%. Therefore, the accuracy of the price could be a product of both market value fluctuations and the waste incurred through the project.
Updating templates can be a tedious task. Fortunately, users can account for these various changes by using the “Markup/Discount” feature. Since my actual costs and evaluated costs are so similar, there is no need. It’s up to you to determine if the error is acceptable.
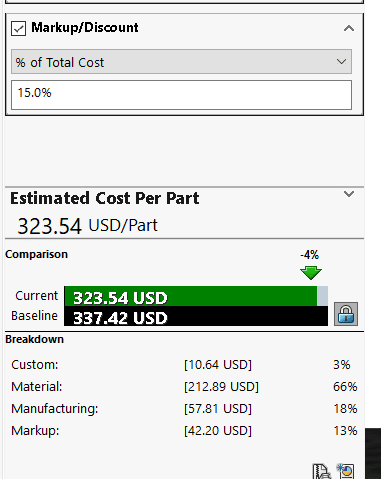
Markup can be used for more than just adding profit margins. It can be used to factor in price fluctuations or to approximate product waste. You may also wish to treat this as so. I like this practice because it saves time and is easy to calculate.
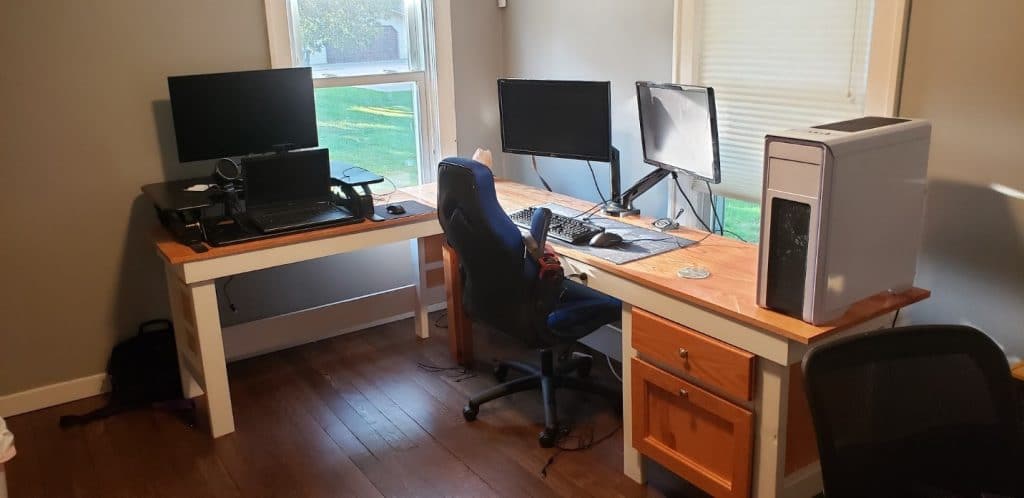
And of course, I must show the finished result!
SOLIDWORKS makes design like this almost mindless by generating detailed cut lists of the profiles and cut lengths that make up this desk. Other ways of construction- like hand sketching- are tedious and error-prone. Costing can help us to make design decisions that impact our bottom line. I can treat wood panels (plywood) as sheet metal for better evaluation, and I can even include costs that I’ve purchased outright. I can calculate manufacturing operations with an exhaustive list of costs associated with model surface area, edge lengths, volume, and more. The customizability within the template editor ensures that costing can help estimate almost any type of fabrication.
If you’re interested in learning more about how Costing can benefit your product lines, reach out to your CATI sales representative today! CATI offers custom mentoring and implementation services to make sure your templates are well-maintained and giving you great results at the start! I look forward to talking with you more about this wonderful cost-optimization tool.
As always, happy designing!
Jordan Kleinschmidt, CSWE
Application Engineer II
Computer Aided Technology