Navigating Large Assemblies in 3DEXPERIENCE with Explore Mode
CATIA has always been known for its ability to efficiently design in the context of large and data-intensive assemblies. Luckily, Dassault has passed down these abilities to its new platform, 3DEXPERIENCE. However, with the ability to design the entirety of a large assembly in one place, there comes the challenge of finding parts that directly affect, or are in the proximity of the part you’re working on. To do so would require the ability to view the entire assembly and easily filter out the relevant supporting data. This is where “Explore Modes” and “Filters” come in to play.
Picking each part one-by-one is not ideal (especially if they are in different sub-assemblies) and opening the entire assembly in a design-based context would take far too long. To provide a good workflow for this, 3DEXPERIENCE provides a Explore Mode(s) and Filters. With Explore Mode, users can view large datasets and navigate them easily because it is open in a lightweight environment. With Filters, users can open relevant data in a design-heavy environment easily with little-to-no navigation of the assembly’s tree structure.
Here, we will look at some capabilities of the Explore Mode called “Product Finder” and the “Volumetric Filters” as well as how to use them.
A closer look at Explore Mode
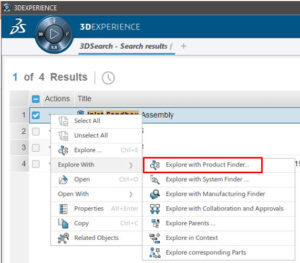
To begin, you’ll want to search for and open your part in Product Explorer using Right Click > Explore With > Explore with Product Finder.
Explore Mode (Product Finder in this case) has a few navigation features that can help you navigate an assembly.
You can visually break up the assembly into its individual parts and sub-assemblies using the turntable. You can break up sub-assemblies deeper in the structure by expanding their trees as well. The level of detail will be based on which level(s) of tree you wish to expand.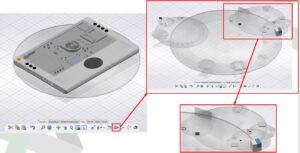
Explore Mode is a great way to navigate an assembly and its sub-assembly structures. However, creating a filter will not only expedite this process but will allow the user to reuse the filter at any point and avoid having to repeatedly open a set of data one-by-one.
Creating a filter
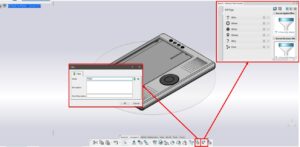
To create a filter, you simply select the Filter command from the Navigation Toolbar. Here, you will see a window that allows you to define a range of filters. Before you create your filter, you will want to expand your tree. To do this: Right Click > Tree Expansion > Expand All. This will ensure all your graphical representations can be visualized in your session. In this article, we will be focusing on the Volumetric Filter. To create a Volumetric Filter, select “Volume” from the tree and then “New” from the top menu.
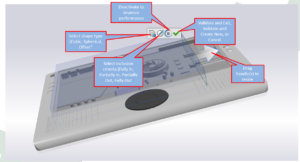
Next, you will notice that your tree has disappeared and a context menu is displayed with 4 commands, each of which are described in the image below. To start, select which type of filter shape you want. The options are Cubic, Spherical, or Offset. You will then select the part with which you want to center your filter on. 3DEXPERIENCE will create the chosen filter shape and center it at the selected part’s center of gravity. The shape will include handles that allow you to resize it. Finally, you will choose what criteria will dictate what is included/excluded from your filter using the second icon set in the context menu. This icon set includes the following criteria:
-Fully Inside
-Partially Inside
-Partially Outside
-Fully Outside
Adjusting these variables will allow you to fully define which parts will (or won’t) open in Design Mode. Click the green check mark in the context menu when you are happy with the outcome.
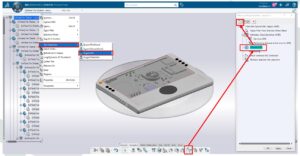
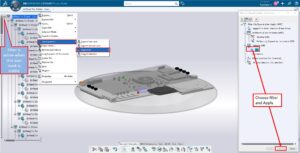
From here, you will see that your Tree and Filter have returned. With the newly created Volumetric Filter highlighted, you can now select “Apply” to add it to the tree. An icon that looks like an orange funnel will overlay on top of the tree root to signify that the filter has been applied successfully. You can now explore the filtered tree structure in 3D by expanding the tree using Right Click > Tree Expansion > Expand All (Explore Mode will not reflect the filter until the tree is expanded).
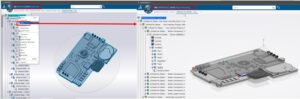
To Open the Filtered structure in Design Mode, select the root of the tree Right Click > Open or Crtl + O.
You can save your Filter for future reference by clicking the “Store Filter” command within the Navigation Toolbar. You can then find and use your saved filters by using the “Retrieve Filter” command. After selecting, a window will appear with your saved filters. You can sort through them by using the 6WTags available within the fly-out menu to the left of the “Retrieve” window. This will allow you to categorize your filters by who, what, when, where, how, and why criteria.