New User Settings to Improve EPDM
New User Settings to Improve EPDM
By now, almost everyone has upgraded to Enterprise 2013 or 2014. Several features have been added to the last two releases of Enterprise PDM that improve the experience for the user. After an EPDM upgrade, it is easy to continue using the program in the same way, but by taking a little time to explore new features, you ensure you are getting the most out of the software. Let’s start with new features in the 2013 release.
Full Row Highlighting in Windows Explorer Vault View
Prior to the 2013 release of EPDM, only the name of the file would be highlighted on selection in Windows Explorer (see Figure 1 below). This made it difficult to quickly and accurately read column data associated with the file.
Figure 1

Now in 2013, you have the option to highlight the entire row (see Figure 2 below). To turn this setting on open your vault view, select ‘Display’ at the top and then choose ‘Options’ ‘Full Row Select’.
Figure 2
User Information Pop-up Window
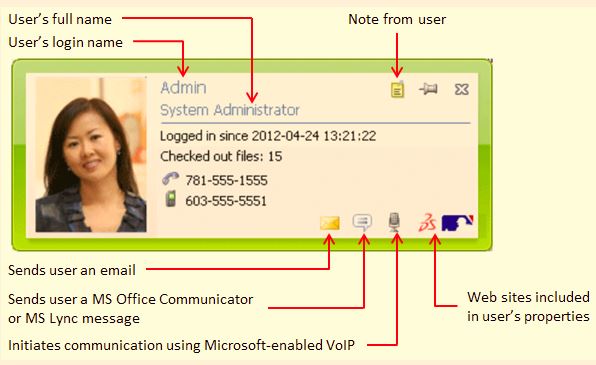
You can now mouse over a user name in the EPDM user interface to open an information pop-up window. This window provides details about the user and helps users communicate with one another. To view a user pop-up window, navigate to an EPDM vault that has files checked out. Locate the ‘Checked Out By’ column and mouse over a user name. Depending on how your network is set up and how much information has been added to the user’s properties, some or all of the following options may be available. Please see Figure 3 below.
Figure 3
Now let’s take a look at some of the features available in the 2014 release.
Navigating Reference Tree Structures More Efficiently
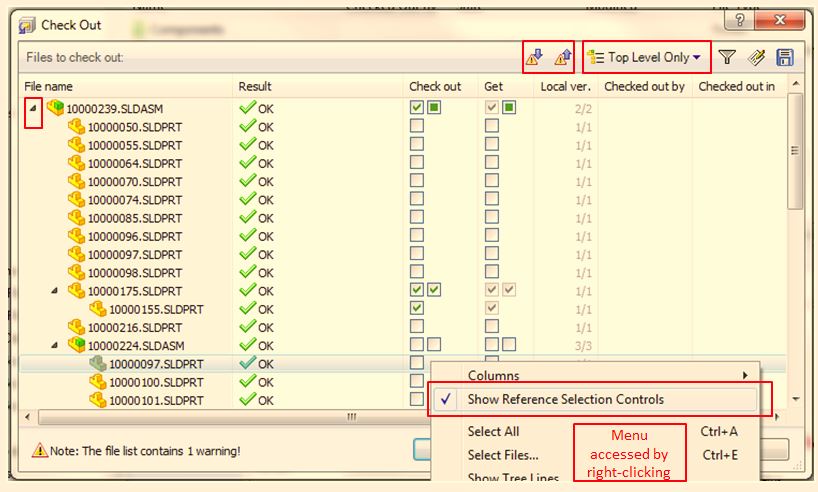
Reference trees for large assemblies can sometimes be difficult to navigate. The Check In, Check Out, Copy Tree, and Change State dialog boxes now have the following reference tree navigational aids available.
- A ‘Top Level Only / Show All Levels’ control lets you show the highest level of the reference tree structure or the entire structure.
- ‘Next Warning’ and ‘Previous Warning’ buttons allow warnings to be easily found within the tree structure.
- Expand and collapse arrows let you expand or collapse individual nodes of the reference tree.
- The ‘Show Reference Selection Controls’ toggle turns on a second set of parent node check boxes at each subassembly level that lets you select or clear all the check boxes for that node. To access this toggle, right-click on any file listed in the dialog box and select ‘Show Reference Selection Controls’.
Figure 4 below shows the location of the controls discussed above.
Figure 4
User Defined Custom Columns
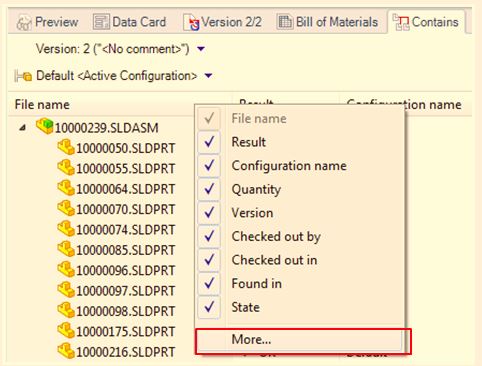
You can now add custom columns based on EPDM variables to the Check In, Check Out, Undo Checkout, and Copy Tree dialog boxes and the Contains and Where Used tabs. To add a custom column to the Contains tab, for example, navigate to the tab in your vault view and right-click anywhere in the column headings. At the bottom of the list select ‘More’. The ‘Choose Columns’ dialog box will open and allow you to select EPDM variables to base columns on (see Figure 5 below). This feature is great for adding a column based on a ‘Description’ variable or similar in order to give yourself more easily accessible information about the file. Note that the order of the columns can be changed by dragging the column headers around.
Figure 5
Blog Post By: Andrew Bornstein