Push it Real Good: SOLIDWORKS Animations to SOLIDWORKS Visualize
 Inside of SOLIDWORKS, there are some stellar tools to get you started down the road of photorealistic animations and the ability to push those animations over to SOLIDWORKS Visualize Professional.
For those new to Visualize, SOLIDWORKS Visualize Professional takes the photorealistic rendering of Standard and enhances it in many forms. The one critical to pushing animations from SOLIDWORKS CAD to Visualize is the mere ability to create animations for your models, cameras, appearances, and more.
SOLIDWORKS Visualize Professional includes lots of tools to help boost quality and your productivity including:
Render Queue: Set your renders in a queue instead of when you select render and start it at a convenient time (e.g. when you’re leaving for the day).
Lighting: Set precision and accurate IRAY traced lighting throughout your environment
Physics Engine, Panoramics, and much more.
The Visualize toolbar inside of SOLIDWORKS looks like the image below once turned on.
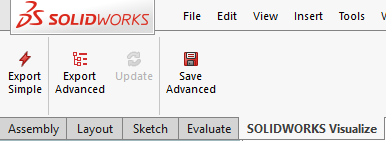
Here is a breakdown of what each button does:
Export Simple
- – Exports your model to Visualize, importing in the model with Appearance mode, which merges appearances together to group parts
- – No animations can come along
- – No ability to monitor a file for changes
Export Advanced
- – Will export your model to Visualize, importing in the model with Automatic mode, which leaves parts in an organized structure
- – Any single animation can be brought along and chosen from a selection box
- – The file will be monitored for any saves done to Model Update
Update
- – A way to push updates to Visualize
Save Advanced
- – Save a full copy of the model that can have additional animations included
But what content can I push from SOLIDWORKS over to Visualize and why do it here?
There are a handful of ways you can create content in SOLIDWORKS with a few of them having a slight crossover. However, the beauty of using SOLIDWORKS to create these animations and push them is that many times you are already doing some of these steps and just need one final button click to finish it up.
The most common ways to create or extract this content inside of SOLIDWORKS is through Mate Controller, Animation Wizard, Animation, Basic Motion, and Motion Studies.
Mate Controller is a great way to show the range of motion and limits of a certain assembly by controlling the value of the mates and animating the various positions it tends to go through.

By clicking the Motion Study tab at the bottom of your screen you can get to the Animation Wizard which you’ve probably seen but haven’t used.
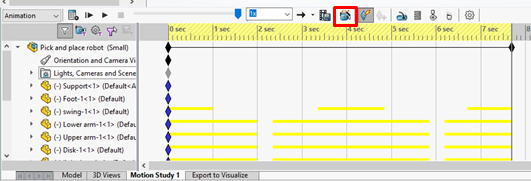
With this great tool, you can import previously created content such as your Explodes, Collapses, Mate Controller, or results from other studies. Once imported, you will have a timeline of all the movement that is occurring for each part and you are ready to export to SOLIDWORKS Visualize.
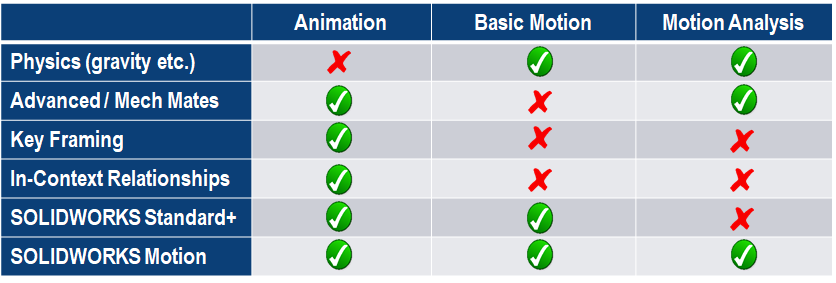
In the same location, I can create my Animation by clicking parts and setting the locations with the use of Keyframes inside of the Motion Manager. The position of these parts is set by freedoms still allowed by your SOLIDWORKS mates or motion drivers. A limitation inside of Animations is that it does not account for any Physics such as gravity or parts interacting.
The use of Basic Motion and Motion Studies are very similar but with some key differences. Both are used for dynamic systems where there is movement and interaction between models and I can include higher-end physics like gravity in Basic Motion as well as Force and Dampers in Motion Studies.
Below is a quick highlight between these three.
Once these items are created, we can use Advanced Export or Save Advanced to kick the animations over to SOLIDWORKS Visualize Professional to start adding additional setup and truly build the breathtaking and realistic views we want with our lighting, backgrounds, or HDR’s.
A few tips
- – Auto space in explodes animate in reverse order, so try to stay away
- – In context, features do not push (they can be made but do not push to Visualize)
- – No Mesh deformation is allowed (springs compressing and metal bending – you would need to have each metal piece as an individual part)
I hope you found this look into SOLIDWORKS Visualize Professional helpful. If you have any questions contact us!
Related Articles
Real or Rendered? Represent Real Life with SOLIDWORKS Visualize Professional
7 Reasons to be on (and Stay on) SOLIDWORKS Subscription
How to Leverage Animation Data from SOLIDWORKS 3D CAD Within SOLIDWORKS Visualize Professional
About the Author
 David Janicki is an Application Engineer based out of our office in Grand Rapids, MI. He is a proud graduate of Western Michigan University, where he received his Bachelors in Engineering Management. Prior to joining Fisher Unitech in November 2015, David worked in various industries from Automotive and Sheet Metal to Electronic RFID’s. A large portion of his background is in the Continuous Improvement industry and still continues to be his passion, helping customers use the software more effectively both on a user and company level.