SOLIDWORKS 2017 What’s New: Importing and Exporting 3D Manufacturing Format (3MF) Files – #SW2017
Importing and Exporting 3D Manufacturing Format (3MF) Files
For almost 30 years STL (Surface Tessellated Language) has been the predominate format for 3D Printers. So why develop something new? 3D Printers have made significant strides in development with accuracy, resolution, materials, colors, etc., but sadly the STL file has remained stagnant. The STL format simply wraps triangles or tessellates a surface; recording the vertices of the triangles in 3-Dimensional space, it does not record any information regarding color, material, texture, etc.
When Microsoft sought to implement 3D printing support that would solve customers’ existing problems and address future needs, an important consideration was how applications should pass model data to 3D printers. Partnering with industry leaders on both CAD and 3D equipment manufacturers, such as SOLIDWORKS and Stratasys, they concluded that no currently released file formats could meet the stated goals for 3D printing support.
Therefore a group effort of industry partners determined that the best approach would be to create a new 3D file format — the 3D Manufacturing Format (3MF). The 3MF format is designed to be an additive manufacturing format, with the complete model information contained within a single archive: mesh, textures, materials, colors and more.
From a Standards perspective, it may be important to note that the ASTM Committee charged with defining standards for Additive Manufacturing Technologies has recently entered into a cooperative relationship with the 3MF Consortium. This liaison could define the industry standard for years to come.
It is also worthy to note that the code to read or write 3MF is available as open source: Microsoft’s donated code reads STL/OBJ/3MF, writes 3MF. The 3MF specification is free of royalties, patents and licensing.
Importing 3MF Files:
You can import 3MF files as graphics body, solid body or surface body in SOLIDWORKS 2017 without using the Scan to 3D add-in.
- Click the Open icon or File> Open.
- In the dialog box, in Files of type, select *.3mf.
- Browse to a file to open.
- Click Options.
- In the dialog box, set Import as to one of the following and click OK.
- Graphic Body
- Solid Body
- Surface Body
6. Click Open.
The file is imported.
Exporting 3MF Files:
1. With a model open, click the Save As icon or File > Save As.
2. In the Save As dialog box:
- Set Save as type to 3D Manufacturing Format (*.3mf).
- Click Options.
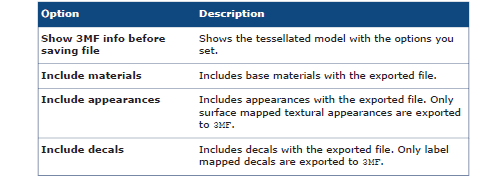
- In the System Options dialog box, set options, including
- Click OK.
- Click Save.
We hope this part of the What’s New series gives you a better understanding of the new features and functions of SOLIDWORKS 2017. Please check back to the CATI Blog as the CATI and MCAD Support Teams will continue to break down many of the new items in SOLIDWORKS 2017. All of these articles will be stored in the category of “SOLIDWORKS What’s New.” You can also learn more about SOLIDWORKS 2017 by clicking on the image below to register for one of CATI’s or CATI’s Design Summit’s.
Mark Abshire
Application Engineer, Additive Manufacturing
Computer Aided Technology, Inc