SOLIDWORKS Costing Template Editor
 I recently joined a project to learn more about SOLIDWORKS Costing. I was surprised that there was not much information available for costing templates. This blog is a summary of the template editor used with SOLIDWORKS Costing.
SOLIDWORKS Costing is a SOLIDWORKS Professional/Premium feature that allows users to create product estimates and quotes. It allows you to make design decisions including how the part will be manufactured to reduce part costs and has many more added benefits like automatic report generation with Microsoft Word all within the SOLIDWORKS UI. Keep in mind that costing whole assemblies requires SOLIDWORKS Premium. In this blog, I will be sharing how to modify SOLIDWORKS default templates by looking at the menu options of sheet metal, machining, and multi-body templates.

It is important to understand that SOLIDWORKS Costing is only as powerful as the templates that are associated with it. These templates can store massive amounts of data and can be accessed outside of the main SOLIDWORKS UI, by searching for SOLIDWORKS Costing Template Editor <Version>, or by launching Costing from the Task Pane, then clicking “Launch Costing Editor..”. it is recommended that you start small with your template.
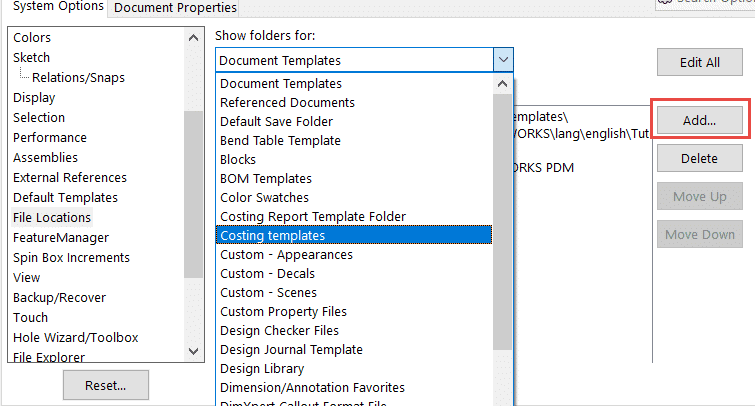
Although the default templates from SOLIDWORKS Costing may give a rough estimate, it is unlikely that these numbers will accurately represent the costs for your material and manufacturing process. It is important to update these so that meaningful data is extracted. Always save a new copy of these templates in a different file location prior to modifying any templates. Place this in a shared vault on the PDM vault or server so those that need access to costing templates can use these easily. Do not forget to add the file location so SOLIDWORKS knows where to look. Navigate to System Options>> File Locations>> Costing Templates and “Add” the file location to the new costing template.
The multi-body, or main, template contains information like units of measurement, materials that may be used, costing for weld beads, and purchased component delegation.
MAIN – Menu Options
Under General, make sure to browse for the new file location for the sheet metal and machining template. You can click “Edit” on the main tab to create a separate tab to manage each additional template.
The Custom option allows the user to add any custom operations to the manufacturing process. The most important consideration here is how to choose selection type, which essentially controls how the part is estimated per unit. Can it be purchased by the inch? Square Inch? Is this cost accrued for each part?
The last menu option from the multi-body template is the purchased components tab. This is used to declare what custom property values will be understood as the price for Costing to use. This means that all purchased parts, including fasteners, need to also have these custom properties. I have mine set to these values: “Cost – Total Cost” [Default], “Price”, and “Purchase Price”. The default value is “Cost – Total Cost” when pulling the data from SOLIDWORKS Costing. I added “Purchase Price” to define anything that is procured. I can add part names that Costing can look for to evaluate assemblies [Premium].

Sheet Metal – Menu Options
 Items that are manufactured by flat patterns are evaluated here. Costing evaluates sheet metal by surface area.
“Material” menu option allows the user to define which materials are being available as sheet metal. Add any shop stock materials here.
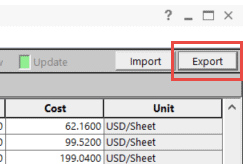
Materials can be assigned thickness values, sheet sizes, gauges, and costs to the under “Thickness” option. An option to Export into Excel for editing appears in the top right corner, allowing spreadsheets to be evaluated quickly using Excel functionality.
Under “Cut”, different cutting, drilling, and punching costs can be added specific to sheet metal applications. Specific cut methods may be appropriate for some gauges of material while others are not. The costs associated with each material/thickness/cut method are also added here.
Under “Bend”, setup costs can be associated for bends and hems, including the cost per bend as it varies throughout different materials.
Costs can be assigned to library features in the “Library Features” menu. These values are added by the file name and setup costs can be cost-distributed to the part itself or a quantity or lot of parts. The cost of the feature can change with material or thickness.
More information on sheet metal costing options here.
MACHINING – Menu Options
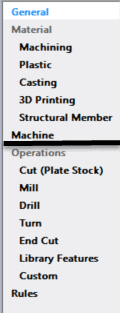
The machining template is the last template that needs to be covered. Any part that is not converted into sheet metal features is evaluated using this template by default. As pictured, several methods of manufacture, “Machining, Plastic, Casting, 3D Printing, and Structural Member (weldments)”, are listed.
The machining tab is where any milled or turned product will retrieve its data. Additional machined materials are added here. The option to select a certain stock type can be selected from either a block, cylinder, or plate. Their thicknesses are added so that cost can be evaluated as a unit of measure per pound.
Plastics can be defined for mold making, where molds are included as an initial setup cost. Additional materials and their cost per pound are included here and used to evaluate cost from volume. Casting is the same, but specific to metal components by default. However, this does not need to limit the user. This option could be used to capitalize on any fluctuation between mold costs on two libraries of materials.
Structural Member is for any weldment features. It can include anything that could be quoted in USD/ft or USD/stock. More information on weldment costing here.
 The Machine tab allows you to add additional critical details for any machining, cutting, end cutting (trimming stock to size), plastic injection molding, die cast molding, or 3D printing application. Details like feed rates and operating times are located here and can be added, removed, or modified.
The Cut (Plate Stock) tab allows you to choose how specific gauges of sheet metal material may be cut, and how long it takes them to cut one inch (length) per specific material and thickness.
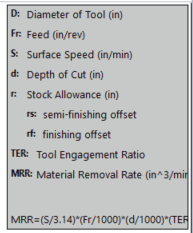
The Mill menu option requires inputs of several sizing and machine speed requirements to make its calculations. A legend up at the top right corner is helpful to define some of those inputs and is pictured here.
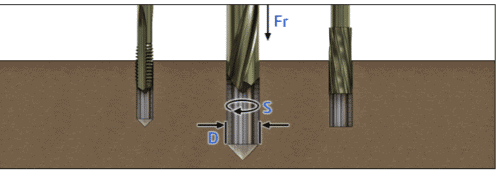
The Drill menu option is also calculated with MRR, or material removal rate.The variance of costs depends on other parameters, such as the type of tool, machine used, and the material being cut.
Lathe manufacturing costs can be evaluated here. The varying parameters are material, machine, tool type, and surface finish.
Library features that are not applied to sheet metal parameters are evaluated here, as well as any custom operations specific to machining practices under “Custom”. Options to create out additional rules-based operations can also be found in this template. For more information on rules-based operations,see rules-based operations.
It should be noted that you should consider which manufacturing costs you may or may not omit.
More information on machining costing here.
SUMMARY
Costing provides efficient, repeatable cost estimates that can be updated whenever material or labor costs need revision. This overview serves as a useful tool to get acquainted with the tool. Computer Aided Technology offers many more resources and insight to specific subjects of costing.
This article covered the basic use of SOLIDWORKS Costing templates with sheet metal, machining, and multi-body templates. It covered the key features of the main, sheet metal, and machining template.
If you are interested in learning more about how SOLIDWORKS Costing can benefit you, contact your CATI Sales Representative for a full demo. We also offer consulting services for full template customization! I hope you have found this article advantageous and I look forward to hearing of your costing successes!
Good luck and happy designing!
Jordan Kleinschmidt, CSWE
Application Engineer, Computer Aided Technology
Computer Aided Technology, Inc.