Simplify Your SOLIDWORKS Custom Property Input with the Custom Properties Tab
 SOLIDWORKS World 2018 offered many different breakout sessions on an array of interesting subjects. However, if you weren’t able to make it to the Los Angeles, California event this past February doesn’t mean you should miss out on informative presentations. This blog covers what Fisher Unitech SOLIDWORKS Expert, Rachael Buhl, presented to users on how to simplify your custom property input with the custom properties tab.
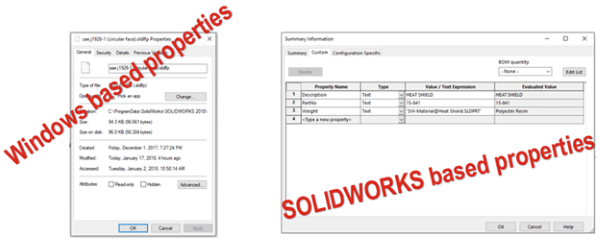
Properties are simply details about a file which can be searched, and even referenced by other files. There are Windows-based properties and SOLIDWORKS based properties. Windows-based properties, such as file size, date created, and date last modified can be seen by right-clicking a file in Windows Explorer and clicking Properties. SOLIDWORKS properties, on the other hand, are very customizable. They may include anything you need. Common examples are Description, Part Number, Weight, or Material, just to name a few.
These come in handy when one SOLIDWORKS file needs to reference another. File references allow users to have data in one location update data in multiple other locations. For example, on this Bill of Materials, you see the Description for the Cannon Wheel is blank. That’s because on the Cannon Wheel part file, the property Description has been left blank. The Bill of Materials in the drawing file is referencing the file properties in the part file.
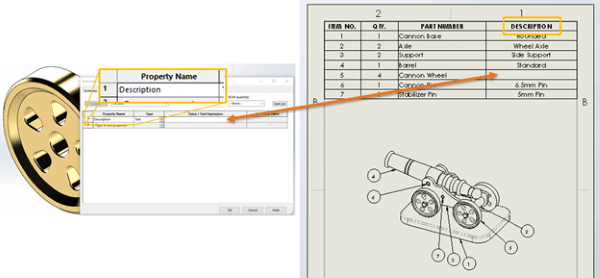
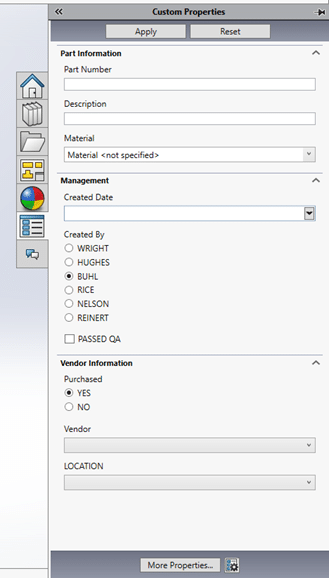
To manually enter properties, as seen above, you can go to File, Properties, and in the Property Name column, choose the property from the pulldown menu or manually type it in, then in the Value column, enter the property for that particular file. There is a faster way, however, that is also much more efficient. You can build your own custom interface on the task pane to enter properties into. This tab is called the Custom Properties Tab. Take a look at the video below to see the final product.
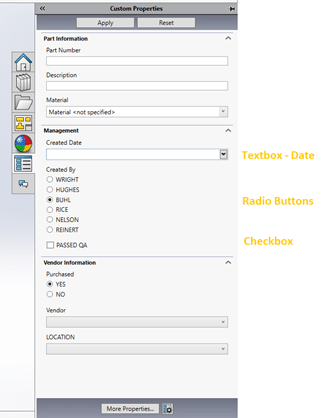
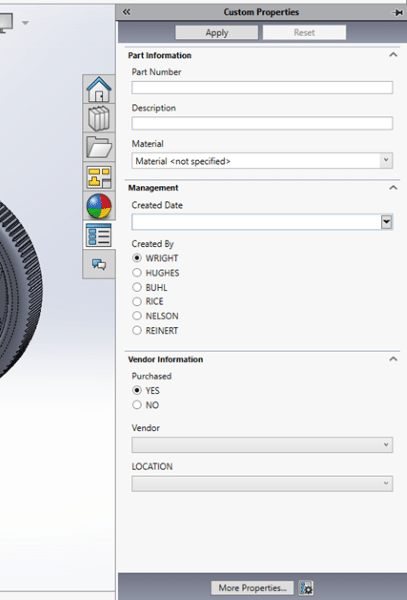
As you can see, using the Custom Properties Tab to input your properties actually pushes the information into the File, Properties. In the Custom Properties Tab, you can have regular text boxes, dates, radio buttons, checkboxes, and more, and you even may have noticed that some of the subsequent options depend on the selections chosen earlier.
So, first thing’s first, you have to build your custom interface for the Custom Properties Tab. You accomplish this by using the Property Tab Builder. The Property Tab Builder can be accessed through your Start Menu on a Windows machine, in the SOLIDWORKS Resources Tab, or by clicking Create Now on the Custom Properties Tab.
It will help to consider the final desired layout of the Custom Property Tab. In the video, notice that all of the interactive elements are listed under the heading “Part Information”, “Management”, or “Vendor Information”. These collapsible sections are called Groupboxes. So, the first step in creating our Custom Property Tab using the Property Tab Builder is to create group box called “Part Information”. This is a simple drag and drop operation.
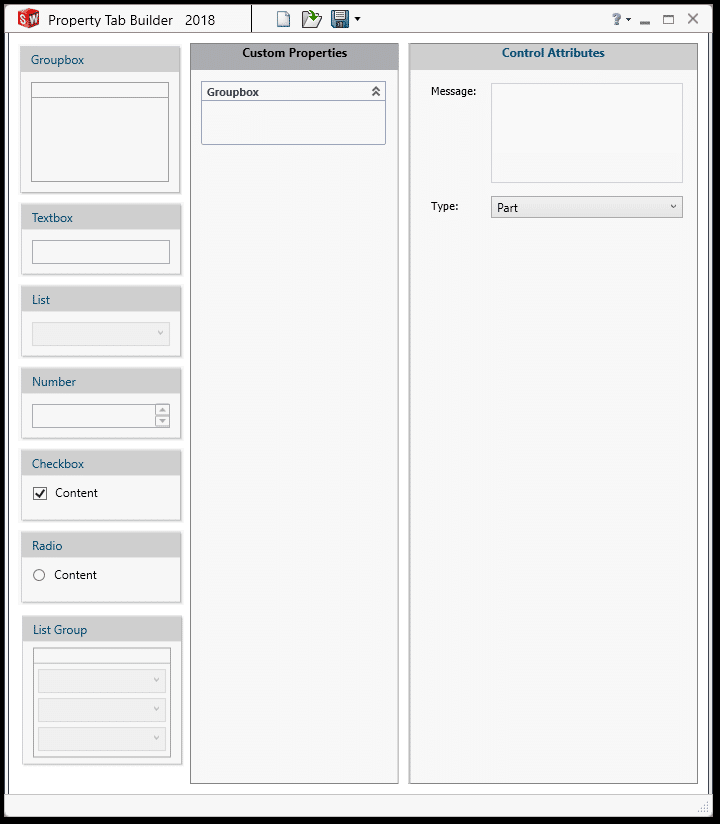
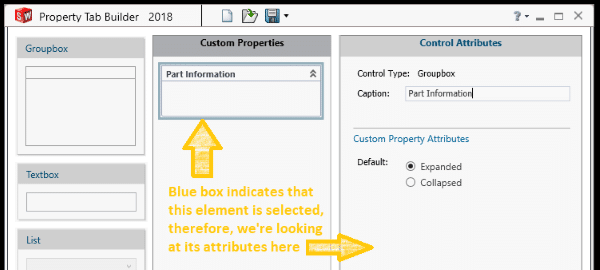
In the first column are all of the elements available to you, and the second column, labeled “Custom Properties” is essentially your workbench. The third column, labeled “Control Attributes” is where you can customize each element when you have it selected. Since there’s already a Groupbox in the middle column, we’re ready to customize it. Selecting the Groupbox in the second column allows you to then customize it in the Attributes column. We want it to be called “Part Information”, so we fill that in for Caption. Caption is simply the text the user will see prompting them for that element.
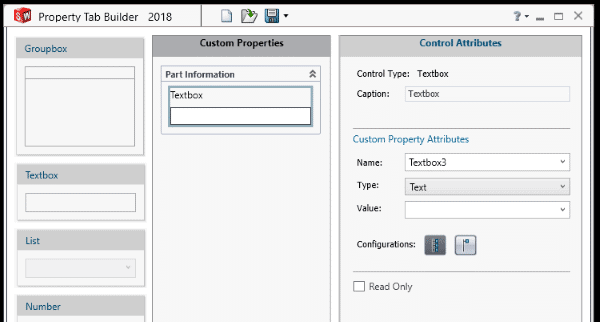
Now that we have our first Groupbox and we’ve changed its Caption to “Part Information”, we can start filling it with the elements we want. Looking back at our desired final outcome, we next want the user to be able to type in a Part Number. Letting the user type something in means we want a Textbox. So, we’ll drag a Textbox into the Groupbox we’ve created. With it selected, we’ll then look at its attributes.
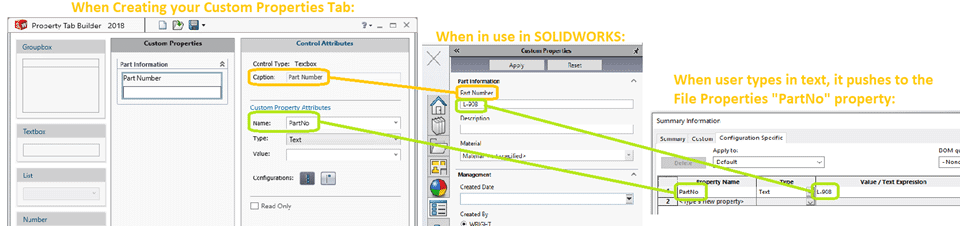
We’ll update its Caption to “Part Number”. The Custom Property Attributes section is next. Remember how I mentioned that when the user fills in the information on the Custom Properties Tab it pushes that info into the File, Properties? Well, which property do we want the user’s input to populate? That’s what the Name attribute is asking. When the user types something into this textbox, I want it to push to the File Property of PartNo, so I’ll use the Name pulldown and choose PartNo.
Now our Part Number is complete! We would repeat these steps for the Description. Drag a Textbox element into the Part Information Groupbox, change its Caption to “Description” (so the user sees the word “Description”), and change its Custom Property Name to “Description” (so when the user fills in some text it is pushed into the Description file property).
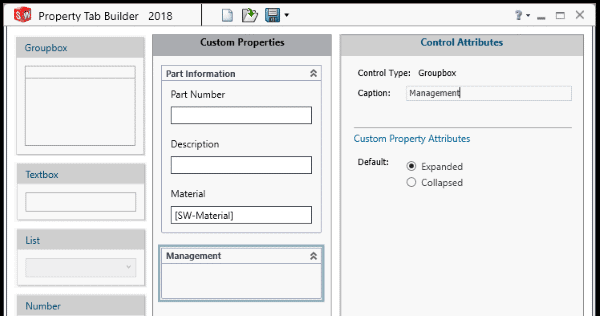
The next one will be only slightly different. For Material, we want the user to be free of responsibility. We want SOLIDWORKS to go ahead and link the value to the material from the tree. To do that, we simply go to the Custom Property Attribute of “Value” and fill it in, however, we don’t actually fill it in by typing because that would mean any file we use this on would have whatever we typed. Instead, we use the pulldown menu and choose [SW-Material] which is indicating to SOLIDWORKS to go ahead and fill this one in with whatever the Material in the tree says.

By now, you may have noticed the “Configurations” option on each Control Attribute. This allows you to choose whether these properties are populated into the Custom tab or the Configuration Specific tab. By default, it is set to Configuration Specific.
Next, we want to move on to the “Management” section. So, we’ll drag a new Groupbox into the middle column and make the Caption “Management”.
In the Management Groupbox, we’ll have the user input a date (a textbox), choose the person who created the part (radio buttons) and choose whether it has passed QA (a checkbox).
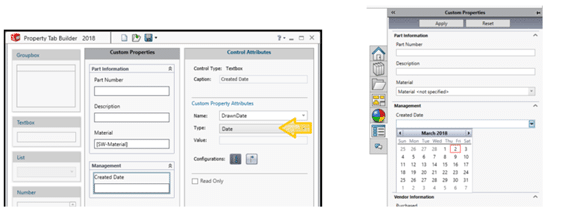
After dragging a textbox into the Management Groupbox, changing its Caption to Created Date, and assigning its Custom Property Attribute Name to DrawnDate, we will need to change the Type on this one to Date. This way, the user will have a calendar interface to select the date instead of manually typing it in.
Next, we want the users to be able to select a Radio button for the person who created the file. Drag a Radio element into the Groupbox and change its caption to Created By, and its Custom Property Attribute Name to DrawnBy.
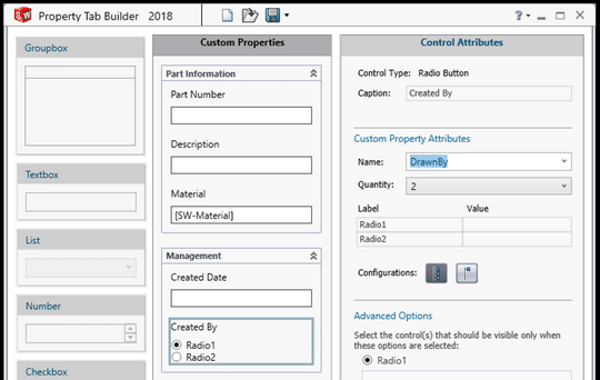
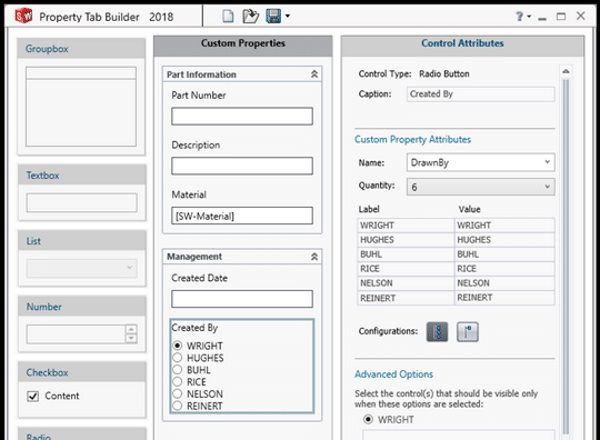
Now we can change the Quantity to the number of radio buttons we need, up to 10. There is then a Label column and a Value column. The Label column is what the user will see next to each Radio button, and the Value column is what the Custom Property will be populated with if they selected that Radio button. For example, if we had an employee with a nickname, you may put the nickname as the Label, but their real name as the Value, so they can click the Radio button for “Smitty”, but the Custom Property gets populated with “Smith”. In our example, all of the Labels and Values will be the same.
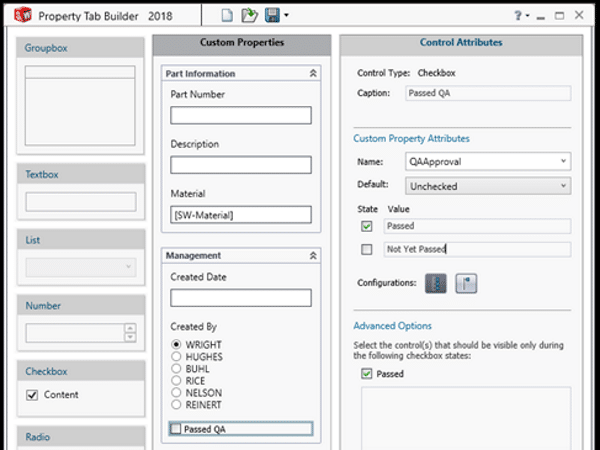
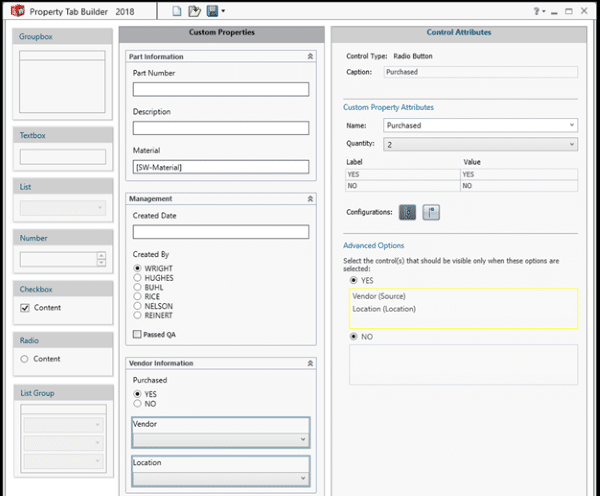
Next, we want a Checkbox for whether or not it has passed QA. However, I only want this Checkbox to show up if someone other than WRIGHT was selected for Created By. Let’s first create the Checkbox, then go back and make that condition. To add a Checkbox, simply drag the Checkbox into the Groupbox. We’ll change the Caption to “Passed QA” and change the Custom Property Attribute Name to “QAApproval”. In the State and Value area, we will specify what we want the Property to be populated with if they check the box and if they don’t check the box. We’ll use “Passed” and “Not Yet Passed”.
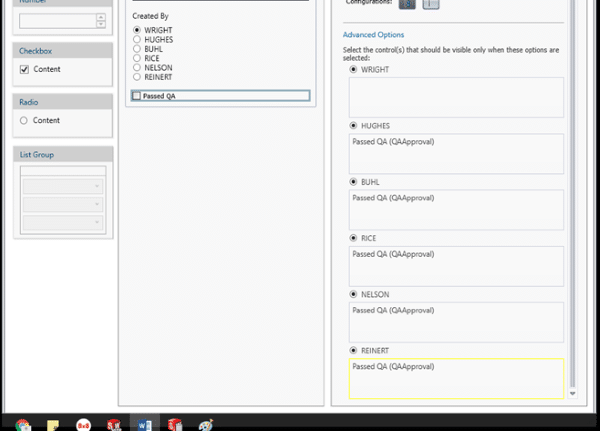
Now, let’s make sure this Checkbox only shows up if the user has selected HUGHES, BUHL, RICE, NELSON, or REINERT. We do that by going back to the “Created By” Radio element. With the “Created By” selected, look at the Advanced Options. If you don’t add anything in the Advanced Options area, then no conditions are applied. If you do add any later element under any of the names, that later element will ONLY show if that name is chosen by the user. We want “Passed QA” to show ONLY if HUGHES, BUHL, RICE, NELSON, or REINERT is chosen, so we’ll add it under each name by putting the cursor into the box and clicking the “Passed QA” element.
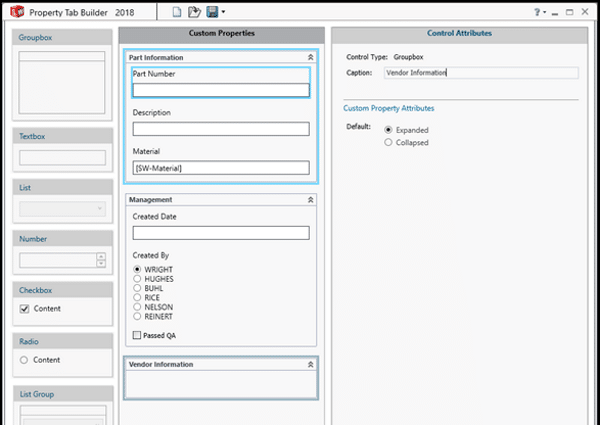
That’s all for the Management Groupbox. Our last Groupbox will be the Vendor Information Groupbox, so we’ll drag a new Groupbox in, and change its caption to “Vendor Information”.
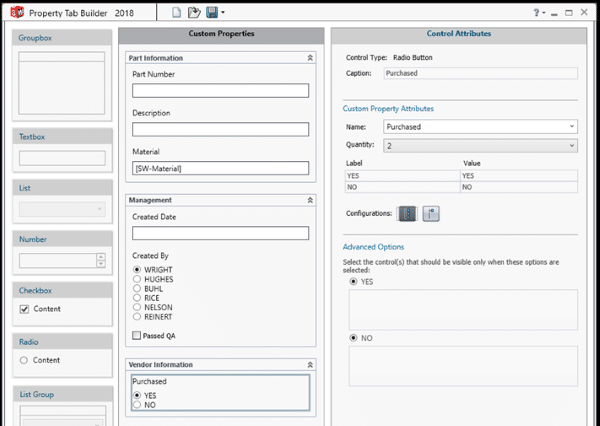
Within, we would like to give the user a Radio button option of YES or NO for “Purchased”.
We’ll drag in a Radio element, change the Caption to “Purchased”, and the Custom Property Attribute Name to “Purchased”. The Labels (what the user sees) will be YES and NO, and the Values (what gets input into the File Property) will be YES and NO.
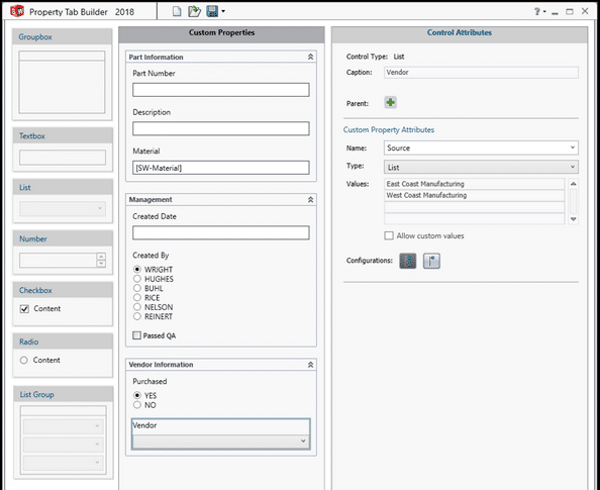
Next, we want a pulldown menu for the user to select which Vendor the part comes from IF it is purchased (which means we will make that condition afterward). To give the user a pulldown menu, we use a List element. So, we’ll drag a List element into the Groupbox, change its Caption to Vendor, and its Custom Property Attribute Name to “Source”. In the Values, we’ll input all of the choices we want to see in the pulldown menu.
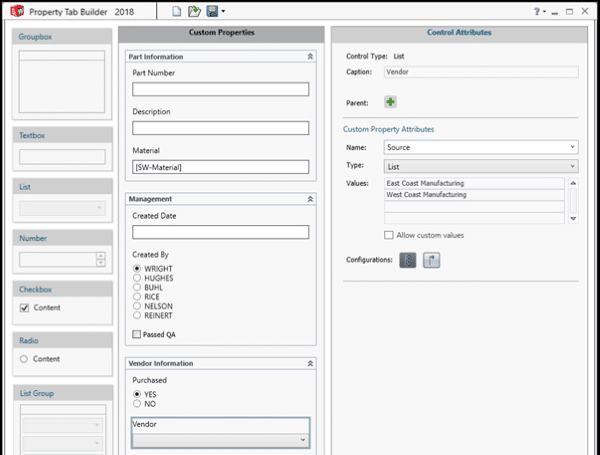
We need to make sure this Vendor option only shows when YES was selected for Purchased. To do this, we’ll go back to the Purchased element, and in the Advanced Options, we’ll insert Vendor into the YES box. So, only if the user selects YES will they see the Vendor List.

The Vendor List will have 2 Values: East Coast Manufacturing, and West Coast Manufacturing.
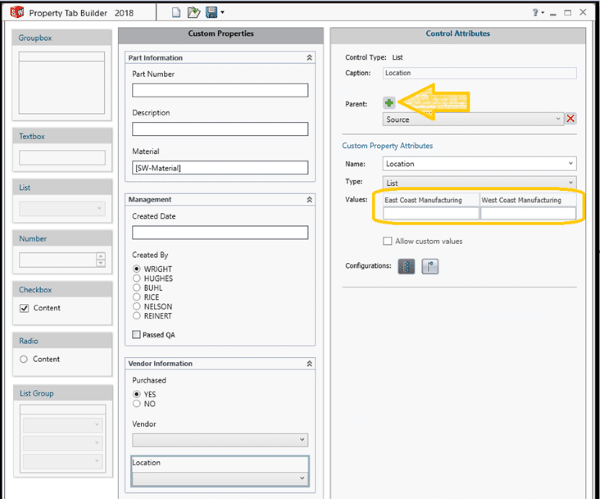
We also want a List element for Location, so we’ll drag a List element into the Groupbox, change the Caption to “Location”, and the Custom Property Attribute of Name to “Location”.
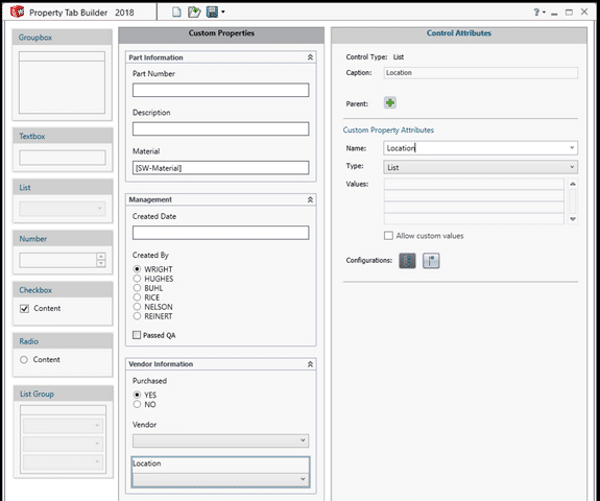
This element, however, has two conditions. We only want this element to appear if YES was selected for Purchased, AND we want to have a certain list of locations if they chose East Coast Manufacturing, and a different list of locations if they selected West Coast Manufacturing. We’ve seen the first scenario so we’ll just jump back to the Purchased element again and add “Location” to the YES box in the Advanced Options, so ONLY if YES is selected will the user see Vendor and Location.
To see a different list depending on what they selected for Vendor calls for a “Parent”. With the Location element selected, we’ll click to add a Parent, and make “Source” the parent. This gives a separate column for if they had selected East Coast Manufacturing or if they had chosen West Coast Manufacturing.
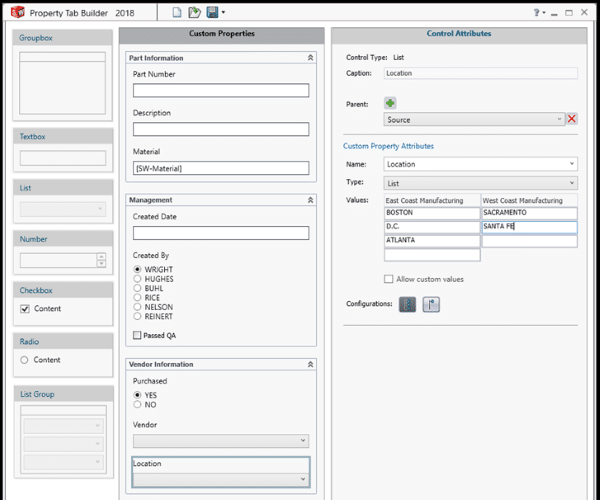
We can populate each column with the respective cities.
And that completes the creation of our Custom Properties tab using the Custom Properties Tab Builder! Now we just need to save in the proper File Location. The default File Location can be used, or you can specify your own in Tools, Options, System Options, File Locations, Custom Property Files.
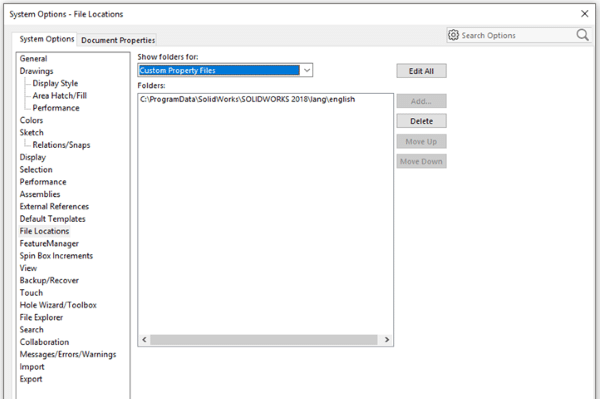
As long as you save your Custom Property File in the file location listed in System Options, you’ll then be able to use your custom interface to add properties on the Custom Properties Tab.
Congratulations! You can now create your own Custom Property Tab using the Custom Property Tab Builder!
Related Articles
2 SOLIDWORKS Tips for Working with Large Assemblies
Why You Should Use the Automatically Load Components Lightweight Option in SOLIDWORKS
About the Author
 Rachael Buhl earned her BS in Technology, Engineering, and Design Education at North Carolina State University. She joined Fisher Unitech as a Support Engineer and is now a dedicated full-time trainer. Rachael teaches the majority of the online courses offered by Fisher Unitech and flourishes in her role as an Application Engineer Instructor.