SOLIDWORKS Electrical: Title Block Customization - Rows & Columns
SOLIDWORKS Electrical 2014 | V.1: Title Block Customization – Rows and Columns
In this tutorial, I will show you how to customize your title block to have an automated row and column number. The title block template is designed to have flexibility between projects, and thus, there are two main areas of editing that will take place: The title block template and the project settings.
Title Block Edits
1. First let’s take a look at a default title block. You can access your title blocks by going to Library > Title blocks manager:

This will open up your title blocks manager. For this example we will edit a B-sized sheet. Select the sheet to be modified, right-click and select open:

2. For this example, let’s say we need to add a row of numbers as well as columns to define the space within the drawing. To start, we will need to add attribute tags that will express the values. On the left side panel, open Miscellaneous inside of the attributes list and locate #ROW. Double-click the tag and add it to your project. This tag will represent any row values that we will modify in the project settings:

If needed, you can change text properties of the tag by right-clicking #ROW and selecting properties:

3. Now, using the drawing function Array, we will create copies of this tag. Go to Drawings > Array. When prompted, you will select the spacing between each object based on an XY coordinate system. You can check these values by looking at the bottom-left status bar or by right-clicking the bottom-right status bar.
Note the distance of your offset. We will use this value to calibrate the title block later. In the image, it will be 0.75.

4. Using the same method, we can select the attribute tag #COL from the attribute list and create an array of the tag.
5. Next, we will measure the location of your attribute tag to calibrate the title block. A simple way to do this is by using Linear Dimension from the drawing tools. From the title block origin to the first #ROW mark, create a linear dimension mark:

6. Now that we know where our rows will be marked, let’s calibrate the offsets. In the side panel, scroll down to locate the row/column title block properties. Here, you will enter in your offsets with the referenced dimension marks created:

In this case, the values will begin at 1 and vertically increment up. If you would like to reverse these values, determine the offset value of the top row. In this case, it would be 1.75+(0.75*12 rows) = 10.75 for the First row position and Height of a row will be set to -0.75 to increment down.
The column of the title block can be calibrated in the same manner. If you are not using a column, keep With columns unchecked. There is also added flexibility if you need to add multiple numbering columns by toggling Row numbering.
7. Delete the reference linear dimensions and save the title block template.
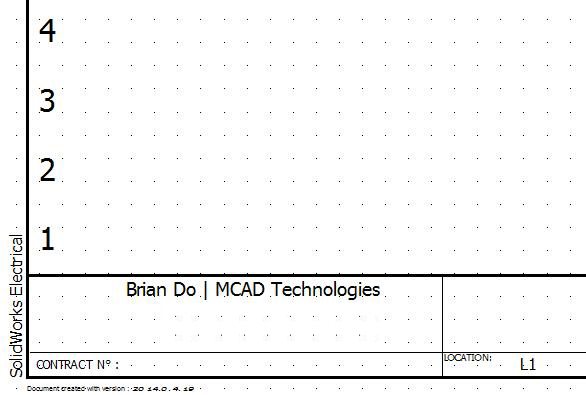
8. To test the sheet, open up a project and add the title block sheet to your project. The results of customization will follow default settings:
Project Settings for Rows and Columns
Once the title block has been completed, it can now be used in multiple projects with different customization parameters.
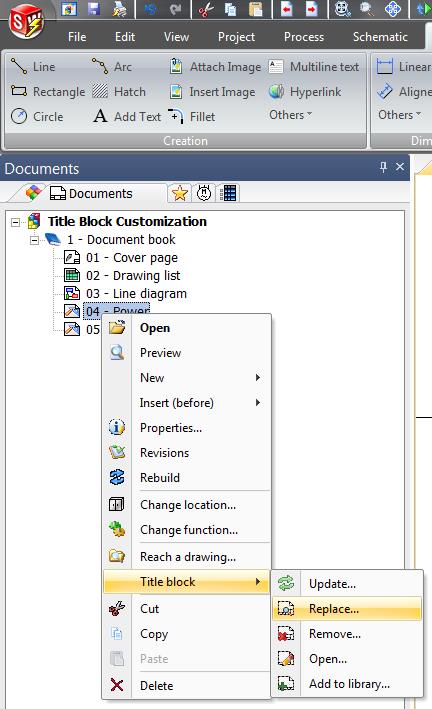
1. First, add the title block to your project. This can be done by replacing an existing sheet by right-clicking the sheet and going to Title blocks > Replace followed by locating the customized sheet:
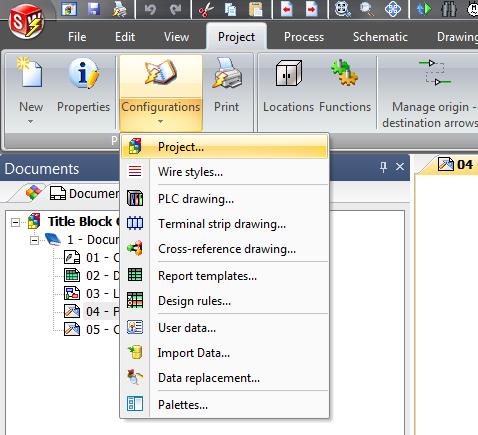
2. Once the sheet is in your project, we can customize how the values will output. To do this, navigate to Project > Configurations > Project:
3. Next, go to the tab Mark and select the formula symbol:

4. This will open up the formula manager for the row mark. In this area, you may perform SQL coding to generate the values you would like to appear on each #ROW mark. In this example, we will replace the default row number with alphabetic characters. To do this, select Row identified by letters (ASCII) and select Replace formula. This will change the SQL formula.

5. Click OK for both the Formula manager: Row mark & Project Settings.
6. To see the changes made, you will have to update the title block by right-clicking on the sheet and navigating to Title block > Update:
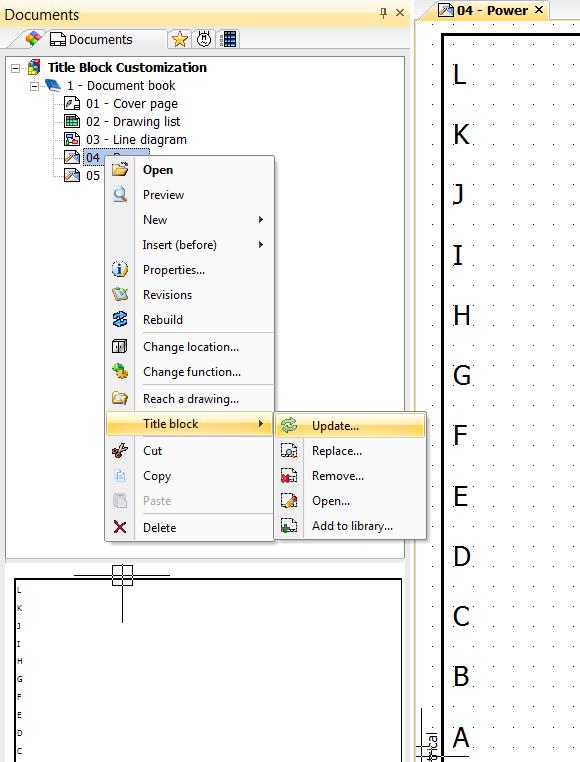
7. After clicking update, the sheet will regenerate the row values based on the modified SQL formula.
8. Save and continue your project.
Blog Post By: Brian Do | Electrical Product Specialist