Urethane Casting 101: RTV Molding in 3D Printing
 In my previous blog, we defined Room Temperature Vulcanization (RTV) silicone molding and the benefits of simulating production materials by using two-component urethanes. We also played out a real-world example of how printing four master patterns, molding them and piecemealing each engineer their parts is much more efficient than 3D printing them individually or even in small batches. In this blog, we share some standard mold types, and how they’re created for successful urethane casting.
Silicone molding is a step-by-step process for creating sturdy replicas of master patterns – but there are a few things to keep in mind.
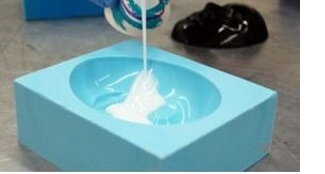
Room Temperature Vulcanization requires mixing two chemicals together, which triggers a chemical reaction. That mixing introduces air bubbles which will leave unwanted voids in the finished mold. During the casting stage, the urethane will fill that void, leaving a bump on the cast part. Having a pressure pot (paint pot) or vacuum chamber on hand while creating both the mold and the urethane casting is crucial for eliminating those bubbles.
 Under pressure, any bubbles in your silicone mixture will be compressed to a minute size. The problem with pressure is that this pressure must do its work before the silicone starts to set, which can be tricky as it thickens quickly. Using a vacuum, the bubbles expand and rise to the surface until they eventually burst – so I recommend using a vacuum during this stage. Urethane viscosity, on the other hand, is much lower than silicone, so pressure casting will minimize bubbles during the urethane’s work or gel time.
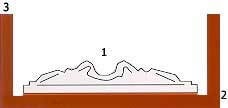
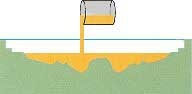
The easiest mold to make is a block mold. In the image on the left, you are looking from the top down into the cavity. Urethane is poured into the cavity creating an exact replica of the mold cavity. If your pattern has a flat base, you’ll begin by constructing a mold box around your pattern leaving ¾” – 1” around the pattern.
Note: A mold box can be made from pretty much anything such as a plexiglass base and four plexiglass sides or countertop sink “cut-outs” (the formica provides for an easy release) which can be bought at big box stores for a few dollars.
Seal the master pattern to the base with some non-sulfur modeling clay, caulk, super glue, or double-sided adhesive tape. Use some non-sulfur clay to form a seal around the base to prevent silicone to flow under your pattern. Using a hot glue gun will hold the mold box onto the mold base.
Platinum vs. Tin Cured Silicone
Once your mold box is constructed, it’s time to mix the silicone. There are two major types of silicone: Condensation Cure (Tin) or Addition Cure (Platinum).
Addition cure silicones offer exceptional heat resistance and work better in high temperatures than condensation cure silicones. The former can also be heat accelerated for faster curing.
Condensation cure silicone molds cure with a slight degree of shrinkage, 1%-4%, while addition cure provides virtually no shrinkage.
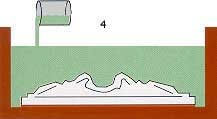
Once you’ve chosen your silicone, mix the base and curing agent according to the manufacturer’s instructions. This is usually a 10-1 mix ratio base to catalyst. Once thoroughly mixed, place the silicone into a vacuum chamber. The container used should be large enough to hold a 5X expansion. Once the silicone rises and falls back onto itself, you can remove the silicone and pour into your mold box.
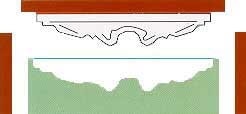
Once the silicone has cured (usually overnight unless you heat cure platinum silicone) you can remove the master from the mold.
Once your master pattern has been removed, you can put your mold box together to prepare for casting. Urethanes are a two-component mix, similar to silicone, but the mix ratio varies between resin and hardener so it’s important to pay close attention to the manufacturer’s instructions.
Mix the two components together and place the container back into the vacuum chamber to expand and burst the bubbles. Or, if work time allows, you can pour into the mold cavity and then place the urethane filled mold under pressure. (I prefer to vacuum, pour, then place into a pressure vessel.)
And that’s a wrap for now. In part three, we’ll continue this discussion with the construction of a block mold with a user-defined parting line and the construction of a two-part mold. Stay tuned.
Sketches courtesy TAP Plastics
Photos courtesy BJB Enterprises
Related Articles
Alive or Dead? RTV Molding in Additive Manufacturing
New Announcements from Stratasys: F120, V650 Flex SLA, and Pantone Colors
What Can You Make with a 3D Printer?
About the Author
 Derek Ellis has been with Fisher Unitech since 2018 as a 3D Printing Application Engineer and is based out of our office in Chicago, Illinois. With over 25 years of experience in the industry, Derek holds a strong passion for educating customers about the cost-benefits 3D printing and additive manufacturing can bring to a business.