Upgrading to SOLIDWORKS PDM 2017 Part 2: Post-Upgrade Tips
Often times, the thought of a software upgrade can be daunting and cause concerns over how time-consuming or challenging the process could be. With help from the experts, you don’t have to worry. This blog series provides tips and tricks to help make it easier for you to upgrade to SOLIDWORKS PDM Professional or Standard. In Part 1 I covered tips to help you prepare for your upgrade. However there is always something that needs to be done after an upgrade and in this blog, I will cover the following post-upgrade tips:
- – Run the PDM Database Upgrade Tool
- – Manually upgrade any PDM Add-Ins like Dispatch or SWTaskAddIn
So let’s get started!
Errors indicating a broken connection between the client and the server
Too often after the upgrade is complete, users will try to connect to their local vault view and experience one of the following pop-up error windows:
From the PDM Administration Tool.
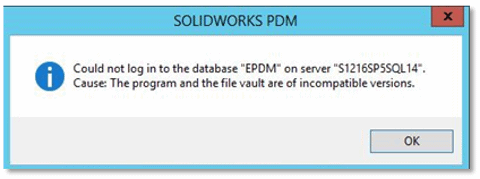
From the local vault view.
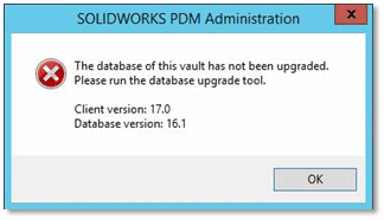
This error from the local vault view has the answer in the second line “Please run the database upgrade tool.” Inform whoever performed the upgrade that the Database Upgrade Tool needs to be ran against the database. Running the database upgrade tool is a manual post-upgrade step often overlooked, resulting in no connectivity between the clients and the servers.
The location of the Database Upgrade Tool is <SOLIDWORKS media>swpdmserverupgrade. <SOLIDWORKS media> and is either the DVD from SOLIDWORKS (d:) or the download location from SOLIDWORKS customer portal (C:UserststarksDocumentsSOLIDWORKS DownloadsSOLIDWORKS 2017). You will only need to upgrade the vault database(s). ConisioMasterDB does not need to be upgraded and is not selectable in the Database Upgrade Tool.
The process is:
- Run upgrade.exe “as administrator” to remove any permissions issues
- Click YES button on the first pop up window
- Click NEXT button on Step 1 screen
- Select / type the SQL server name or SQL Server namenamed instance that PDM is using and click NEXT button. PDM Standard will have SQLExpressnamed instance that would need to by typed in.
- Enter the SQL username and password that PDM needs to connect to the database.
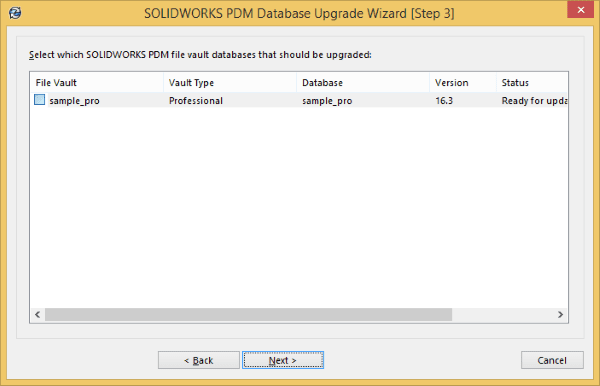
- For Step 3 Select the vault(s) database(s) to upgrade. Any vault database that is not selected cannot be accessed or removed. Click the NEXT button.
- Click the NEXT button on Step 4 screen to start the upgrade.
- Scroll down on Step 5 and verify that the database(s) upgraded successfully. Contact support with a screenshot of any errors that are displayed. Click FINISH button.
To see this in further detail, watch this short video.
Start updating your Add-Ins
You can manually upgrade any PDM Add-Ins like Dispatch or SWTaskAddIn starting with PDM 2016 Add-Ins that are not the same version. Often times, PDM Servers/Clients can cause COM DLL error, especially for PDM viewer clients. The Add-in upgrade process can be found in SOLIDWORKS Knowledge Base solution S-062429 on the SOLIDWORKS Customer Portal. When upgrading Dispatch, all existing scripts will be retained. To take advantage of the 2017 changes to the convert task, upgrade both the task and the macro inside of the task.
To upgrade Dispatch:
- Connect to the vault as an administrator or the admin account
- Right mouse click the vault and select IMPORT
- Point to the directory where dispatch is located. By default it is C:Program FilesSolidWorks CorpSolidWorks PDMDefault Data
- Change the filter to Add-Ins (*.CAF) and double click dispatch.caf
- Click YES to ALL button on the pop-up window, Click OK button on the second pop-up window
To upgrade SWTaskAddIn:
- Connect to the vault as an administrator or the admin account
- Right mouse click the vault and select IMPORT
- Point to the directory where tasks are located. By default it is C:Program FilesSolidWorks CorpSolidWorks PDMDefault Data
- Change the filter to SOLIDWORKS PDM Export Files (*.cex)
- Scroll down to the bottom of the list and double click Convert_gb.cex, DesignerChecker_gb.cex, or Print_gb.cex. Any of these files will upgrade the SWTaskAddIn. Again use Convert_gb.cex if you want Convert to use the 2017 3D PDF function
- Click YES to ALL button on the pop-up window, Click OK button on the second pop-up window
You can also view this process by watching the video.
This concludes the post-upgrade tips in this blog series. Be sure to come back for the next blog, which will cover additional post-upgrade tips that will help make your upgrade to SOLIDWORKS PDM 2017 easier.
In the meantime, you can get upgrade support from one of our PDM experts if you need help.
Related Articles:
- – Upgrading to SOLIDWORKS PDM 2017 – Part 1: Pre-Upgrade Tips
- – Upgrading to SOLIDWORKS PDM 2017 Part 3: PDM Professional Post-Upgrade Tips
- – Latest and Greatest – SOLIDWORKS PDM 2017