SOLIDWORKS 2020 What’s New – Plastics - Enhanced Solid Mesh (Auto) Workflow
The launch of SOLIDWORKS 2020 is an exciting time for users. There are many new tools to work with. There are a few tweaks and changes to things we’ve grown accustomed to. Then there are the changes to SOLIDWORKS Plastics 2020 that will absolutely delight those of us who are tasked with injection molding analysis! There are two main topics I’m going to cover for SOLIDWORKS Plastics 2020 – Enhanced Solid Mesh (Auto) Workflow and Streamlined Mesh Creation. Keep reading to see how things were in SOLIDWORKS Plastics 2019 and how these are made new in SOLIDWORKS Plastics 2020!
Enhanced Solid Mesh (Auto) Workflow
SOLIDWORKS Plastics users can opt for the software to automatically create a mesh for injection molding analysis. Both the interface and the default mesh have changed in SOLIDWORKS Plastics 2020 (Figure 1). In SOLIDWORKS Plastics 2019, the process began by right-clicking on the mesh icon within the feature tree, then selecting Solid Mesh (Automatic). In SOLIDWORKS Plastics 2020, you first right-click on the Solid Mesh icon, then hover over Mesh Type, then left-click to select Automatic. The second step is to again right-click on the Solid Mesh icon and then click Create Mesh. You may also notice a slight change in the study interface between 2019 and 2020 – more on that later.
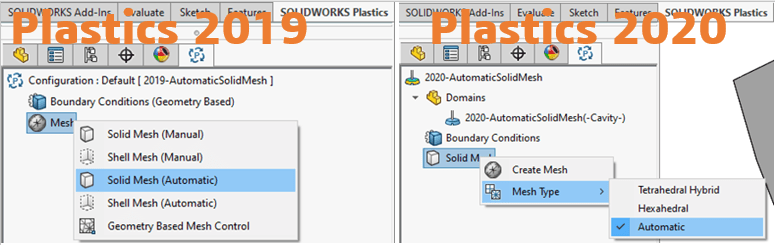
Figure 1
The second part of Enhanced Solid Mesh (Auto) Workflow change in is the default mesh created. In earlier SOLIDWORKS Plastics versions, the default automatic mesh was a marching hexahedral mesh (Figure 2).
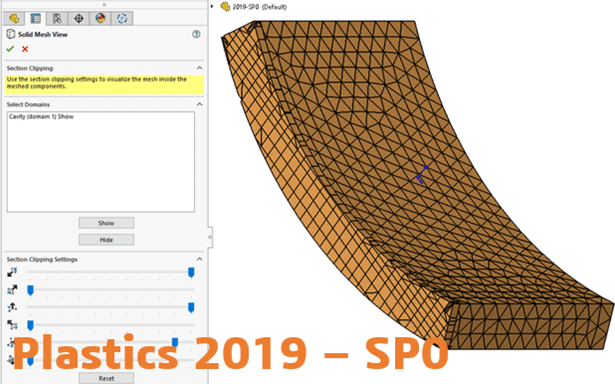
Figure 2
In SOLIDWORKS Plastics 2020, the default automatic mesh has changed to a hybrid tetrahedral mesh. This mesh type combines prism elements at the surface and tetrahedral elements to fill the volume of components. This mesh type is what most users were familiar with if they used manual meshing techniques. I confirmed this change to automatic solid mesh creation was quietly introduced as early as SOLIDWORKS Plastics 2019 SP3 (Figure 3). You may recall there were several other updates introduced with that service pack.
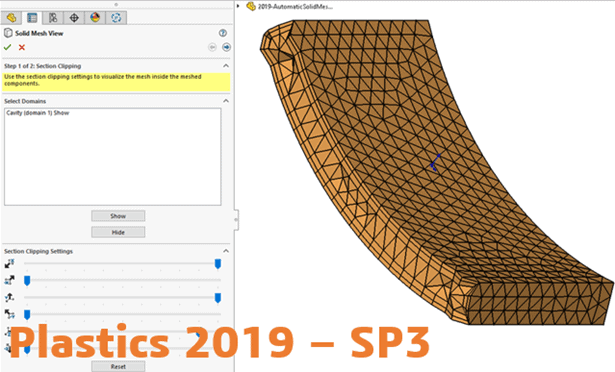
Figure 3
The hybrid tetrahedral mesh creation of SOLIDWORKS Plastics 2020 in Figure 4 was created with all default settings.
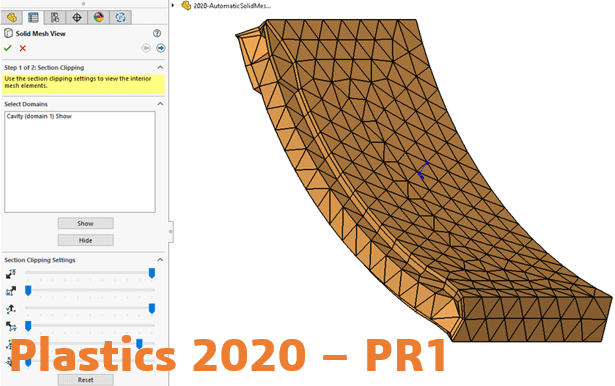
Figure 4
Streamlined Mesh Creation
Earlier, I mentioned there were changes to the SOLIDWORKS Plastics 2020 interface. One that will be immediately noticeable to users is creating projects. In SOLIDWORKS Plastics 2019 and earlier, when you change to the PlasticsManager tab, the beginnings of a study were already in place, as seen on the left-hand side of Figure 1. In SOLIDWORKS Plastics 2020, you must first create a study by left-clicking on the New Study icon, then name the study and choose the characteristics of the project (Figure 5). This workflow will be very familiar with SOLIDWORKS Simulation and SOLIDWORKS Flow Simulation users.
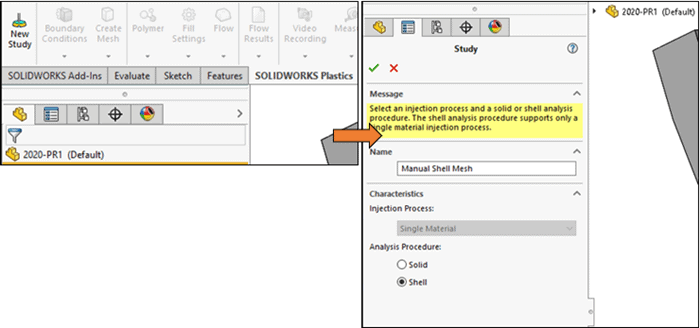
Figure 5
Note that SOLIDWORKS Plastics still requires a unique configuration for each study, so once a study has been created, the New Study button will be unavailable until you change to a configuration without a study or delete the existing study in the current configuration.
Now it’s time to look at the mesh creation process, both for SOLIDWORKS Plastics 2019 and 2020. In 2019, the steps to create a shell mesh are visually depicted in Figure 6. The process includes several left and right button clicks on both arrows and green checkmarks to progress through a multi-page Property Manager.
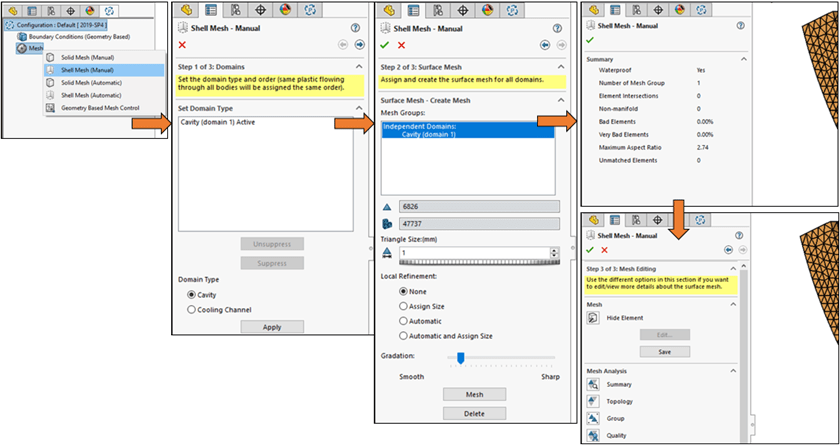
Figure 6
After the final green checkmark has been clicked, the mesh is saved to your hard drive. Now you’re ready to begin setting up the rest of the study features. If your analysis utilizes a solid mesh, there are additional inputs required after the mesh editing step (bottom right Property Manager in Figure 6). As I have heard more than a few users lament, “so many button clicks”!
Now let’s look at how mesh creation has been streamlined in SOLIDWORKS Plastics 2020. The process of creating a shell mesh is super-fast! You first right-click on the Shell Mesh icon in the study feature tree, then left-click Create Mesh. This brings up the Shell Mesh Property Manager. You can, of course, just click on the Create button using all the default settings to create a shell mesh (Figure 7).
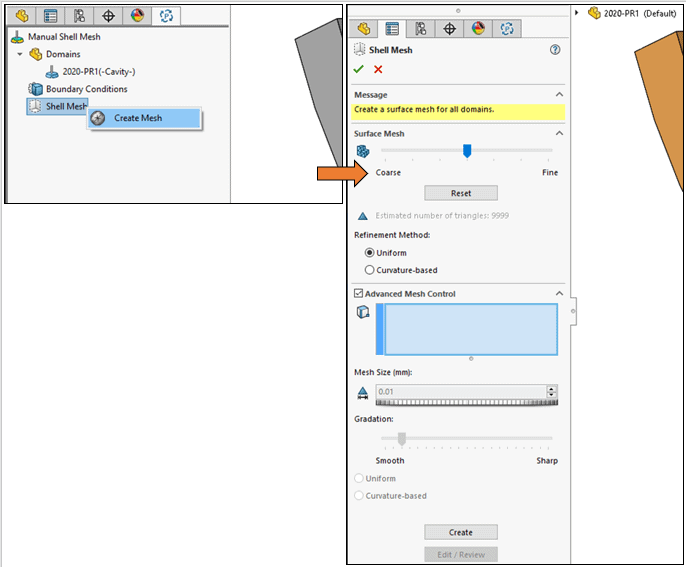
Figure 7
Alternately, for a little more control, the slider bar provides a global mesh size adjustment that Simulation users are familiar with. You also have the option to use either Uniform or Curvature-based refinement, similar to using either the Standard or Curvature based meshing algorithms in sim. Finally, you can also check the radio button for accessing the Advanced Mesh Control options. The difference is four Property Manager windows and (at least) seven button clicks in 2019 compared to one Property Manager window and four button clicks in SOLIDWORKS Plastics 2020 to create a shell mesh.
The process to create a solid mesh has likewise been streamlined for efficiency. The first step is to create a shell mesh, but rather than clicking on the green checkmark to finish the process, you left-click on the arrow in the upper, right-hand corner of the Solid Mesh – Tetrahedral Hybrid Property Manager. (This named Property Manager assumes that was the users’ mesh type selection, as shown on the right-hand side of Figure 1.) The next step is to make changes to the solid mesh settings, as needed, then click the Create button to generate the solid mesh (Figure 8).
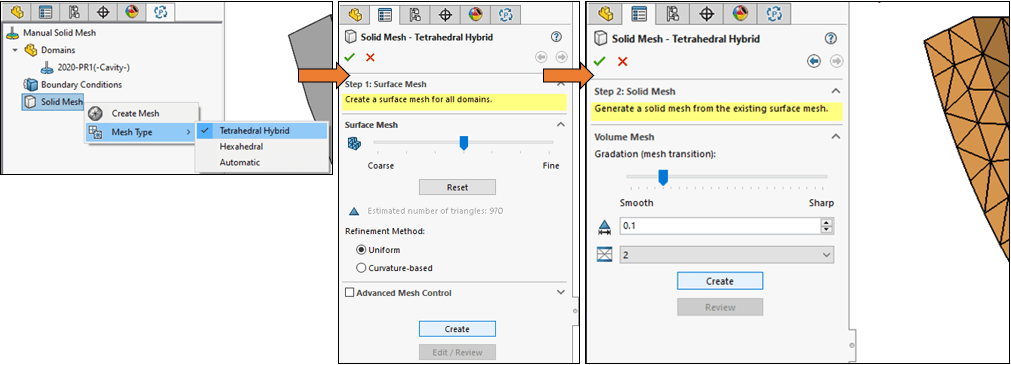
Figure 8
Once the shell mesh has been transformed into a solid mesh, the Solid Mesh View Property Manger automatically starts, allowing you to section through and review the quality of the mesh (Figure 9). The last step is, of course, click the green checkmark in the upper, left-hand corner of the Property Manager to write the mesh data to your hard drive.
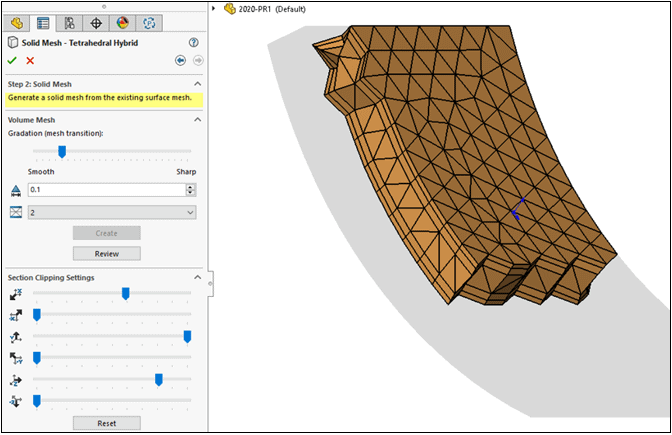
Figure 9
I am very pleased with the changes the SOLIDWORKS Product Definition has made to greatly improve the SOLIDWORKS Plastics user experience for meshing. At first glance, it may seem that users are losing the ability to tweak the mesh for their studies that were previously available. I assure you that all the prior options are available, just in fewer property manager windows and button clicks.
I hope this part of the What’s New series gives you a better understanding of the new features and functions of SOLIDWORKS 2020. Please check back to the CATI Blog as the CATI Application Engineers will continue to break down many of the new items in SOLIDWORKS 2020. All these articles will be stored in the category of “SOLIDWORKS What’s New.”
Design Innovation Month – October 2019
What is DI Month? We’re declaring October Design Innovation Month—again! It’s a month-long series of special events focused on what’s new in design and manufacturing technology. You’ll learn about enhancements in SOLIDWORKS 2020 that deliver new capabilities for improved performance, streamlined workflows, and a connected design ecosystem. Find out what’s new in 3D printing applications and 3D scanning to integrate into your design process. So, get ready to do things differently. It’s time to innovate!
Bill Reuss
Product Specialist, Simulation
Computer Aided Technology, LLC