Simplified Configurations and Working with Large Assemblies in SOLIDWORKS
 Large assemblies in SOLIDWORKS can often be slow to open, slow to save, and slow to work with, and throughout this blog series, we’ve been exploring different options one can take to help with lag, locking up, and wait time. In this blog, we’re going to continue talking about large assemblies that are slow to work with and working with simplified configurations.
I often like to say that there is no silver bullet when it comes to working with large assemblies, it’s really a combination of a lot of different settings, but if there was one silver bullet it would be to learn how to utilize working with simplified configurations. Overly detailed models in your top-level assembly will significantly slow down your assembly performance and overly detailed models in your top level assembly are the number one contributor to lag.
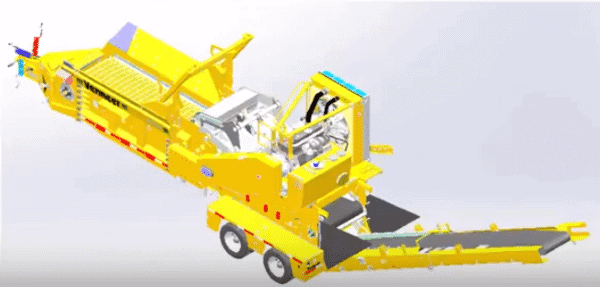
So what do we mean by ‘simplified configurations?’ Well, if you look at this top-level assembly that we’ve been working on of 6,000 components can you see the details on the tires? Well if we zoom in a little bit we can start to see it and certainly if I isolate that tire you can see a lot of tread detail and you can see some of the extruded text running around the outside of the tire.
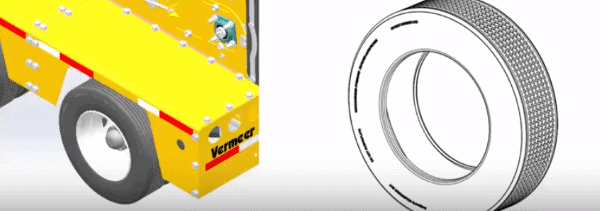
The question is can we see this detail when we’re out here at this level and the answer is obviously no, but your graphics card can. That is absolutely going to slow you down and it’s going to impact your performance when working with a large assembly.
So what we want to do is we want to take that tire and we want to maintain a fully detailed version of that tire to maybe use occasionally, use it in certain drawings, or use if we’re actually creating a mold for that tire but then we what we want to do is created a simplified configuration and we’re going to utilize this simplified configuration in our top-level assembly .
Top Culprits for Slowing Down Your Assembly
There are very specific and common culprits when it comes to slowing down assemblies that have too much detail: helical sweeps and extruded text. These culprits are often found in hardware. If you download hardware from a hardware vendor you’re likely going to get helical sweeps because you’re going to get a helical cut for your threads and we want to be sure that we have a simplified configuration of this hardware without that cut sweep.
Similarly, if you have springs in your models, you want to do whatever you can to get those springs our of your model to create a simplified configuration of your spring. You see the problem with these kinds of features is that it’s usually not one single hex bolt, it’s usually the hex bolt with that helical cut sweep used 50 or 100 times. It’s usually the same thing with the springs, you usually don’t have just one spring you have that one spring used over and over again 30 or 40 times and each instance of that spring is just crushing your assembly performance.
Another problem when you download a model from a customer is that it will include a manufacturing plate – those plates often have a bunch of extruded text which will really slow you down when working with a top level large assembly.
Another tip we’re going to talk about is a tool call assembly evaluate assembly visualization. Assembly visualization lets you identify which components in your assembly are generating the largest number of graphics triangles. This is really valuable information because this will help you go through your assembly and figure out which components are in fact the greatest offenders and taxing your graphics card the hardest.
When you open your large assembly in SOLIDWORKS, the first thing you’ll want to do is look for anything component that is overly detailed.
Now, instead of going through the assembly and having to guess which components are falling into the category of “worst offenders” we can use a tool in SOLIDWORKS called “evaluate assembly visualization”. Before we do that though, we need to set our components to be resolved to get the best result.
To do this go to right mouse button > set lightweight to resolved which will load the full component into memory not just the lightweight subset of the component. Next, go to the Evaluate command, click Assembly Visualization and SOLIDWORKS will bring up a new display by adding a tab to the property manager area. SOLIDWORKS is going through the assembly looking at the volume of the components times the density of the material that has been assigned to the components and it’s coming up with a total mass for each component which you can then sort by (highest vs lowest).
Now to go the flyout menu and select more from the pull-down menu select Graphics Triangles and hit OK. Now components that are generating the highest number of graphics triangles are shown at the top. This is directly indicating how much taxation is taking place on our graphics card. You can color code depending on the level by using the right mouse button on the color slider > change color. You can also add your own by left-clicking next to the color bar and adding additional colors for the different number of graphics triangles.
To learn more about this watch the video below.
Extruding and Delete and Patch
Continue cutting the number of graphics triangles
To utilize a simplified and fully detailed version of the sub-assembly, at lech level you must create a simplified and detailed configuration at each level.
Get rid of helical geometry
If you have a subassembly that has a helical component, removing it can help performance.
Take a look at your hardware with helical screw cuts
Threads, helical geometry, and springs are the biggest culprits for slowing down your top-level geometry. The video below will show you how to find them.
Did you catch all that? Make sure to check out my checklist video below.
I hope you found these large assembly tips helpful. Be sure to check out the rest of the series by checking out the related articles below.
 >
>
Related Articles
SOLIDWORKS Tips for Large Assemblies That are Slow to Work With
Slow SOLIDWORKS Load Time? Check This Setting
2 SOLIDWORKS Tips for Working with Large Assemblies
About the Author
 Toby Schnaars began using the SOLIDWORKS Software on the ’98 plus release, in October of 1998. He began working for Prism Engineering (now Fisher Unitech) as an instructor and tech support engineer in 2001. He has fielded over 10,000 tech support cases and been the head instructor for over 200 SOLIDWORKS training classes. Toby is a regular presenter at users groups, technical summits, and SOLIDWORKS world. In 2003, in Orlando, FL, Toby won first place in SOLIDWORKS MODEL MANIA a modeling contest based on speed and accuracy. Toby hosts a free monthly webinar called “Toby’s Tech Talk” where you can tune in and get more tips and tricks on the SOLIDWORKS software.