SOLIDWORKS 2018 What’s New – Creating a Tab and Slot – #SW2018
SOLIDWORKS 2018 What’s New – Creating a Tab and Slot – #SW2018
A bunch of SOLIDWORKS users work in the sheet metal industry. Some use slots and tabs to help locate sheet metal parts. Several years ago, I saw a request for a SOLIDWORKS feature that allows you to easily create a tab and slot. Currently, you can manually create a tab and slot. There are several techniques that work, like library features and the Combine feature. But for such a repetitive task, it is still very time consuming. Thankfully, SOLIDWORKS 2018 has introduced a new Tab and Slot tool. Just like it sounds, this new SOLIDWORKS 2018 feature automates the process of creating tabs on one solid body and slots on the adjoining body. So, now you can quickly and easily create two interlocking bodies with just a few clicks. In addition, you have full control over how many tabs are made, including all of the pertinent size information.
The main purpose of the new Tab and Slot feature is to make it easier to weld parts together and also to simplify the process of building complicated fixtures in SOLIDWORKS 2018 because you can now easily interlock several sheet metal parts. Even if you do not use sheet metal in SOLIDWORKS, the Tab and Slot feature is available in all parts. So, this feature can be used on single bodies, multibodies, and even on parts in the context of an assembly. The only fine print is that the edges and faces must correspond to each other. In other words, if you pick an edge to add tabs to, you will have to pick a matching face for the slots. But since this is most likely what you want anyways, it should prove to be a great time-saver. The only documented restiction at this time is that the edges and faces must be planar or cylindrical, but they do not have to touch.
Creating a Tab and Slot
Let me show you a quick example that lets you see the new SOLIDWORKS 2018 tool in action. I will use a simple sheet metal part as an example.
Click the Tab and Slot button, available on the Sheet Metal toolbar or Insert > Sheet Metal > Tab and Slot.
Select an edge in the graphics are for the tabs.
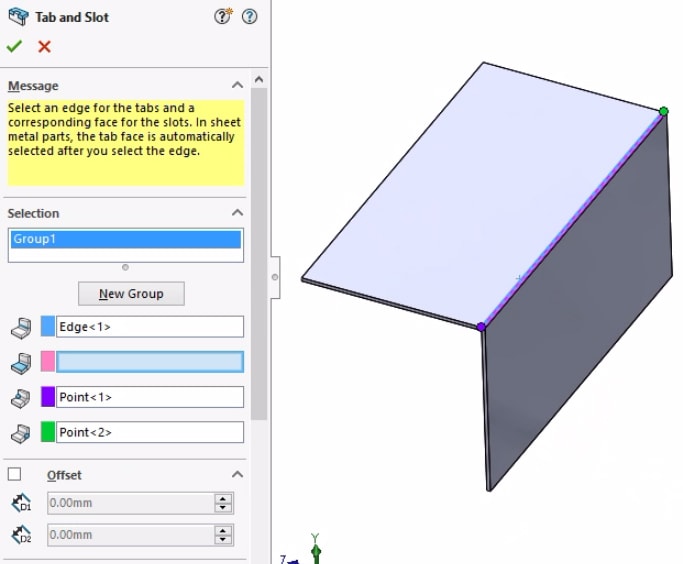
Next, select the corresponding face in the graphics area for the slots.
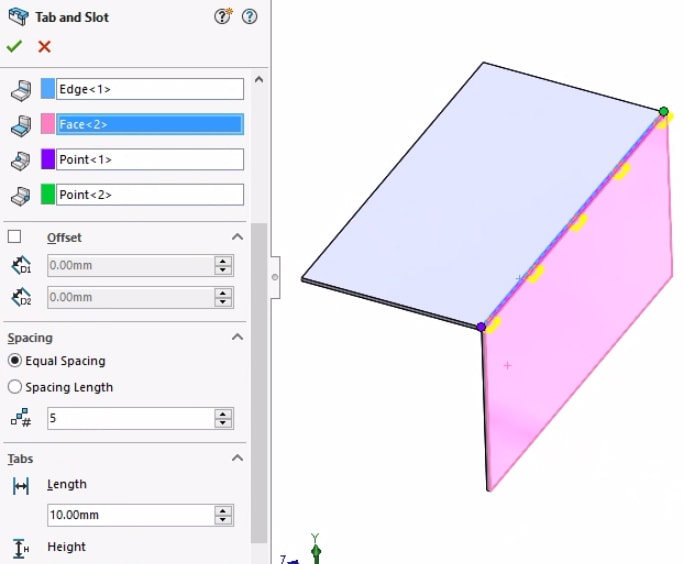
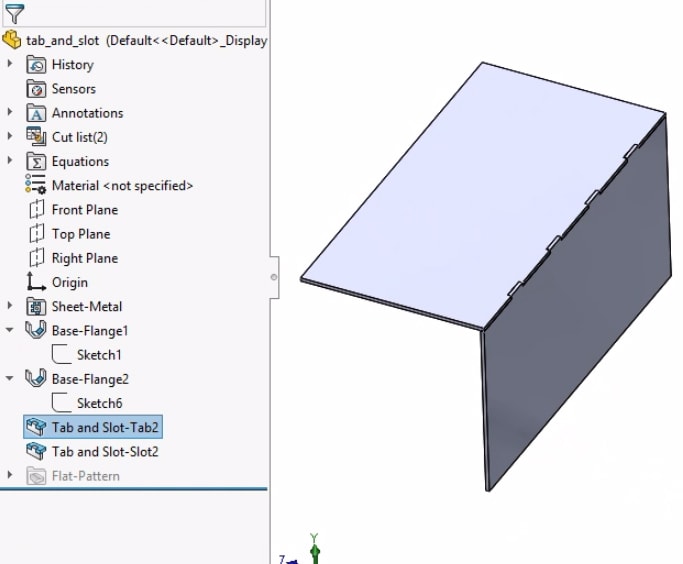
In the Tab and Slot PropertyManager, under Spacing, I chose Equal Spacing and I set the Number of Instances to 5. Under Tabs, I set the Length to 30.00mm, the Height to Blind and the Tab Height value to 2.00mm.

That’s it! Click the green OK check mark and you created all of your tabs and slots.
I hope this part of the What’s New series gives you a better understanding of the new features and functions of SOLIDWORKS 2018. Please check back to the CATI Blog as the CATI Application Engineers will continue to break down many of the new items in SOLIDWORKS 2018. All of these articles will be stored in the category of “SOLIDWORKS What’s New.” You can also learn more about SOLIDWORKS 2018 by clicking on the image below to register for one of CATI’s Design Innovation Summits.
Neil Bucalo
CATI Support Engineer
www.cati.com