SOLIDWORKS 2021 What’s New – SOLIDWORKS Plastics Tutorial Validating Injection Molding Process
A question that my colleagues and I are often asked is ‘how accurate are the results from <insert simulation product name here>?’. You might think that is an easy answer. In some instances, it absolutely is. To me, the better question is ‘if I set up my study/project correctly, can I trust the results’. That gets to the heart of the matter when it comes to analysis. If we are going to design better products by utilizing analysis tools, the digital twins of our physical product testing need to generate results we can trust. This is where a new SOLIDWORKS Plastics tutorial enters the conversation.
I wrote about tutorials for SOLIDWORKS Plastics when they were first introduced with SOLIDWORKS Plastics 2019 SP3. In SOLIDWORKS Plastics 2021, the new tutorial is ‘Validating Injection Molding Simulation’. To work through this tutorial you need to have a license of either SOLIDWORKS Plastics Professional or SOLIDWORKS Plastics Premium. While not readily apparent from the screen capture (Figure 1), the SOLIDWORKS CAD model is a multibody part file with bodies for the cavity, runner, A- and B-side molds and their cooling channels (hidden in the image). If you have SOLIDWORKS Plastics Standard, here is a tip for you to still work through most of the tutorial: suppress the bodies for both mold halves and both cooling channels, then combine the runner and cavity bodies into a single volume. That will allow you to work through the FLOW portion of the tutorial.
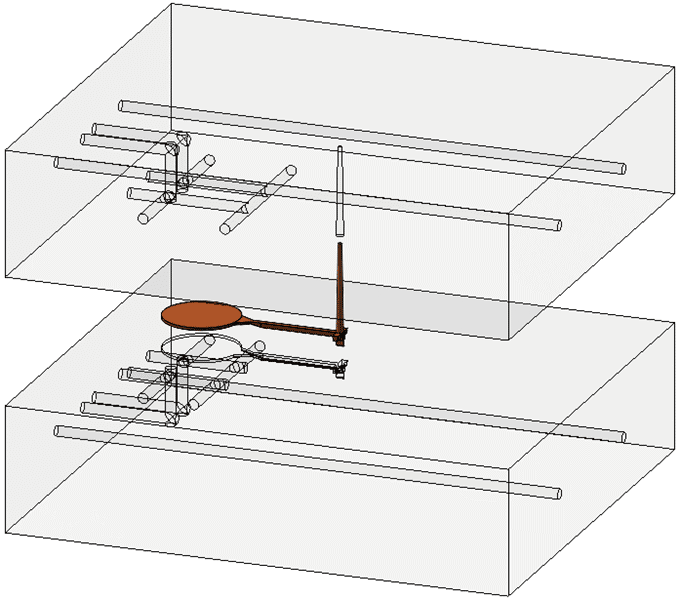
Figure 1
The fastest way to access the PDF file for SOLIDWORKS Plastics tutorials is to left-click on the Settings and Help icon on the SOLIDWORKS Plastics command manager tab, then left-click Tutorials. This automatically opens the PDF file that you could manually find in your SOLIDWORKS installation folder C:Program FilesSOLIDWORKS CorpSOLIDWORKS PlasticsDocumentenglishswplasticstutorials.pdf.
You might have noticed I wrote “new” tutorial a couple of times already. This new tutorial first became available in SOLIDWORKS Plastics 2020 SP3! (I sure like these mid-year service pack additions!) The tutorial was written for the SOLIDWORKS Plastics 2020 user interface and workflow. If you have read this blog by my colleague Drew Buchanan, you already know about the UI changes. Be prepared to find where the buttons and settings are in SOLIDWORKS Plastics 2021 compared to where they were in SOLIDWORKS Plastics 2020.
Now you are probably asking where the accuracy statement of this tutorial comes in for what looks like such a simple part. To back that up, you need to read the SOLIDWORKS blog How Accurate is a Digital Simulation When Compared to Physical Reality. The model for this tutorial was validated by SOLIDWORKS Corporation working together with Chung Yuan Christian University (CYCU) in Taiwan. There were more parts built and tested than just this tutorial model. I have worked through the new tutorial with both SOLIDWORKS Plastics 2020 and SOLIDWORKS Plastics 2021. I can say that my results matched the validation tutorial step for step.
I will not go into all the details, but I will say it shows you there can be a lot more in setting up FLOW and PACK parameters than time and pressure. One of the interesting results is verifying the location of the plastic melt front in the part at specific times during the FLOW portion of the analysis. In Figure 2, the three results from left to right are a Fill Time plot at 0.054 seconds, 0.088 seconds, and 0.121 seconds, respectively. (These results are from solving the tutorial as it is written for SOLIDWORKS Plastics Professional or Premium.)
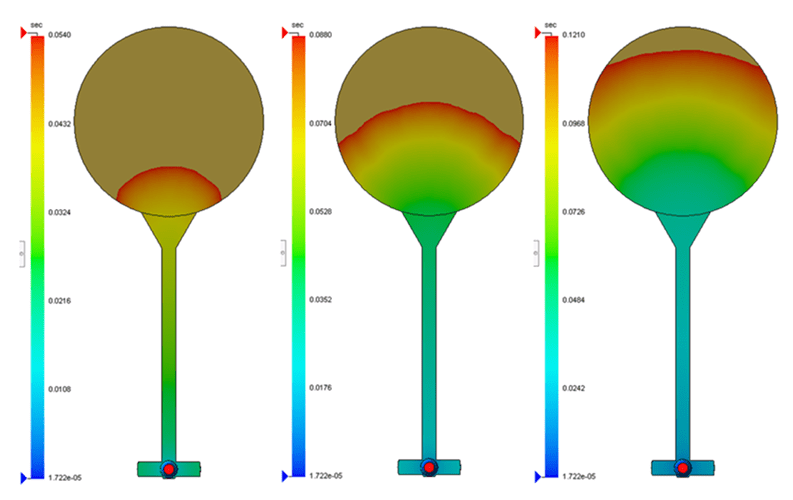
Figure 2
As I mentioned earlier, if you have SOLIDWORKS Plastics Standard, you can still work through the cavity FLOW portion of the tutorial. In Figure 3, I have modified the SOLIDWORKS model and set up the FLOW parameters, per the tutorial. The Fill Time plots, from left to right, are at the same instances in time – 0.054 seconds, 0.088 seconds, and 0.121 seconds. If you look close – really close – there are slight differences in the plastic melt front between the two approaches to the solution.
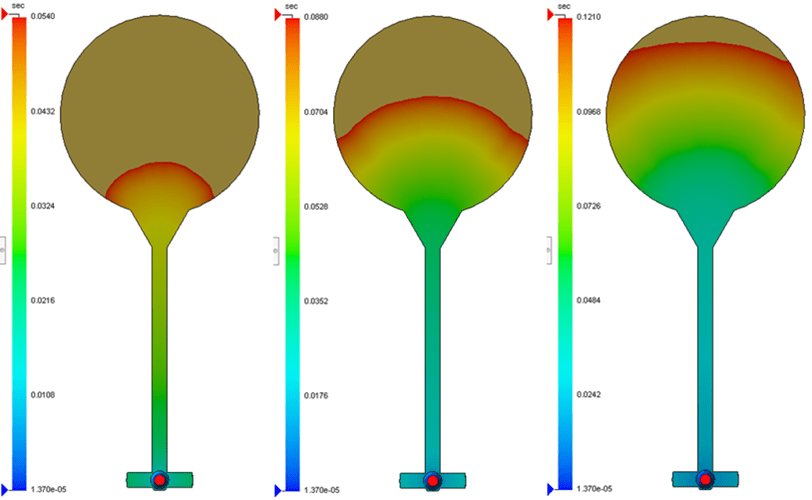
Figure 3
Whether or not this tutorial should qualify as new does not matter to me. What matters is that SOLIDWORKS Corporation and the SOLIDWORKS Plastics R&D team are investing in activities that prove the tool is accurate. Telling me a tool is accurate is one thing, showing me is quite another. I now have a question for you. How do you invest in proving the value of your products and designs? Now go make your products better with SOLIDWORKS Simulation!
I hope this part of the What’s New series gives you a better understanding of the new features and functions of SOLIDWORKS 2021. Please check back to the CATI Blog as the CATI Application Engineers will continue to break down many of the new items in SOLIDWORKS 2021. All these articles will be stored in the category of “SOLIDWORKS What’s New.”
Bill Reuss
Sr. Simulation Product Specialist
www.cati.com
What is DI Month? We’re declaring October Design Innovation Month—again! It’s a month-long series of special events focused on what’s new in design and manufacturing technology. You’ll learn about enhancements in SOLIDWORKS 2021 that deliver new capabilities for improved performance, streamlined workflows, and a connected design ecosystem. Find out what’s new in 3D printing applications and 3D scanning to integrate into your design process.