SOLIDWORKS Automation Options for the Innovative Engineer
SOLIDWORKS automation solutions can help save time making changes to redundant, “similar but different” components and assemblies. The benefits of automation compound over time, leaving you more time to focus on further automation or any other engineering task that demands your attention.
Automation through SOLIDWORKS doesn’t always come with a hefty price tag. Some of the most basic ways to automate come free with every seat of SOLIDWORKS. These include design tables and DriveWorksXpress. This article intends to explain both design tables and DriveWorksXpress, some of their similarities, their differences, and going further with DriveWorks automation.
Design Tables for SOLIDWORKS Automation
Design tables can be embedded in a SOLIDWORKS design table, or through an Excel-based design table. It can be used to build additional configurations in a model or assembly, suppress features or parts, change dimensions, drive custom properties, and more!
We are going to focus on Excel-based design tables, as they’re the most robust type of table. Excel-based design tables have a few options. You can create a multi-line design table– which typically contains the comprehensive list of everything a component can be—and single-line design tables, which contain a single row of all features, parts, properties, and dimensions that could change within a component. Both options have a Configuration Publisher tool that interfaces with the end user. This works as a form control that will be given to a user who is inserting parts/sub-assemblies into an assembly.
Configuration Publisher
You can create the Configuration Publisher tool with any Excel-based design table. For multi-line tables, SOLIDWORKS automatically creates the Publisher. For single-line tables, the process is a bit more manual. This isn’t a bad thing and we’ll get to that later.
You can find the Configuration Publisher by right-clicking the top-level component in the ConfigurationManager.

This tool allows you to fill out forms to call out the correct configuration, rather than looking through a long list of configuration names. As you fill out the information, the tool looks through the Excel table to find an existing configuration. Through single-line design tables, if no existing configuration exists, it will create a new configuration within the part file. The “Configure Component” PropertyManager is available only when inserting the component into an assembly.


Multi-Line Design Tables
Multi-line design tables are used when we want all the configurations stored in the SOLIDWORKS file. While this makes it easy to find all options for configuring, it can also make the file size exceedingly large. Multi-line design tables are best for components with only a few variations. “A few” is subjective. A few could be 100, depending on your application and system. A good rule of thumb is to consider the performance of your multi-line design table. If it’s less than ideal, it might be time to consider another option.
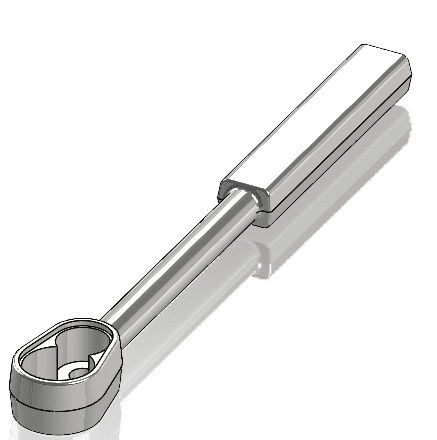
A part like this (below) makes a good use case for a multi-line design table because there are only 8 configurations.


![]()
The file size of this model is only 329 kB. When I create just 90 more configurations, the file jumps to 5.9 MB after force-rebuilding all configurations. That’s 18x larger even for this simple file. On the plus side, the Configuration Publisher tool automatically creates the form to select the proper configuration.
Single-Line Design Tables
Single-line design tables optimize file size. However, the Configuration Publisher is required for this method. A single-line design table consists of all parameters that can be configured in a single row. This could be dimensions, feature suppression states, part suppression states, custom properties, and more.


The benefit of a single-line design table is that we’re building the design table on the fly. Here, you can specify any range of values within the Configuration Publisher, rather than just what’s available in the design table. This is because we can configure the Configuration Publisher to allow for this. This manual process gives more control to the user. If you want to learn more about Excel-based design tables, check out this SOLIDWORKS Help File entry.
SOLIDWORKS Automation with DriveWorksXpress
While DriveWorksXpress works similarly for configuring components and SOLIDWORKS automation, it’s also much more than that. Yes- DriveWorksXpress can use table-like logic to generate models. Yes – DriveWorksXpress can suppress features, change dimensions, and drive custom properties. It can also automate file naming, file paths, and drawings! This is what makes DriveWorksXpress stand out. It also has a unique rule builder that makes it simple to program. Much like the Excel-based Configuration Publisher, Xpress also has its own form designer.
Activate DriveWorksXpress
Access and activate DriveWorksXpress either by going to the Menu Bar> Tools> Xpress Products> DriveWorks Xpress, or through the “Evaluate” CommandManager. The first time you launch into the tool, you’ll be prompted to visit a link and log into your SOLIDWORKS user account. Then, just copy and paste the product code into the window. Upon entering, DriveWorksXpress should open in the Task Pane.

Using DriveWorksXpress
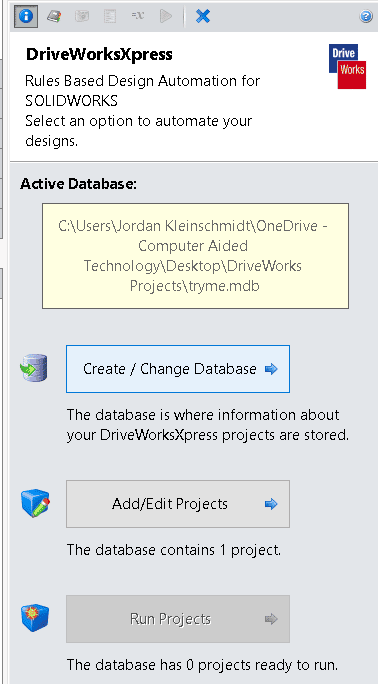
When you first launch the fully licensed DriveWorksXpress, you’ll see it open in the task pane. Here, my database is already active, but if an existing database hasn’t been selected, a new database must be configured. Think of this database as the DriveWorks project template. I must select the location of the DriveWorks project by clicking “Create/Change Database”, then give the *.mdb file a name.
Projects
The next page is the “Projects” tab. This is where DriveWorks stores all of the projects in the database. If the model we want to drive through DriveWorks is open, select “Use Open Model”, if not, select “Browse”.
This is where we can browse for parts or assemblies. However, we aren’t controlling drawings at this stage. We’ll get to drawings in a bit because DriveWorks considers them as part of the model.
Capture
The Capture icon is signified by the camera.

It is used to capture features, dimensions, drawings, and custom properties that can change throughout the tool. Activate “Captured Assembly Structure” and check any parts that change in some way based on the form inputs. Go back to “Captured Models” and double-click on a single component to capture it’s parameters. To capture a part or assembly’s dimensions/features, activate the “Drawings and Features” button and simply double-click the item in the Feature Tree. Re-name the feature to capture it or click on the dimension of the feature in the graphics area.
Form Design
The next step is to create a form for users to input information. This is what invokes the custom configuration. The location is at the top of the Task Pane tab.

You can choose between 5 different form types: text box, numeric text box, drop-down, spin button, and check box. They will also assign a name to the input type.

Rules
Now that the form is designed and rules are configured, it is now time to set up the rules that drive the model changes.

There are 5 different rule types: File Names, Configurations, Custom Properties, Dimensions, and Features. The Task Pane shows which rules we still need to configure. I can click a check box next to the rule type, then click “Edit Rules” to build rules for a specific rule type. The most important behavior to understand applies to “File Names”. We can build rules to delete or suppress parts and features completely when a check box is ticked. DriveWorks’ unique rule builder allows you to select from various inputs and logic statements like “If” statements, see below. In my example, if FeatureType was TRUE, or “checked”, it would suppress the component. It would unsuppress if FALSE.

DriveWorksXpress vs. Excel-Based Design Table Comparison
Let’s compare the similarities and differences between the DriveWorksXpress and Design Tables. This helpful feature matrix should show you what’s possible between the tools. An example, below, shows the variation in form control appearances.
Table – *limited functionality

It’s clear from the table that DriveWorksXpress can do just about anything that design tables can do and more! Personally, the DriveWorksXpress rules builder is a more intuitive programming language than Excel-based design tables. Be sure to try both and see where your specific application suits you best!
DriveWorksXpress helps reduce file size because we’re configuring models only after filling the form. There are no configurations, but it works more like saving a variation of a master component or assembly. This greatly reduces file size while making it easy to find through automated file naming.
Going Further with DriveWorks
Not satisfied with the level of SOLIDWORKS automation DriveWorksXpress provides? Try a 30-day free trial of DriveWorks Solo. Get in contact with a CATI sales rep to learn how to start your free trial today! Click for more information on DriveWorks Solo and DriveWorks Pro.
As always, happy designing automating!
Jordan Kleinschmidt, CSWE
Application Engineer II
Computer Aided Technology