SOLIDWORKS 2018 What’s New – Logging into SOLIDWORKS – #SW2018
SOLIDWORKS 2018 What’s New – Logging into SOLIDWORKS– #SW2018
Between Mouse Gestures, Shortcut Bars, Command Buttons, and even Icon Colors, customizations to the SOLIDWORKS 2018 User Interface allow you to really personalize your experience with the CAD software. While some of these options are just personal preference, most lead to faster and more productive modeling. When you need to get some work done on an unfamiliar or rarely used machine, the differences in setup can hinder your performance. You might be lucky enough to have a recent Copy Settings Wizard file handy, but if that file is located on a machine back at the office or in the dark depths of the hard drive that just died, you might find yourself spending hours trying to get everything back.
SOLIDWORKS 2018 introduces a new Login option inside SOLIDWORKS, allowing you to load your individual Customer Portal account in a session. With this login comes three new features to the software. First, it will allow Standalone License users that have opted into the new ‘Online License’ scheme to access and silently activate their licenses. Next, it will give you automatic access to hyperlinked web content within SOLIDWORKS without running into these annoying error messages:

And finally, it will allow you to synchronize settings between any SOLIDWORKS 2018 installation with a copy of your settings stored in your online My.SOLIDWORKS account.
To get started with logging in you will need a SOLIDWORKS Customer Portal account. If you don’t already have one, head over to CustomerPortal.SOLIDWORKS.com to get started. (The registration process can be a bit tricky, so check out this blog if you have any issues).
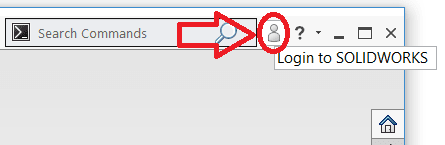
Once you have a Customer Portal account, launch SOLIDWORKS 2018 and click on the new Login icon in the top right-hand corner of the title bar.
After successfully logging in you will notice that a new field is added to the System Options dialog box:
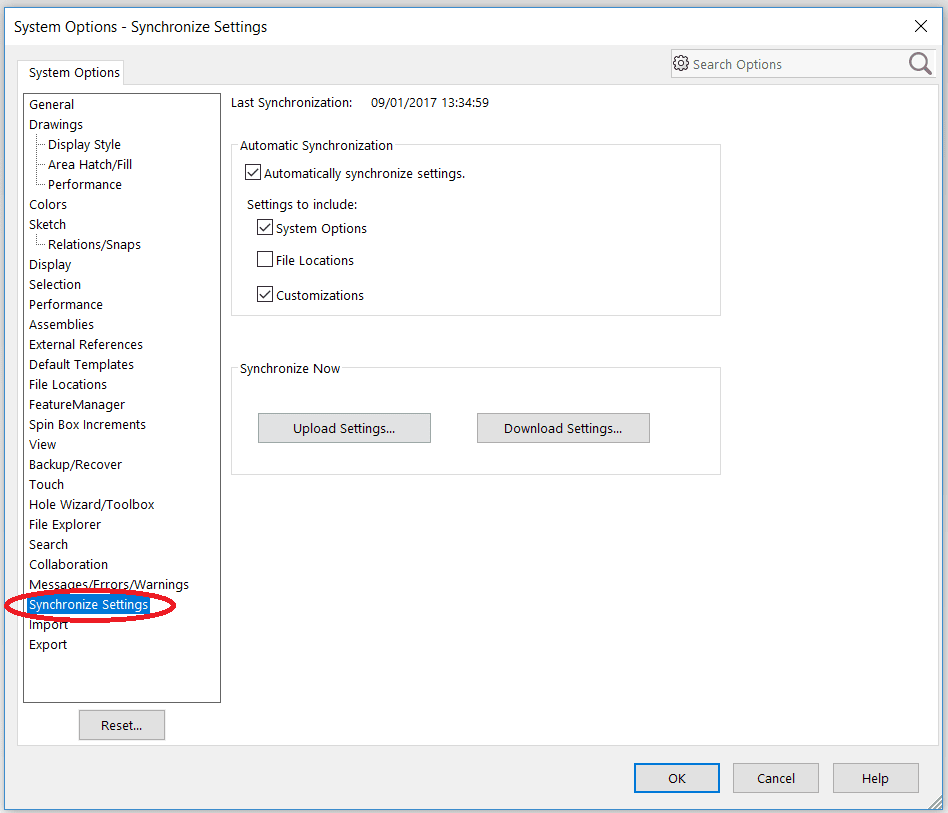
To start synchronizing settings, you will need to “Upload Settings…” at least once to have something in the cloud to copy from. By default, SOLIDWORKS will attempt to sync all System Options (excluding any file locations) and User Interface customizations. File Locations are left off by default, as copying file locations to machines with different installation locations and folder structures can really wreak havoc on a system. Be especially careful when utilizing this option. (These options can vary between machines, so synchronizing everything on your main machine with the cloud while only copying down menu customizations to a secondary machine is always an option).
Once you’ve initially uploaded your settings to the cloud, you can choose to turn on “Automatic Synchronizations” which will continuously keep track of and apply settings changes to any machine you log in to. Alternatively, you can use the “Upload Settings…” and “Download Settings…” to manually copying your settings to and from the cloud as needed. And don’t worry CAD Administrators: any locks you put on your user’s settings will override settings synchronized from other machines.
I hope this part of the What’s New series gives you a better understanding of the new features and functions of SOLIDWORKS 2018. Please check back to the CATI Blog as the CATI Application Engineers will continue to break down many of the new items in SOLIDWORKS 2018. All of these articles will be stored in the category of “SOLIDWORKS What’s New.” You can also learn more about SOLIDWORKS 2018 by clicking on the image below to register for one of CATI’s Design Innovation Summits.
Hannah Harmon
Application Support Engineer
