3D Designs For 3D Printing: 3D Printed Bobblehead
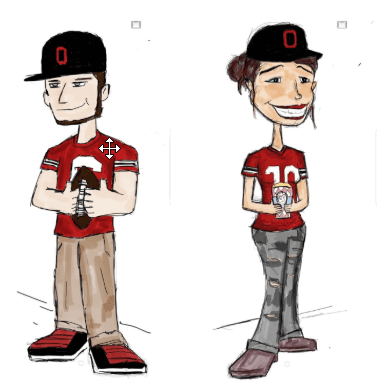
 When people ask me what I do for a living and I respond with “I repair 3D printers”, most people are perplexed yet intrigued. Although 3D printing technology is becoming more mainstream, the general public, by and large, still don’t quite understand what a 3D printer actually is or how it works. So, instead of explaining how a 3D printer works, I will instead show an intrigued prospect a recent project I created. As a gift, I 3D printed a bobblehead version of my brother that was derived from a cartoon drawing that I designed for the label of his home-brewed beer.
Thanks to my passion for creating 3D models, illustration, and graphic design, I was able to successfully develop, design, and 3D print this unique piece. Keep reading to learn more about 3D designs for 3D printing.
In order to get started, I needed to understand how a bobblehead was assembled. I learned this no other than from the internet. YouTube had a 2-minute video showing that the neck of the body must be the length of the head. Then, a spring must be super glued onto the neck with ¼ of it sticking above the neck. Finally, the head is glued to the top of the spring and within seconds, I have an official homemade bobblehead.
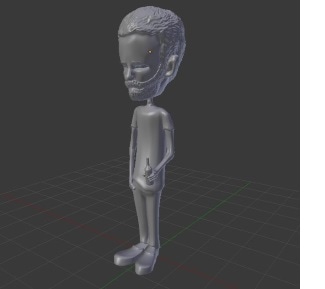
Once I knew my idea was achievable and easy enough to do, I began creating the 3D digital model (the STL file – for all you engineers out there). I’m not well versed in 3D CAD software such as SOLIDWORKS, so I created the model in Blender, which is a software ideal for animation and film rather than mechanical engineering. Blender can extrude, sculpt, and form models in ways similar to SOLIDWORKS with vertices, edges, and faces.
I had my model printed in all white so it could easily be painted over. Now, most models in this industry are used as prototypes and everyone understands that the surface quality on 3D printing shows the layer lines. However, if the piece is meant to be used as a final product, an entire post-processing phase is required.
Hobbyists and 3D printing gurus plague the internet with post-processing techniques such as an acetone bath where the model is dipped into acetone or heated acetone that creates a steam where the model hovers about the steam (a softer and safer technique). There are also sanding techniques which smooth the edges and fades the layer lines. But then, of course, you don’t even have to deal with acetone or sandpaper at all. I applied filler primer, which comes in an aerosol spray can, on the model which hides the lines completely and coats nice and evenly. (I applied 3-4 coats which did slightly thicken the surface of the model).
 Once my primer dried, I was pleasantly surprised with how smooth the surfaces were (and I didn’t even have to smell or touch acetone or spend hours sanding). Another great aspect of this technique is that it works on both ABS and PLA plastics.
After every separate part of the bobblehead was printed and primed then came the fun part – painting and coloring. I wanted to mimic the colors and design choices in the drawing, but I also wanted to have a flat cartoon look so what you will see in the final images is mostly just mixed base paint.
The devil is in the details, so I had to add the checkers on the shoes, the abstract art on the shirt, and lines that look like ink from a drawing pen, as well as the pupils.
After the two coats of paint it took to cover the gray filler primer dried, it was time to assemble. I glued the body to the base and then very carefully followed the instructions for the head.
I had trouble finding a spring that was small enough for a piece of plastic that’s only an inch high, but I eventually found one that was slightly funnel-shaped. This shape was actually beneficial because it allowed the perfect amount of weight distribution to the head.
Once the spring was glued nicely to the neck, I was anxious to glue the head to the top part of the spring. It was tricky because if I pressed down too hard it would glue down the neck making it, well, not a bobblehead. I, therefore, had to apply just enough pressure for it to touch the glue, and then let it go to dry.
After five minutes, I tested my work and sure enough, the head bobbled! But what if I turned it upside down? Would the head fall off? After carefully turning my model upside down I was ecstatic to see that it stayed. So without further ado, I give you the official Kowabunga bobblehead.
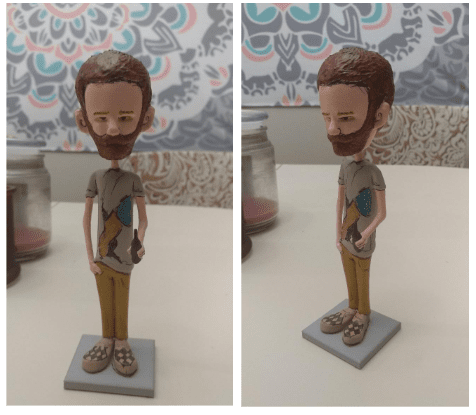
When my brother opened this, his smile and laugh were so big. It now sits proudly on top of his Kowabunga beer fridge.
Curious to see more? I’ll be 3D printing my fiance and me for our wedding to stand near the cake and dessert table. The images below are a concept preview.
To learn more about 3D printing contact us. Until then, cheers to my 3DP chaps. Happy printing!
Related Articles
What are 3D Printing Part Services and When Would I Need Them?
What to Look For in a 3D Printer: The Best 3D Printers by Industry
3D Printing Uses in Business: How are Top Companies Taking Advantage of 3D Printing Technology?
3D Printing Company Finds their Way to ABCs Shark Tank
New in SOLIDWORKS 2014: Sketch Features
About the Author
 Keith Morris is a 3D Printing Field Technician based out of Cleveland, Ohio and has been part of the Fisher Unitech family since 2017. Keith’s passion for creativity and technology lead him to the Cleveland Institute of Art where he majored in Digital Arts specializing in animation, film/video, and graphic design. Keith has a knack for creating 3D models and enjoys writing, weight-lifting, and OSU football.