Boost Your Productivity with SOLIDWORKS Visualize Boost
 SOLIDWORKS Visualize – introduced to the SOLIDWORKS product suite in 2016, gives us another excellent choice when we have a need to generate photo-realistic images. All seats of SOLIDWORKS Visualize Professional include a license for SOLIDWORKS Visualize Boost.
In this blog, I’ll cover what SOLIDWORKS Visualize Boost is, how it can boost your productivity, and an in-depth look on how it works.
What is SOLIDWORKS Visualize Boost?
The SOLIDWORKS Visualize Boost license is intended to be installed on a remote system. If you have more than one license of Visualize Boost, a cluster of remote systems may be joined together for faster offline calculation times.
What is the benefit of SOLIDWORKS Visualize Boost?
In either scenario, whether you use a single Visualize Boost machine or a cluster, this allows the user with the local SOLIDWORKS Visualize Professional seat to keep working on the next project while all of the heavy calculations are handled remotely. This blog will describe the necessary steps for setting up multiple machines as a render cluster or render farm.
What are the requirements for SOLIDWORKS Visualize Boost?
For each SOLIDWORKS Visualize Professional seat you own, a Visualize Boost license is automatically included. If you want more Boost systems running in the cluster beyond these licenses, it is possible to purchase additional Boost licenses.
Each machine in the cluster needs to be running Windows 7 x64 or later. The minimum ram needed is 8GB, but 16GB+ is recommended. A NVIDIA Quadro GPU with a minimum 2GB of ram is recommended. See the SOLIDWORKS knowledge base for the latest recommended model numbers. Note that if you have installed non-NVIDIA graphics cards, the machine will resort to using the CPU for processing rather than taking advantage of the GPU.
Configuration of the Render Cluster
Once SOLIDWORKS Visualize Boost has been installed on each of the render cluster machines, it is important to link the machines together to form the cluster or render farm. When SOLIDWORKS Visualize Boost is launched on each cluster machine individually, notice that it opens in a browser window. In this case study, we will cluster three machines together.
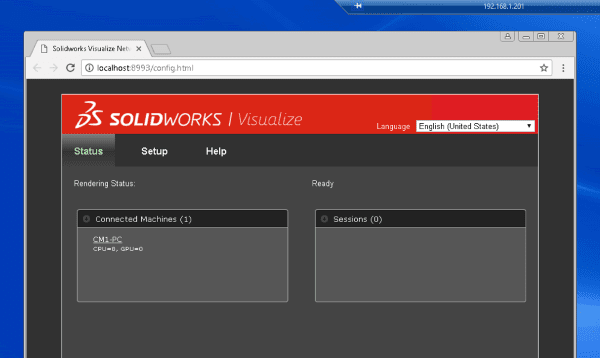
In the image above, machine “CM1-PC” has been assigned a specific network IP address 192.168.1.201. On the initial setup, we can see that the render service is running. There are eight active CPU’s and zero active GPU’s. Since this machine has older hardware, the graphics card does not qualify for a GPU. Therefore, it will rely exclusively on the CPU’s for processing the rendering on this cluster machine.
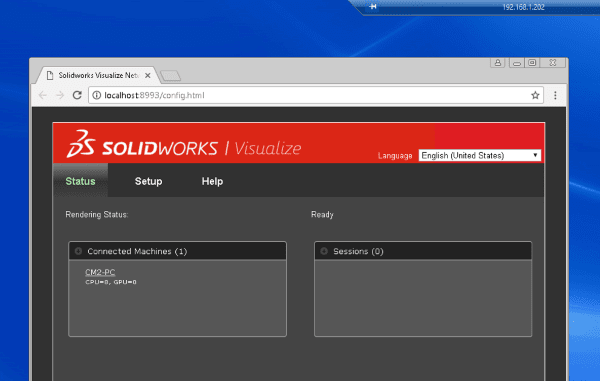
In in above image we see all of the same information as Figure 1, but the machine name, “CM2-PC”, and IP address, 192.168.1.202, are unique.
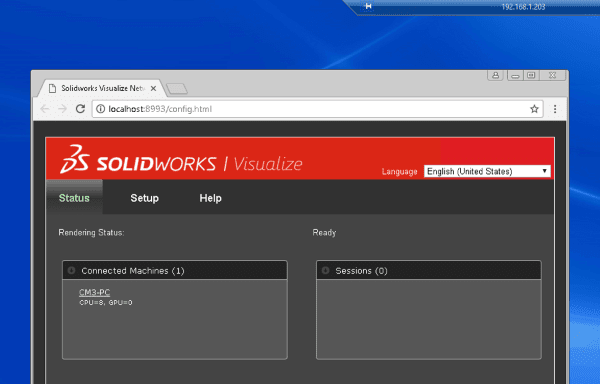
In the image above, we see all of the same information as Figures 1 and 2, but the machine name, “CM3-PC”, and IP address, 192.168.1.203, are unique.
Configuration of the render cluster “head node”
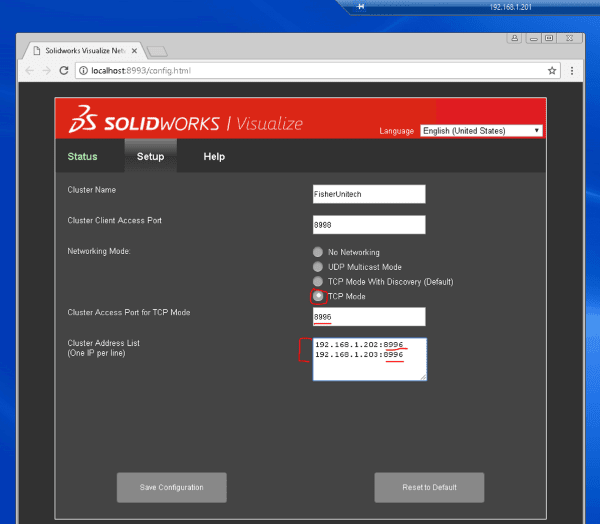
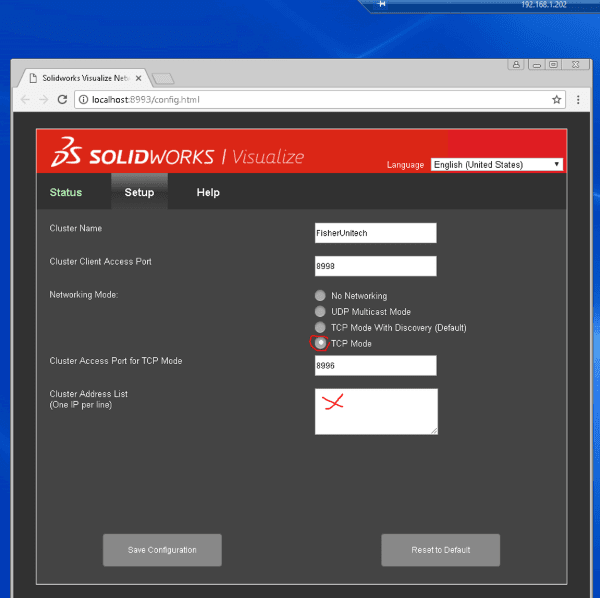
We are setting up CM1-PC as the “head node” in our server cluster. Go to the Setup tab and choose the TCP Mode. Give the cluster a name in the top field. The default cluster client access port is 8998.
Take notice of the “Cluster Access Port for TCP Mode” as it is set to 8996. The head node needs to have the IP addresses and the associated access ports listed for the remaining two server machines that will be working in this cluster. We have keyed in 192.168.1.202:8996 and 192.168.1.203:8996 appropriately.
Click Save Configuration and wait for the service to start. You may need to reboot the machine which has been designated the head node. If you return to this screen on the head node setup, the cluster address list will be blank, but the connection to the remaining server machines will already be established. Re-entry of the address/port is not necessary.
Review settings for second node
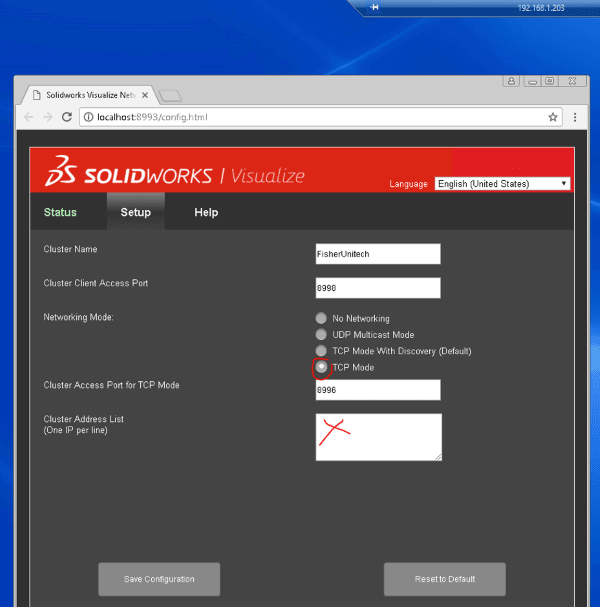
The image above shows the configuration of CM2-PC (our second node). Go to the Setup tab and highlight the radio button for TCP. The cluster name and cluster client access port should match the head node. Make note of the Cluster Access Port for TCP Mode and make sure it is set to 8996 to match the head node.
Do not enter any addresses in the Cluster Address List. That is only done on the head node machine. Save Configuration.
Review settings for third node
The above image shows the configuration of CM3-PC (our third node). These steps are identical to the second node.
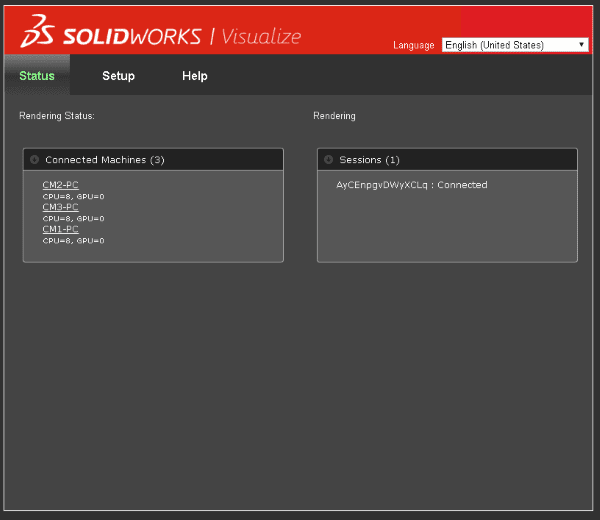
Review the status of the newly formed cluster
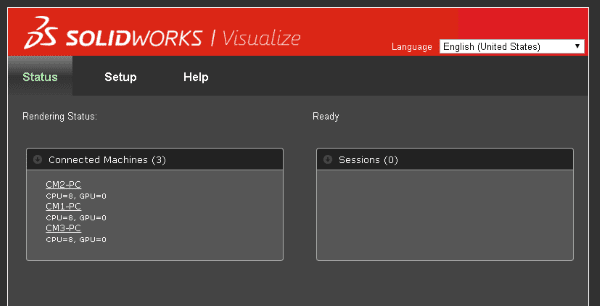
Now we can see on the Status tab that all machines in the cluster are listed (above) and available for the next job. The connected machine listing should be consistent when viewed from any server on the cluster.
Connecting the client to the cluster
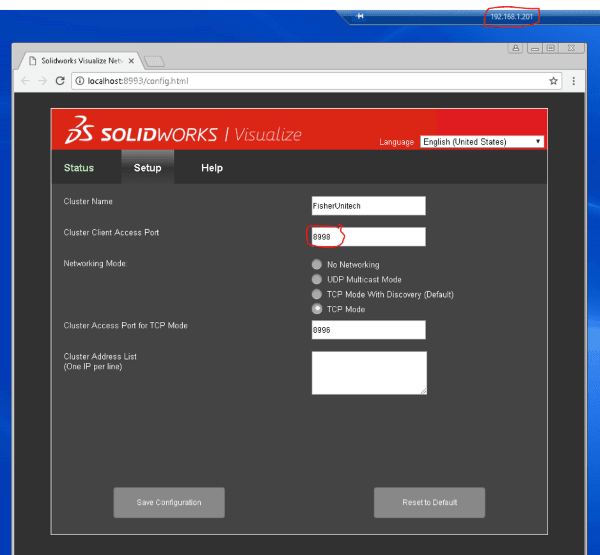
Taking another look at the head node, we can extract the information we need to use when connecting a client machine to our render cluster (render farm). We will need the head node IP address and the Cluster Client Access Port. In this case it is 192.168.1.201:8998
On the client machine, SOLIDWORKS Visualize Professional is REQUIRED to take advantage of the SOLIDWORKS Visualize Boost technology. In the below image, the splash screen should show SOLIDWORKS Visualize Professional.

Client configuration menus
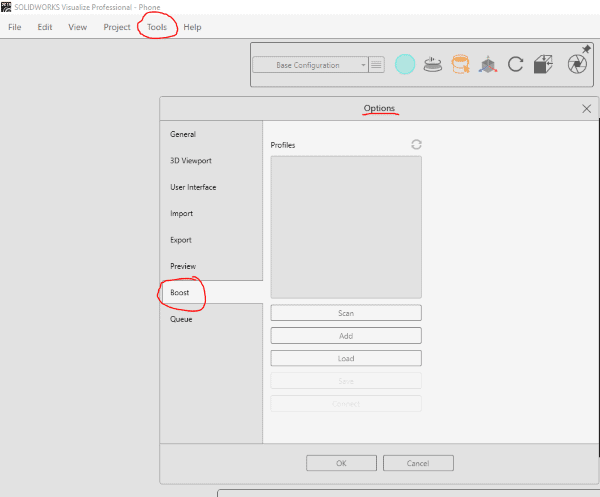
In the image above open a sample project. Next, go to Tools > Options > Boost.
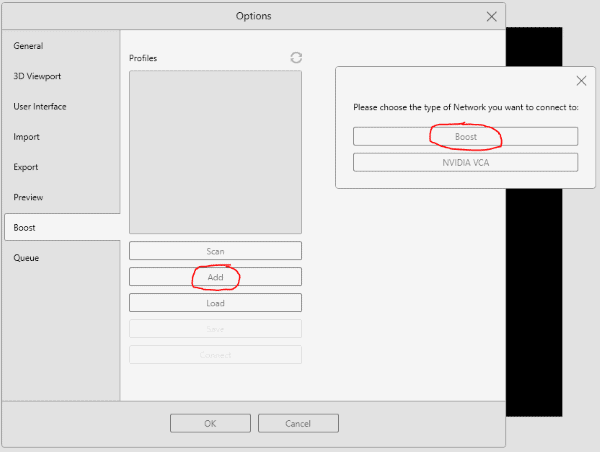
Add > Boost
More client configuration menus:
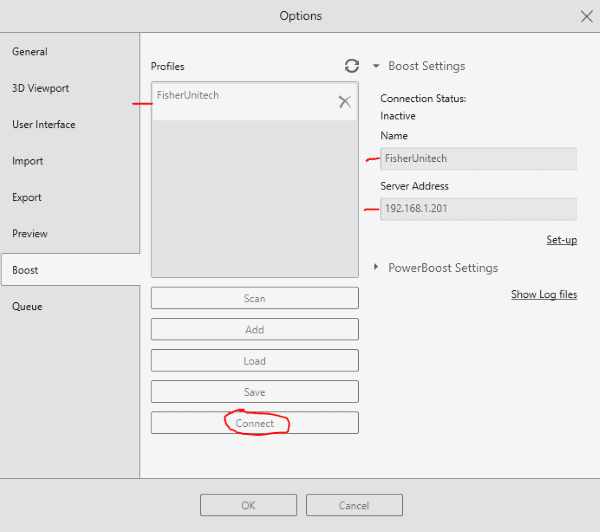
On the server address line, key in the IP address for the head node. Once the last digit is entered, the name of the cluster should automatically populate. In this case the name “FisherUnitech” shows up. Also, we see “FisherUnitech” listed under the profiles. Click Connect.
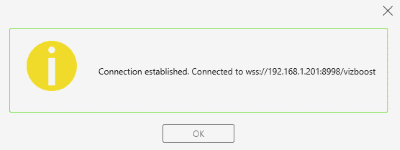
The resulting “connection established” message should come up next, as shown in above.
Connection status:
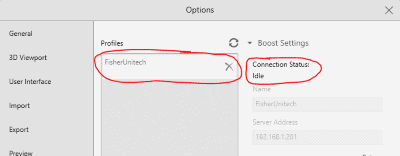
With the FisherUnitech cluster profile highlighted, we can see that the Connection Status reads “idle”. This simply indicates that no render jobs are being sent to the cluster at this moment.
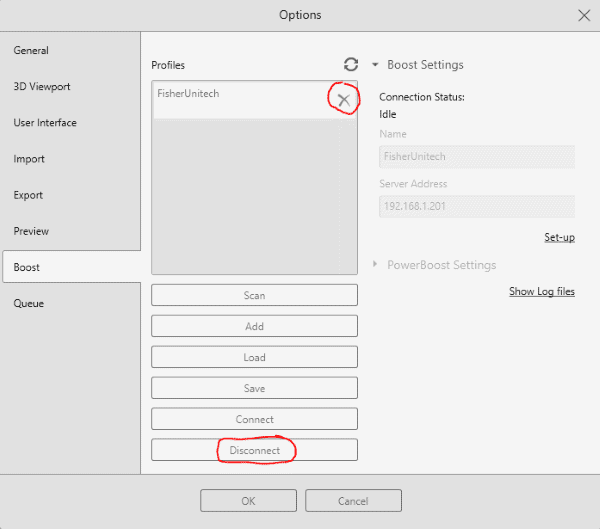
To disconnect from Boost (but remember the old connection), click on the “Disconnect” icon. To remove an unwanted Boost Profile permanently, highlight the profile name and then click the “X” on the right side.

Click NO to leave the connection live for this example
Sending a render job to the queue of the render cluster:
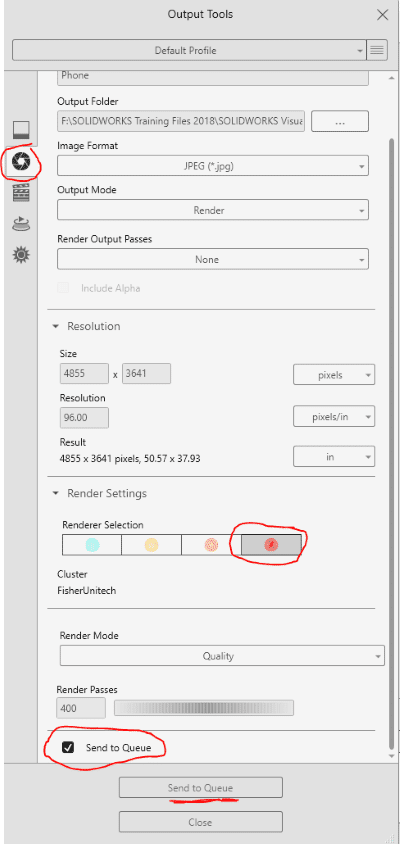
To use Boost on the next render job, go to Tools > Render > Click the Render tab at the top and then highlight the Boost icon in the lower right (looks like the rocket) as shown above.
Notice that “FisherUnitech” is the name of the cluster that the client is connected to.
Be sure the Send to Queue box is checked. Then you can stage multiple jobs to run on the render cluster without bogging down the local install of SW Visualize Professional.
Managing the queue
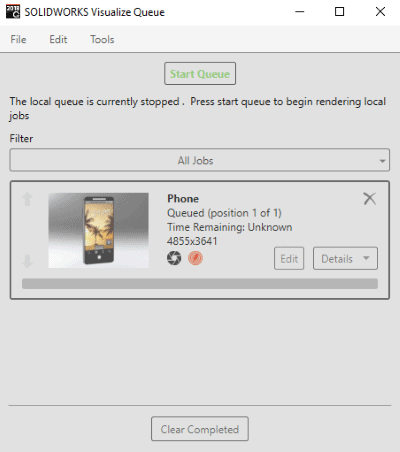
The image shown above shows the dialog that automatically opens on the client machine once a job has been sent to the queue. Click on the “Start Queue” icon at the top of the dialog to start the process on the render cluster machines.
The image above shows the active “sessions”. A different session will show here as different client machines send jobs to the render cluster.
I hope you enjoyed this inside look at SOLIDWORKS Visualize Boost to help boost your performance. To learn more about SOLIDWORKS Visualize, check out the related articles below.
Related Articles
New SOLIDWORKS 2018 Touch Mode and Touch Sketching
What’s New Series: SOLIDWORKS Visualize 2018
Top 10 CAD Enhancements in SOLIDWORKS 2018
Productivity Tools in SOLIDWORKS Simulation
About the Author
 Matt Haywood has a Bachelor of Science in Mechanical Engineering from Western Michigan University. After several years of experience in the automotive and office furniture industries, he joined Fisher Unitech in 2003 as an Application Engineer. Fisher Unitech created a dedicated SOLIDWORKS support group shortly thereafter, and Matt was one of the founding members of the support team. As a Senior Support Engineer today, Matt enjoys working with customers to resolve SOLIDWORKS technical issues and teaching SOLIDWORKS training classes.