The Power and Value of the SOLIDWORKS Hole Wizard
 I am often surprised to discover how many SOLIDWORKS users are not taking advantage of the SOLIDWORKS Hole Wizard and all the capabilities that it brings to the table. The SOLIDWORKS Hole Wizard provides a myriad of hole options from threaded and clearance holes to pipe threads, dowel holes and slots.
What many people don’t realize is that by using the SOLIDWORKS Hole Wizard you can automatically bring in your hole callouts into drawings, have the toolbox match the appropriate fastener size to the hole, and even have SOLIDWORKS automatically populate your holes with the correct fastener. If you do not use the Hole Wizard then you are manually performing all of these actions, which is a lot of extra design work that could be better spent on other tasks. It’s time to work smarter, not harder. Keep reading to learn more about the SOLIDWORKS Hole Wizard.
Locating the SOLIDWORKS Hole Wizard
The SOLIDWORKS Hole Wizard tool can be found under the Features tab.

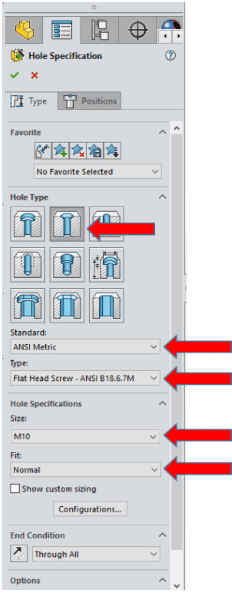
Once the Hole Wizard tool is activated the Property Manager below will appear. You will now select which hole type you want to use as well as a few other specifications. We can see that I have selected to use a Countersink hole type, I have selected ANSI Metric for my Standard, Flat Head Screw ANSI B18.6.7M for my Type, M10 for the Size, Normal for my Fit, and Through All for my End Condition.
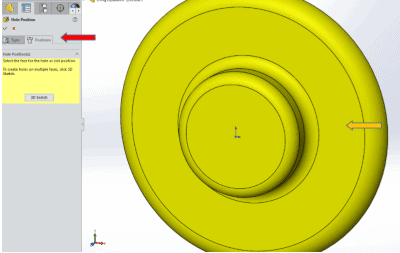
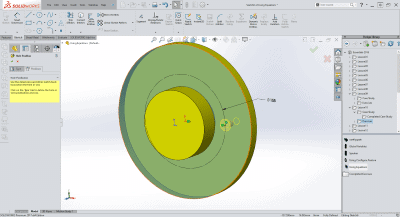
Once I have made all of those selections I will now scroll back to the top of the Property Manager and select the tab labeled Positions, which is to the right of the Type tab. The first thing that I am asked to do is select a face on which I want to place a hole or slot. I have selected the face next to the orange arrow.
Once that face has been selected we immediately see a preview for the hole. Once I have placed my hole I can start to add relationships and dimensions in order to fully define the position of my hole.
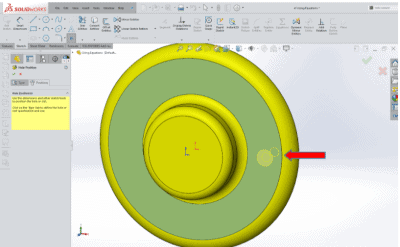
We can see that I have a construction circle as a reference as well as a horizontal relationship to the origin. Now the position for my hole is fully defined I can click the checkmark to accept this feature.
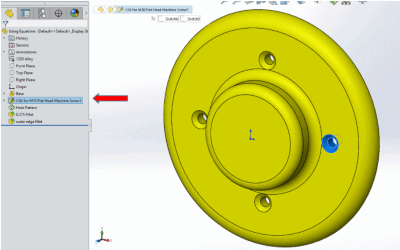
Note: Another advantage to using the SOLIDWORKS Hole Wizard is that the feature is named for you and adds design clarity to the FeatureManager Design Tree. This is very helpful when you need to go back into a design and make design changes.
Creating a drawing with SOLIDWORKS Hole Wizard features
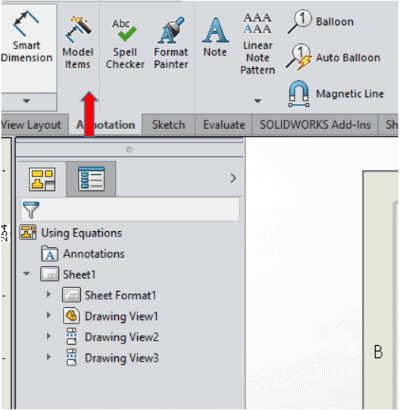
Now that our design is complete we need to make a drawing. Here is how we can leverage the design data from the model and import those dimensions directly into the drawing. First, we start by placing the necessary model views into the drawing. Next, select the Model Items tool found under the Annotations tab.
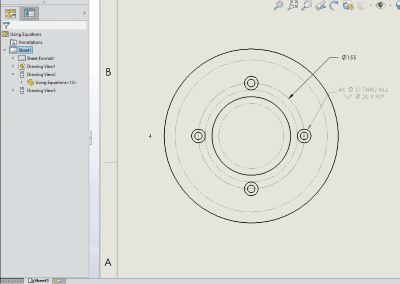
Now the Model Items Property Manager is active. For this example I am only selecting the hole feature but you could also bring in all the dimensions for the model by changing the Source from Selected Feature to Entire Model. I have chosen Selected Feature for my Source, next I select Instance/Revolution Counts, then Hole Wizard Locations, and last I select Hole Callout.
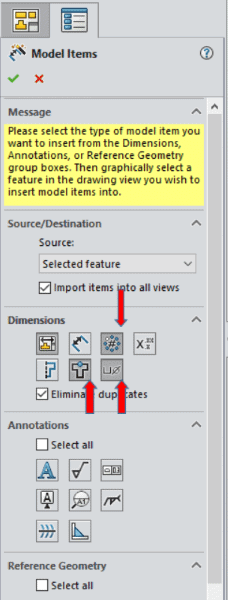
Now I click the green check mark and voila! My hole callout, instance count, and pattern diameter appear in the drawing.
As we can see, the SOLIDWORKS Hole Wizard helps save time, makes us more accurate, and prevents manually typing notes. I hope you found this tip helpful. You can find more tips & tricks listed below.
Learn More
Have more questions? Join us for “Straight from Support” where our experts answer the most frequently asked questions in real-time along with any other questions you may have during the Q&A session. Register here.
More Tips & Tricks
Bringing Flat Files into SOLIDWORKS to Create Models: Drawings and DXF Files
Removing Padlocks in the Customer Portal Area
How to Link Variables in SOLIDWORKS PDM to a Newly Created Drawing
What You Need to Know About Variable Pattern
Related Articles
Delivery Drone Soars with SOLIDWORKS 2018 at Design to Manufacturing Events
Optimize Your Plastic Parts and Injection Molds with SOLIDWORKS Plastics
Online SOLIDWORKS Training: Your Source for Success
Like what you see?

About the Author
 James Reeher has a Bachelor of Science in Mechanical Engineering from Cleveland State University and began using SOLIDWORKS in 2007. After many years as a Product Development Engineer in the industrial fitting, biomedical device, and LED lighting industries he joined the Fisher Unitech team in 2016. James is very interested in new technology and how different technologies can be applied to one another. As an Application Engineer he enjoys helping customers learn how to leverage SOLIDWORKS to meet their needs and introduce them to technologies that can help their businesses.